Difference between revisions of "Rock/flash the image"
(→Using RKAndroidTool to flash image by selection) |
|||
| (50 intermediate revisions by 6 users not shown) | |||
| Line 1: | Line 1: | ||
| + | {{rock_header}} | ||
{{Languages|rock/flash_the_image}} | {{Languages|rock/flash_the_image}} | ||
__TOC__ | __TOC__ | ||
| − | This page describes how to install an image to the nand flash of Radxa Rock, ie, how to flash the board. You can choose to either flash the whole image (ie, [[rock/update.img |update.img]]) to the board or just flash the selected [[rock/partitions |partitions]]. You can download the [[rock/prebuilt images| prebuilt images]] from our [http://dl.radxa.com/rock/images/ server] or build your own images. | + | This page describes how to install an image to the nand flash of Radxa Rock, ie, how to flash the board. You can choose to either flash the whole nand image (ie, [[rock/update.img |update.img]]) to the board or just flash the selected [[rock/partitions |partitions]]. You can download the [[rock/prebuilt images| prebuilt images]] from our [http://dl.radxa.com/rock/images/ server] or build your own images. |
== Before you start == | == Before you start == | ||
| − | + | ||
Keep in mind that: | Keep in mind that: | ||
'''You can always flash the rock, it never bricks (as the name :)) unless some hardware damage occurs.''' | '''You can always flash the rock, it never bricks (as the name :)) unless some hardware damage occurs.''' | ||
What you will need to flash the board is: | What you will need to flash the board is: | ||
| − | * | + | |
| + | * Firmware image, check [[Rock/hardware_revision | hardware revision]]. there are Pro and Full/Lite, firmware is different | ||
| + | * Radxa Rock or Rock Pro or Rock2 Square board | ||
* a PC running Windows (XP 32/64bit, Windows 7 32/64 bit) or Linux (32/64bit) | * a PC running Windows (XP 32/64bit, Windows 7 32/64 bit) or Linux (32/64bit) | ||
| − | * a micro USB cable with one side plugged in to the OTG port of | + | * a micro USB cable with one side plugged in to the OTG port of the board and the other side plugged into the USB port on PC. |
== Windows == | == Windows == | ||
| − | The Windows tool for flashing the image is provided by Rockchip. To flash the [[rock/update.img| update.img]], you need to use the RKBatchTool and to flash the [[rock/partitions| partitions]], you will need to use RKDevelopTool. Both RKBatchTool and RKDevelopTool rely on the RK USB driver so you will need to install it first as below: | + | The Windows tool for flashing the image is provided by Rockchip. To flash the [[rock/update.img| update.img]](you'd better click this link and read this page,it's very Important for the radxa beginner), you need to use the RKBatchTool and to flash the [[rock/partitions| partitions]], you will need to use RKDevelopTool. Both RKBatchTool and RKDevelopTool rely on the RK USB driver so you will need to install it first as below: |
=== Install driver === | === Install driver === | ||
| Line 28: | Line 31: | ||
Note:The method just support WinXp,Vista,Win7, NOT SUPPORT Win8 | Note:The method just support WinXp,Vista,Win7, NOT SUPPORT Win8 | ||
| − | There’s no need to connect your Rockchip device during this procedure just download and extract [ | + | There’s no need to connect your Rockchip device during this procedure just download and extract [https://github.com/rockchip-linux/tools/raw/master/windows/DriverAssitant_v4.91.zip RKDriverAssistant.zip] |
Then double click on DriverInstall.exe in the RKDriverAssistant directory to start the utility. | Then double click on DriverInstall.exe in the RKDriverAssistant directory to start the utility. | ||
If you've previously tried to install the Rockchip USB drivers for any Rockchip devices make sure you click “Uninstall Driver” first. | If you've previously tried to install the Rockchip USB drivers for any Rockchip devices make sure you click “Uninstall Driver” first. | ||
| Line 42: | Line 45: | ||
====b. Install Manually==== | ====b. Install Manually==== | ||
| − | Download driver file first. For WinXp,Vista,Win7,Download the file (usb_driver_v3.5.zip) from [http://dl.radxa.com/rock/tools/windows/usb_driver_v3.5.zip here] . For Win8 Download the file(usb_driver_v3.7.zip) from[http://dl.radxa.com/rock/tools/windows/Rockusb%20Driver%20v3.7.zip here]. shut down the Radxa Rock board then connect the Radxa Rock board to the computer and let the board go to [[Rock/Loader mode|loader mode]]. After your computer should detect the board and you will see an unknown device within device manager. | + | Download driver file first. For WinXp,Vista,Win7,Download the file (usb_driver_v3.5.zip) from [http://dl.radxa.com/rock/tools/windows/usb_driver_v3.5.zip here] . For Win8 Download the file(usb_driver_v3.7.zip) from [http://dl.radxa.com/rock/tools/windows/Rockusb%20Driver%20v3.7.zip here]. shut down the Radxa Rock board then connect the Radxa Rock board to the computer and let the board go to [[Rock/Loader mode|loader mode]]. After your computer should detect the board and you will see an unknown device within device manager. |
[[File:flash_image_1.jpg]] | [[File:flash_image_1.jpg]] | ||
| Line 66: | Line 69: | ||
===Flash Image=== | ===Flash Image=== | ||
| + | |||
| + | Download the tool first [https://github.com/rockchip-linux/tools/raw/master/windows/AndroidTool_Release_v2.71.zip AndroidTool_Release_v2.71.zip] | ||
| + | |||
There are two methods to flash an image. | There are two methods to flash an image. | ||
| − | # | + | # Flash the whole firmware only, it will erase everything. |
| − | # | + | # Flash firmware by partitions, it's very convenient when debugging part function such as kernel |
| − | + | ||
| − | + | ||
| − | |||
| − | |||
| − | |||
| − | + | ||
| − | + | ====Flash the whole firmware ==== | |
Power down the Radxa Rock board and connect the Radxa Rock board to the computer then let the board go to [[Rock/Loader mode|loader mode]] after the program should detect the device.<br/> | Power down the Radxa Rock board and connect the Radxa Rock board to the computer then let the board go to [[Rock/Loader mode|loader mode]] after the program should detect the device.<br/> | ||
| − | |||
| − | + | you can see “Found One MASKROM device “ at the bottom of the tool when you first flash the board or just unbrick the board | |
| − | + | ||
| − | + | Or “Found One Loader Device” at the bottom of the tool when you flashed image not first time | |
| − | + | Then Select an image (rockdev/update.img). For information on how to make nand image see [[Rock/update.img | update.img]]<br/> | |
| − | + | ||
| − | + | After that, Click "Upgrade " to begin flashing | |
| − | + | [[File:Flash_whole_firmware_1.png]] | |
| − | |||
| − | + | [[File:Flash_whole_firmware_2.png]] | |
| − | + | ====Flash firmware by partitions==== | |
| − | [[ | + | Power down the Radxa Rock board and connect the Radxa Rock board to the computer then let the board go to [[Rock/Loader mode|loader mode]] after the program should detect the device.<br/> |
| − | + | you can see “Found One MASKROM device “ at the bottom of the tool when you first flash the board or just unbrick the board | |
| − | + | Or “Found One Loader Device” at the bottom of the tool when you flashed image not first time. | |
| − | + | Then select the partitions you need update, and select the right image which you can find under rockdev or kernel directory. finally click "Run " to flash | |
| − | + | ||
| + | Note: if your address of the partitions doesn't the same as the pic below, you can modify the address by click the address item. | ||
| + | |||
| + | [[File:Flash_whole_firmware_3.png]] | ||
| + | |||
| + | Here is the video you can refer | ||
| + | |||
| + | http://v.youku.com/v_show/id_XNjkzNDk3MjEy.html | ||
=== Troubleshooting === | === Troubleshooting === | ||
| − | ==== | + | ==== FlashTool can not recognize the board ==== |
| − | + | ||
| − | + | ||
| − | + | This often happened by the follow reasons: | |
| − | + | ||
| − | + | ||
| − | + | 1) Not enter the loader mode (refer to [[Rock/Loader_mode | [rock loader mode]]] [[Rock2/square_bb/loader_mode | [rock2 square loader mode]]]) | |
| − | + | ||
| − | + | Note: | |
| + | |||
| + | In general, When you connect to PC with radxa( in loader mode), the PC can recongize radxa as Rockusb Device(windows) | ||
| + | |||
| + | 2) the used usb port of pc is usb3.0 (please change usb2.0 port) | ||
| + | |||
| + | 3) the OS of PC is windows 8 (if windows 8,please use [http://dl.radxa.com/rock/tools/windows/Rockusb%20Driver%20v3.7.zip http://dl.radxa.com/rock/tools/windows/Rockusb%20Driver%20v3.7.zip]) | ||
| + | |||
| + | 4) bad quality usb cable, you can change a short and good quality one to try again | ||
| + | |||
| + | If the problem still exists, you can refer to the topics in [http://talk.radxa.com talk.radxa.com], create a new topic on it or send email to support@radxa.com | ||
==== Flashing failed ==== | ==== Flashing failed ==== | ||
| + | For rock pro | ||
After flashing, the uart print | After flashing, the uart print | ||
| Line 133: | Line 144: | ||
If flashing failed, try to format the nand flash before flashing it. | If flashing failed, try to format the nand flash before flashing it. | ||
| − | * | + | * AndroidTool V2.3 -> Upgrade firmware - click "Erease Flash" button to format the nand flash |
| − | * | + | * AndroidTool V2.3 -> Download Image - click "LowerFormat" to format the nand flash |
| + | |||
| + | For rock2 square | ||
| + | you can press reset key and reflash , if still failed ,you can refer to http://talk.radxa.com/topic/957/bricked-rock2/19 or send mail to support@radxa.com | ||
==== Preparing IDB failed ==== | ==== Preparing IDB failed ==== | ||
This happens at upgrading bootloader, if you need to upgrade the bootloader or the update.img contains a new bootloader, you probably will meet this. The rock is "bricked". Follow this [[rock/unbrick | unbrick instructions]] to unbrick it. | This happens at upgrading bootloader, if you need to upgrade the bootloader or the update.img contains a new bootloader, you probably will meet this. The rock is "bricked". Follow this [[rock/unbrick | unbrick instructions]] to unbrick it. | ||
| + | |||
| + | ==== Win8.1 and USB 3.0 ==== | ||
| + | If you have problem with Win8.1 and USB 3.0, please check: | ||
| + | http://talk.radxa.com/topic/1026/solution-rk-batchtool-problem-with-64bit-windows-8-1-usb3 | ||
== Linux == | == Linux == | ||
| Line 152: | Line 170: | ||
=== Upgrade_tool from Rockchip === | === Upgrade_tool from Rockchip === | ||
| − | Download the Rockchip linux upgrade tool [http://dl.radxa.com/rock/tools/linux/ | + | Download the Rockchip linux upgrade tool [http://dl.radxa.com/rock/tools/linux/Linux_Upgrade_Tool_V2.1.zip here]. Unzip it and you will get a file called '''upgrade_tool''' which is a binary executable file under Linux. |
| − | ==== Flash | + | |
| − | Let the board go to [[Rock/Loader mode| | + | Note: there are two ways to flash the android image. |
| + | |||
| + | 1> Just flash one image file. refer to the "Flash update.img" ,The image you can download here [[rock/prebuilt_images | '''prebuilt_image''' ]] . or you can build the image by yourself refer to [[rock/Android_Build | '''Android_Build''']] | ||
| + | |||
| + | 2>Flash image by partitions,this methods you need flash serveral images depends on the partitions and your requirement. refer to "Flash parameter ", "Flash bootloader ","Flash the kernel(boot.img)" | ||
| + | |||
| + | |||
| + | ====Flash all-in-one nand/emmc image file(Recommended)==== | ||
| + | |||
| + | Let the board go to '''loader mode''' [[Rock/Loader mode| [Rock Loader mode]]], [[Rock2/square_bb/loader_mode | [Rock2 Square Loader mode]]] and run the following command to flash the [[rock/update.img | '''update.img''']]: | ||
sudo ./upgrade_tool '''uf''' /path/to/update.img #(UF Upgrade Flash) | sudo ./upgrade_tool '''uf''' /path/to/update.img #(UF Upgrade Flash) | ||
| Line 160: | Line 187: | ||
sudo ./upgrade_tool '''lf''' #(LF Lowlevel Format) This will erase everything on nand | sudo ./upgrade_tool '''lf''' #(LF Lowlevel Format) This will erase everything on nand | ||
| − | ==== Flash | + | ====Flash by partitions==== |
| − | + | ||
| − | + | The whole files you should flash are"parameter","bootloader","boot.img","recovery.img""system.img" , all the file you can find under the rockdev/ after you build the android successful. | |
| − | + | ||
| − | + | How to flash the file and images. | |
| − | + | ||
| − | ==== Others ==== | + | ===== Flash bootloader ===== |
| + | sudo ./upgrade_tool '''ul''' /path/to/bootloader #(UL Upgrade Loader) | ||
| + | |||
| + | Other partitions can be flashed by '''di''' command. You can use '''upgrade_tool di partition_name image_name''' to flash the image to the partition. There are some shortcuts for certain image name. | ||
| + | |||
| + | {| class="wikitable" border="1" | ||
| + | |- | ||
| + | ! partition name | ||
| + | ! short name | ||
| + | |- | ||
| + | | parameter | ||
| + | | -p | ||
| + | |- | ||
| + | | boot | ||
| + | | -b | ||
| + | |- | ||
| + | | system | ||
| + | | -s | ||
| + | |- | ||
| + | | recovery | ||
| + | | -r | ||
| + | |- | ||
| + | | misc | ||
| + | | -m | ||
| + | |} | ||
| + | |||
| + | ===== Flash parameter ===== | ||
| + | sudo ./upgrade_tool '''di''' '''parameter''' /path/to/parameter | ||
| + | or for short | ||
| + | sudo ./upgrade_tool '''di''' -p /path/to/parameter #(DI Download Image) | ||
| + | |||
| + | |||
| + | ===== Flash the kernel(boot.img) ===== | ||
| + | sudo ./upgrade_tool '''di''' boot /path/to/boot.img | ||
| + | or for short | ||
| + | sudo ./upgrade_tool '''di''' -b /path/to/boot.img | ||
| + | |||
| + | |||
| + | |||
| + | ===== Flash the rootfs ===== | ||
| + | sudo ./upgrade_tool '''di''' linuxroot /path/to/rootfs.img | ||
| + | |||
| + | |||
| + | ===== Others ===== | ||
There are other commands in the upgrade_tool, such as: | There are other commands in the upgrade_tool, such as: | ||
| − | |||
EF: erease the nand flash | EF: erease the nand flash | ||
| + | |||
| + | |||
| + | |||
| + | FAQ | ||
| + | |||
| + | 1) why I must flash this file? | ||
| + | |||
| + | The android image is constructed by this files. | ||
| + | |||
| + | 2)what's the paration info? | ||
| + | |||
| + | The partations info you can get from the paramteter file under the rockdev/ which in the android source code. | ||
| + | |||
| + | CMDLINE:console=ttyFIQ0 androidboot.console=ttyFIQ0 | ||
| + | init=/init initrd=0x62000000,0x00800000 | ||
| + | mtdparts=rk29xxnand:0x00002000@0x00002000(misc), | ||
| + | 0x00006000@0x00004000(kernel), | ||
| + | 0x00006000@0x0000a000(boot), | ||
| + | 0x00010000@0x00010000(recovery), | ||
| + | 0x00020000@0x00020000(backup), | ||
| + | 0x00040000@0x00040000(cache), | ||
| + | 0x003FC000@0x00080000(userdata), | ||
| + | 0x00002000@0x0047C000(metadata), | ||
| + | 0x00002000@0x0047E000(kpanic), | ||
| + | 0x00180000@0x00480000(system), | ||
| + | -@0x00600000(user) | ||
| + | |||
| + | 3) why other parations do have image to flash? | ||
| + | |||
| + | Other parations are used to store data. | ||
| + | |||
| + | 4) why not flash the kernel.img ? | ||
| + | |||
| + | The kernel.img is packed into boot.img . more info you can refer to [[Rock/Android_Build | '''Android_Build''']] | ||
| + | |||
| + | 5) Other questions | ||
| + | |||
| + | Post on the talk.radxa.com or send email to support@radxa.com | ||
| + | |||
| + | === Flash with rkflashtool(Advanced) === | ||
| + | |||
| + | rkflashtool is an open source tool to write nand flash via the loader mode for rockchip platform. | ||
| + | |||
| + | To install rkflashtool: | ||
| + | |||
| + | sudo apt-get install build-essential libusb-1.0-0-dev | ||
| + | git clone https://github.com/linux-rockchip/rkflashtool | ||
| + | cd rkflashtool | ||
| + | make | ||
| + | sudo cp rkflashtool rkcrc rkunpack rkunsign /usr/local/bin | ||
| + | |||
| + | To read/write parameter: | ||
| + | |||
| + | rkflashtool p > param | ||
| + | rkflashtool P < param | ||
| + | |||
| + | To read/write partitions: | ||
| + | |||
| + | rkflashtool r boot > boot.img | ||
| + | rkflashtool w boot < boot.img | ||
| + | |||
| + | rkflashtool r linuxroot > linuxroot.ext4 | ||
| + | rkflashtool w linuxroot < linuxroot.ext4 | ||
=== Rkflashkit with GUI === | === Rkflashkit with GUI === | ||
| Line 203: | Line 332: | ||
[[File:rkflashkit2.png| 500px]] [[File:rkflashkit3.png| 500px]] | [[File:rkflashkit2.png| 500px]] [[File:rkflashkit3.png| 500px]] | ||
| + | |||
| + | === Troubleshooting === | ||
| + | ==== Creating Comm Object failed! ==== | ||
| + | that's udev issues… You can solve this by creating a new file in /etc/udev/rules.d/ with the rule for the rock. | ||
| + | |||
| + | To do that, copy and paste these commands: | ||
| + | |||
| + | echo 'SUBSYSTEM=="usb", ATTR{idVendor}=="2207", MODE="0666", GROUP="plugdev"' | sudo tee /etc/udev/rules.d/51-android.rules | ||
| + | |||
| + | Finally, just remove and reinsert the USB cable. | ||
| + | |||
| + | ==== What's verision of My board and Which Image should I flash! ==== | ||
| + | |||
| + | refer to [[Rock/update.img|update.img]] | ||
== Install the image on RR without PC == | == Install the image on RR without PC == | ||
If you want to write the image on RR without any other host PC, you can download the image and write with dd: | If you want to write the image on RR without any other host PC, you can download the image and write with dd: | ||
sudo dd if=XXX.img of=/dev/block/mtd/by-name/XXX bs=16384 conv=sync,fsync | sudo dd if=XXX.img of=/dev/block/mtd/by-name/XXX bs=16384 conv=sync,fsync | ||
| + | |||
| + | == Videos tutorial == | ||
| + | *Flashing the image to nand flash https://www.youtube.com/watch?v=r20lOKu2E1s&feature=youtu.be | ||
| + | |||
| + | == External Reference == | ||
| + | * http://www.hagensieker.com/styled-26/index.html | ||
Latest revision as of 02:37, 16 August 2023
Contents
This page describes how to install an image to the nand flash of Radxa Rock, ie, how to flash the board. You can choose to either flash the whole nand image (ie, update.img) to the board or just flash the selected partitions. You can download the prebuilt images from our server or build your own images.
Before you start
Keep in mind that:
You can always flash the rock, it never bricks (as the name :)) unless some hardware damage occurs.
What you will need to flash the board is:
- Firmware image, check hardware revision. there are Pro and Full/Lite, firmware is different
- Radxa Rock or Rock Pro or Rock2 Square board
- a PC running Windows (XP 32/64bit, Windows 7 32/64 bit) or Linux (32/64bit)
- a micro USB cable with one side plugged in to the OTG port of the board and the other side plugged into the USB port on PC.
Windows
The Windows tool for flashing the image is provided by Rockchip. To flash the update.img(you'd better click this link and read this page,it's very Important for the radxa beginner), you need to use the RKBatchTool and to flash the partitions, you will need to use RKDevelopTool. Both RKBatchTool and RKDevelopTool rely on the RK USB driver so you will need to install it first as below:
Install driver
- install using RKDriverAssistant tools - the easy way(Just for winXp, Vista, Win7,not support Win8)
- install manually (WinXp,Vista,Win7,Win8)
If you have already installed the USB driver please skip this step.
a. Install using RK Driver Assistant tools
Note:The method just support WinXp,Vista,Win7, NOT SUPPORT Win8
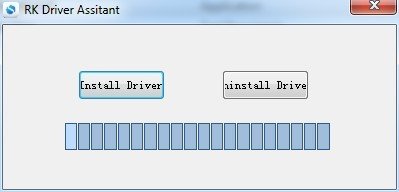
There’s no need to connect your Rockchip device during this procedure just download and extract RKDriverAssistant.zip Then double click on DriverInstall.exe in the RKDriverAssistant directory to start the utility. If you've previously tried to install the Rockchip USB drivers for any Rockchip devices make sure you click “Uninstall Driver” first.
Then click “Install Driver” and when the driver has finish installing then shut down radxa board and connect the Radxa Rock board to your computer and let the board go to loader mode, then your computer will detect the board and you will see it within device manager.
Now the driver should have been installed successfully!
b. Install Manually
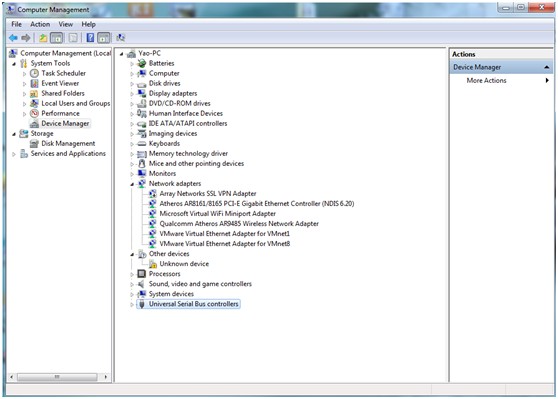
Download driver file first. For WinXp,Vista,Win7,Download the file (usb_driver_v3.5.zip) from here . For Win8 Download the file(usb_driver_v3.7.zip) from here. shut down the Radxa Rock board then connect the Radxa Rock board to the computer and let the board go to loader mode. After your computer should detect the board and you will see an unknown device within device manager.
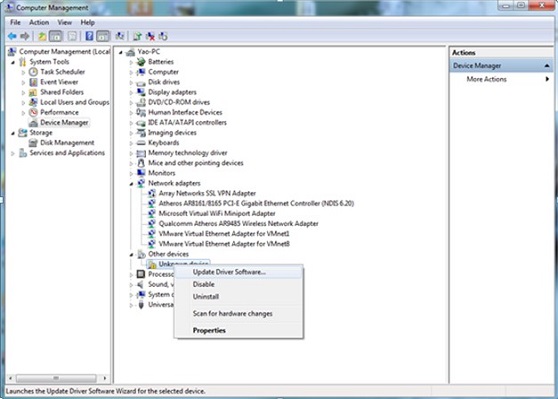
Select the Unknown device then right click and select "Update Driver Software".
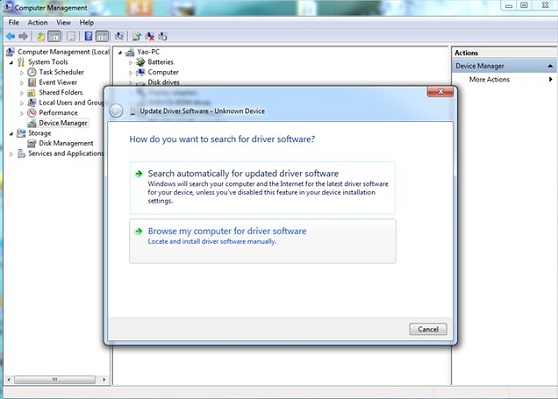
Select "Browse the computer for driver software".
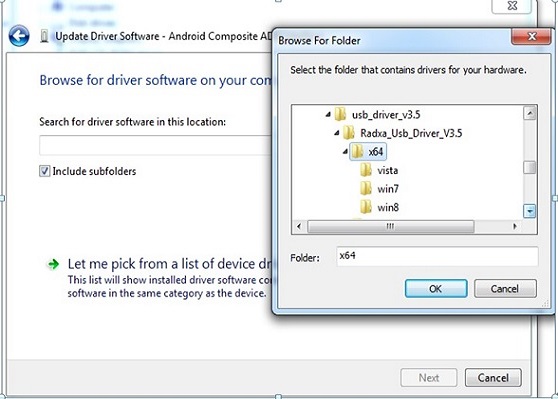
Find the file unzipped file you downloaded earlier (usb_driver_v3.5.zip) and select either the 32/64bit folder then click "OK" to install.
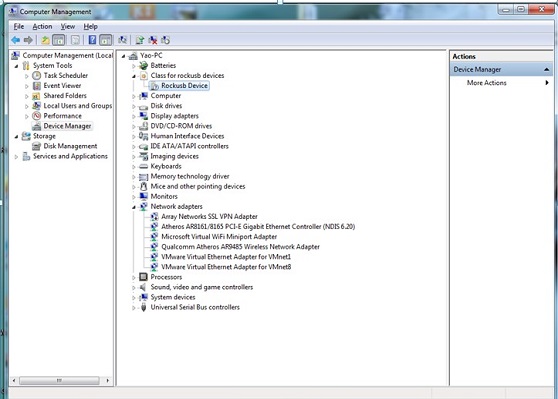
When the driver is installed successful you will then see a Rockusb Device in the device manager window.
Now the driver is installed successfully.
Flash Image
Download the tool first AndroidTool_Release_v2.71.zip
There are two methods to flash an image.
- Flash the whole firmware only, it will erase everything.
- Flash firmware by partitions, it's very convenient when debugging part function such as kernel
Flash the whole firmware
Power down the Radxa Rock board and connect the Radxa Rock board to the computer then let the board go to loader mode after the program should detect the device.
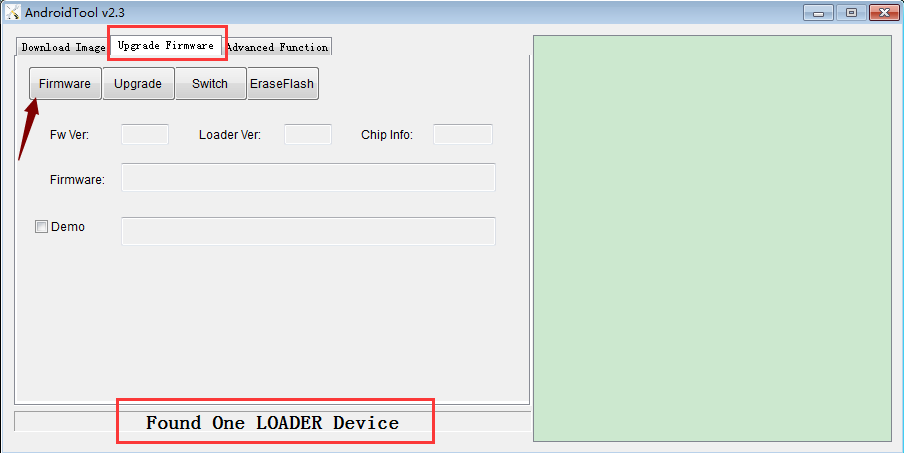
you can see “Found One MASKROM device “ at the bottom of the tool when you first flash the board or just unbrick the board
Or “Found One Loader Device” at the bottom of the tool when you flashed image not first time
Then Select an image (rockdev/update.img). For information on how to make nand image see update.img
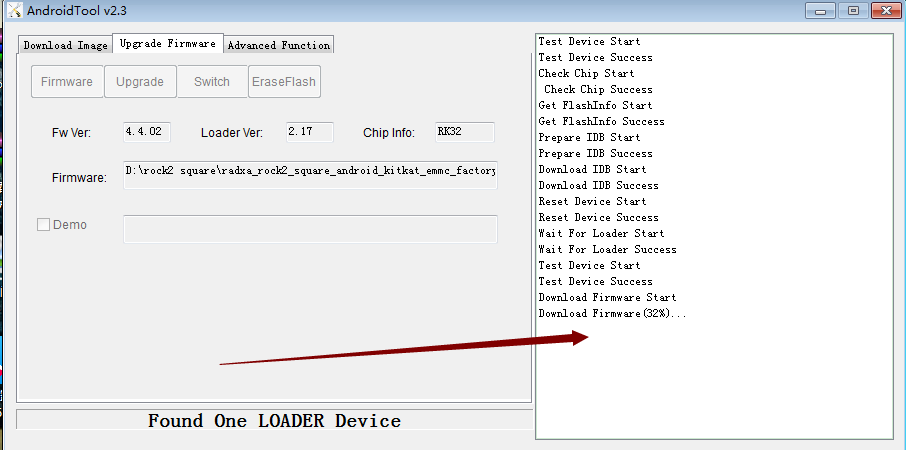
After that, Click "Upgrade " to begin flashing
Flash firmware by partitions
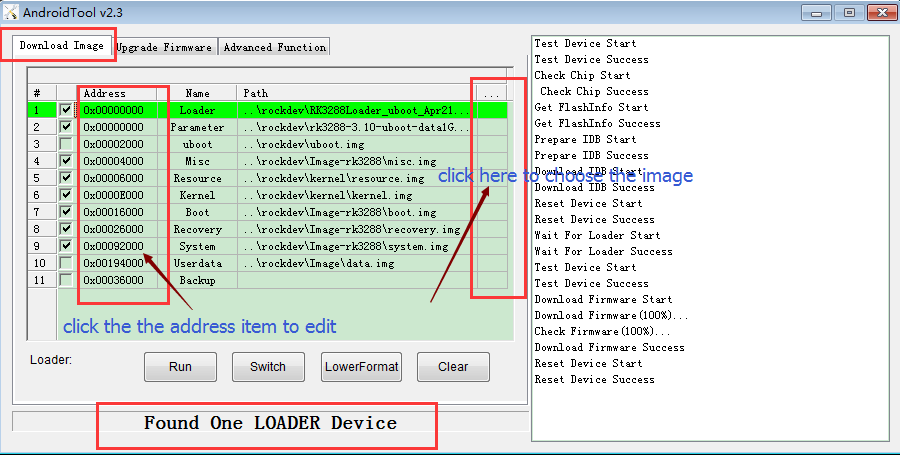
Power down the Radxa Rock board and connect the Radxa Rock board to the computer then let the board go to loader mode after the program should detect the device.
you can see “Found One MASKROM device “ at the bottom of the tool when you first flash the board or just unbrick the board
Or “Found One Loader Device” at the bottom of the tool when you flashed image not first time.
Then select the partitions you need update, and select the right image which you can find under rockdev or kernel directory. finally click "Run " to flash
Note: if your address of the partitions doesn't the same as the pic below, you can modify the address by click the address item.
Here is the video you can refer
http://v.youku.com/v_show/id_XNjkzNDk3MjEy.html
Troubleshooting
FlashTool can not recognize the board
This often happened by the follow reasons:
1) Not enter the loader mode (refer to [rock loader mode] [rock2 square loader mode])
Note:
In general, When you connect to PC with radxa( in loader mode), the PC can recongize radxa as Rockusb Device(windows)
2) the used usb port of pc is usb3.0 (please change usb2.0 port)
3) the OS of PC is windows 8 (if windows 8,please use http://dl.radxa.com/rock/tools/windows/Rockusb%20Driver%20v3.7.zip)
4) bad quality usb cable, you can change a short and good quality one to try again
If the problem still exists, you can refer to the topics in talk.radxa.com, create a new topic on it or send email to support@radxa.com
Flashing failed
For rock pro
After flashing, the uart print
DDR Version 1.04 20130517 In DDR3 300MHz Bus Width=32 Col=10 Bank=8 Row=15 CS=2 Die Bus-Width=16 Size=2048MB Memory OK OUT BUILD=====6 SdmmcInit=0 20 F:32 1061 0 0 40 FlashReadRetry error!!,row = fff000 FlashReadRetry error!!,row = fff000
and not boot.
If flashing failed, try to format the nand flash before flashing it.
- AndroidTool V2.3 -> Upgrade firmware - click "Erease Flash" button to format the nand flash
- AndroidTool V2.3 -> Download Image - click "LowerFormat" to format the nand flash
For rock2 square
you can press reset key and reflash , if still failed ,you can refer to http://talk.radxa.com/topic/957/bricked-rock2/19 or send mail to support@radxa.com
Preparing IDB failed
This happens at upgrading bootloader, if you need to upgrade the bootloader or the update.img contains a new bootloader, you probably will meet this. The rock is "bricked". Follow this unbrick instructions to unbrick it.
Win8.1 and USB 3.0
If you have problem with Win8.1 and USB 3.0, please check: http://talk.radxa.com/topic/1026/solution-rk-batchtool-problem-with-64bit-windows-8-1-usb3
Linux
Rockchip has provided tools for upgrading within Linux (closed source) since Android 4.4. It's called upgrade_tool. It supports update.img, parameter, bootloader and other partitions, and it's command line based.
rkflashkit is an open source GUI version flashing tool for rockchip devices. It can not flash bootloader or parameter, only supports kernel and other partitions, but it supports backup the partitions.
For developers:
The initial RE work of the Rockchip bootloader updating protocol is by naobsd and has been improved by some in rkflashtool. linuxerwang has made a GUI version of the rkflashtool called rkflashkit. Please note: both rkflashtool and rkflashkit can not flash the rock/update.img and can only flash within rock/bootloader mode and not rock/mask rom mode because the rock/mask rom updating protocol is not RE yet. If you are interested in the RE protocol ping naobsd at #radxa on IRC. Since the rock/bootloader has remained unchanged for a long time it's enough for normal usage. If you don't know what this means, just ignore it.
Upgrade_tool from Rockchip
Download the Rockchip linux upgrade tool here. Unzip it and you will get a file called upgrade_tool which is a binary executable file under Linux.
Note: there are two ways to flash the android image.
1> Just flash one image file. refer to the "Flash update.img" ,The image you can download here prebuilt_image . or you can build the image by yourself refer to Android_Build
2>Flash image by partitions,this methods you need flash serveral images depends on the partitions and your requirement. refer to "Flash parameter ", "Flash bootloader ","Flash the kernel(boot.img)"
Flash all-in-one nand/emmc image file(Recommended)
Let the board go to loader mode [Rock Loader mode], [Rock2 Square Loader mode] and run the following command to flash the update.img:
sudo ./upgrade_tool uf /path/to/update.img #(UF Upgrade Flash)
If you have an error with upgrading you can low level format the nand flash first with the following command:
sudo ./upgrade_tool lf #(LF Lowlevel Format) This will erase everything on nand
Flash by partitions
The whole files you should flash are"parameter","bootloader","boot.img","recovery.img""system.img" , all the file you can find under the rockdev/ after you build the android successful.
How to flash the file and images.
Flash bootloader
sudo ./upgrade_tool ul /path/to/bootloader #(UL Upgrade Loader)
Other partitions can be flashed by di command. You can use upgrade_tool di partition_name image_name to flash the image to the partition. There are some shortcuts for certain image name.
| partition name | short name |
|---|---|
| parameter | -p |
| boot | -b |
| system | -s |
| recovery | -r |
| misc | -m |
Flash parameter
sudo ./upgrade_tool di parameter /path/to/parameter
or for short
sudo ./upgrade_tool di -p /path/to/parameter #(DI Download Image)
Flash the kernel(boot.img)
sudo ./upgrade_tool di boot /path/to/boot.img
or for short
sudo ./upgrade_tool di -b /path/to/boot.img
Flash the rootfs
sudo ./upgrade_tool di linuxroot /path/to/rootfs.img
Others
There are other commands in the upgrade_tool, such as:
EF: erease the nand flash
FAQ
1) why I must flash this file?
The android image is constructed by this files.
2)what's the paration info?
The partations info you can get from the paramteter file under the rockdev/ which in the android source code.
CMDLINE:console=ttyFIQ0 androidboot.console=ttyFIQ0
init=/init initrd=0x62000000,0x00800000
mtdparts=rk29xxnand:0x00002000@0x00002000(misc),
0x00006000@0x00004000(kernel),
0x00006000@0x0000a000(boot),
0x00010000@0x00010000(recovery),
0x00020000@0x00020000(backup),
0x00040000@0x00040000(cache),
0x003FC000@0x00080000(userdata),
0x00002000@0x0047C000(metadata),
0x00002000@0x0047E000(kpanic),
0x00180000@0x00480000(system),
-@0x00600000(user)
3) why other parations do have image to flash?
Other parations are used to store data.
4) why not flash the kernel.img ?
The kernel.img is packed into boot.img . more info you can refer to Android_Build
5) Other questions
Post on the talk.radxa.com or send email to support@radxa.com
Flash with rkflashtool(Advanced)
rkflashtool is an open source tool to write nand flash via the loader mode for rockchip platform.
To install rkflashtool:
sudo apt-get install build-essential libusb-1.0-0-dev
git clone https://github.com/linux-rockchip/rkflashtool
cd rkflashtool
make
sudo cp rkflashtool rkcrc rkunpack rkunsign /usr/local/bin
To read/write parameter:
rkflashtool p > param
rkflashtool P < param
To read/write partitions:
rkflashtool r boot > boot.img
rkflashtool w boot < boot.img
rkflashtool r linuxroot > linuxroot.ext4
rkflashtool w linuxroot < linuxroot.ext4
Rkflashkit with GUI
You can download the pre-built rkflashkit here or build it yourself with the following command:
   git clone https://github.com/linuxerwang/rkflashkit
   cd rkflashkit
   ./waf debian
And install it with the following command
   sudo apt-get install python-gtk2
   sudo dpkg -i rkflashkit_0.1.1_all.deb
Run it with the following command
sudo rkflashkit
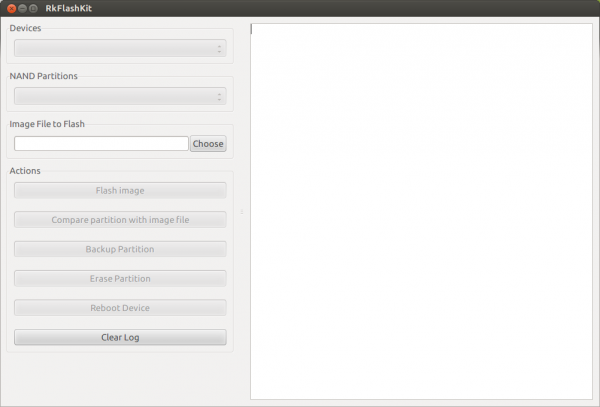
You can see the interface looks like this:
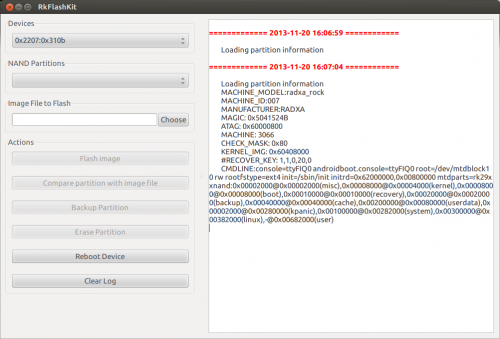
Connect the Radxa Rock board to the computer and let the board go into loader mode you will then see the the program detect the board in loader mode.
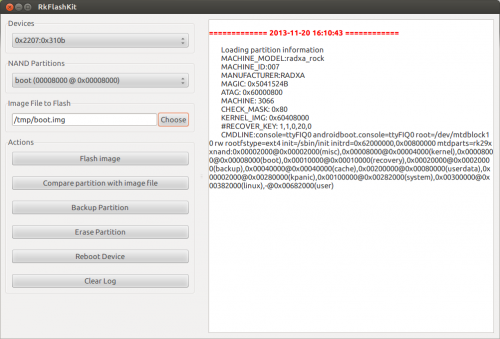
- Click the Nand partition and you will see the partitions of the board listed then choose the one you want to flash.
- Choose the location of the image you want to flash to that partition.
- Click the "Flash image" button and it will start flashing
- After it's finished click "Reboot Device" button to reboot the board.
Troubleshooting
Creating Comm Object failed!
that's udev issues… You can solve this by creating a new file in /etc/udev/rules.d/ with the rule for the rock.
To do that, copy and paste these commands:
echo 'SUBSYSTEM=="usb", ATTR{idVendor}=="2207", MODE="0666", GROUP="plugdev"' | sudo tee /etc/udev/rules.d/51-android.rules
Finally, just remove and reinsert the USB cable.
What's verision of My board and Which Image should I flash!
refer to update.img
Install the image on RR without PC
If you want to write the image on RR without any other host PC, you can download the image and write with dd:
sudo dd if=XXX.img of=/dev/block/mtd/by-name/XXX bs=16384 conv=sync,fsync
Videos tutorial
- Flashing the image to nand flash https://www.youtube.com/watch?v=r20lOKu2E1s&feature=youtu.be

