Difference between revisions of "Rock/SD upgrading"
< Rock
(→Requirements) |
|||
| (4 intermediate revisions by 2 users not shown) | |||
| Line 1: | Line 1: | ||
| + | {{rock_header}} | ||
__TOC__ | __TOC__ | ||
| Line 13: | Line 14: | ||
Note: Only android update.img is supported now. More work needs to be done for linux update.img | Note: Only android update.img is supported now. More work needs to be done for linux update.img | ||
| − | === | + | ===Requirements=== |
| − | * a | + | * a SD card (4G at least) |
| − | * a | + | * a SD card reader |
* Windows System ( the tool to make upgrade disk is exe format) | * Windows System ( the tool to make upgrade disk is exe format) | ||
| − | + | ||
===Get the image for upgrading=== | ===Get the image for upgrading=== | ||
| Line 27: | Line 28: | ||
===Make the Upgrade SD card=== | ===Make the Upgrade SD card=== | ||
| − | + | #Download the tool to make upgrade disk and unzip it: http://dl.radxa.com/rock/tools/windows/SD_Firmware_Tool.zip | |
| − | + | #Insert the reader to pc and insert the sdcard to reader | |
| − | + | #Find SD_Fireware_Tool.exe under SD_Fireware_Tool and click it. See PIC_1 | |
| − | + | #Select the insert sdcard under "Choose removable disk" Item. See PIC_1 | |
| − | + | #Select "Upgrade Fireware" (Note:Select only this item). See PIC_1 | |
| − | + | #Click "Firmware" button to choose the image just download and unzip.See PIC_1 | |
| − | + | #Click "Create" to begin. when complete, there will be a dialog to tell you success | |
| − | + | ||
[[File:upgrade_disk_1.jpg]] PIC_1 | [[File:upgrade_disk_1.jpg]] PIC_1 | ||
| Line 58: | Line 59: | ||
then, your SD card should have a 1GB FAT partition. format it, mount it, then put rksdfw.tag sd_boot_config.config, and Radxa's update image for SD card as "sdupdate.img" into root directory of SD card. | then, your SD card should have a 1GB FAT partition. format it, mount it, then put rksdfw.tag sd_boot_config.config, and Radxa's update image for SD card as "sdupdate.img" into root directory of SD card. | ||
| − | + | Download the binaries from http://files.androtab.info/radxa/sdboot.tgz, and unzip it. | |
dd if=sdboot-header.img of=/dev/sdX bs=1M conv=fsync | dd if=sdboot-header.img of=/dev/sdX bs=1M conv=fsync | ||
mkfs.vfat /dev/sdX1 | mkfs.vfat /dev/sdX1 | ||
Latest revision as of 19:03, 12 January 2015
Contents
This page introduces how to upgrade an update.img to NAND flash from sdcard.
Note:
Windows
Rockchip provides the sd image tool.
Note: Only android update.img is supported now. More work needs to be done for linux update.img
Requirements
- a SD card (4G at least)
- a SD card reader
- Windows System ( the tool to make upgrade disk is exe format)
Get the image for upgrading
The Image is just modified for upgrading android from sdcard. you can download from here
http://dl.radxa.com/rock/images/android/Upgrade_android_from_sdcard/radxa_rock_android_upgrade_from_sdcard_140314_update.zip
and then unzip it.
Make the Upgrade SD card
- Download the tool to make upgrade disk and unzip it: http://dl.radxa.com/rock/tools/windows/SD_Firmware_Tool.zip
- Insert the reader to pc and insert the sdcard to reader
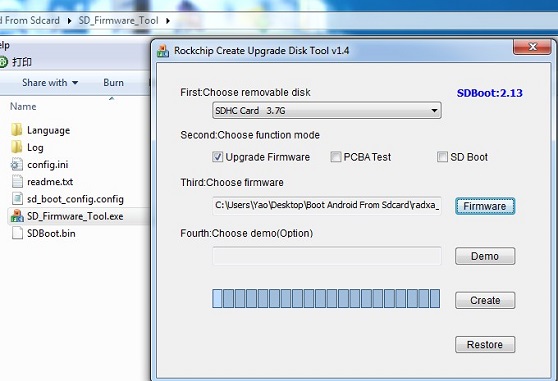
- Find SD_Fireware_Tool.exe under SD_Fireware_Tool and click it. See PIC_1
- Select the insert sdcard under "Choose removable disk" Item. See PIC_1
- Select "Upgrade Fireware" (Note:Select only this item). See PIC_1
- Click "Firmware" button to choose the image just download and unzip.See PIC_1
- Click "Create" to begin. when complete, there will be a dialog to tell you success
Upgrade with SD card on RR
 1. Power off the RR
 2. Insert the sdcard
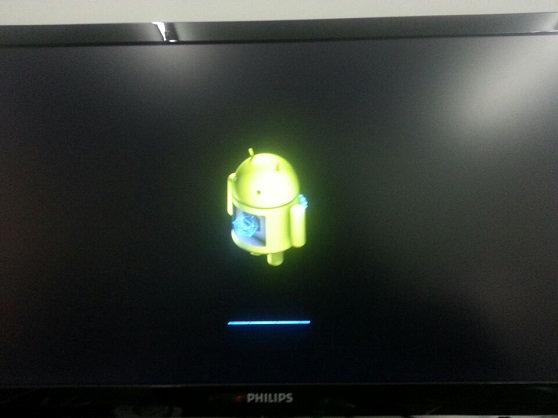
 3. Power on the RR, then the process start,you will see the ui like PIC_2.
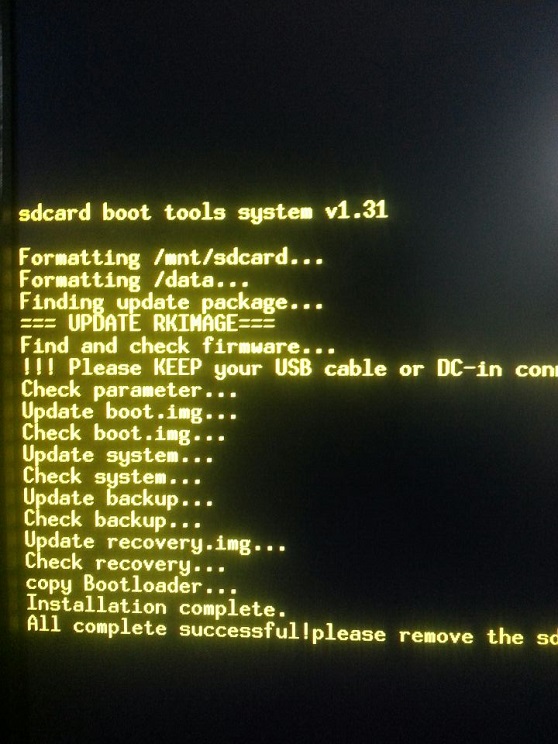
 4. Wait for the process complete. this process will take serveral minutes.when upgrade sucessfully. you will see the result like PIC_3
 5. Power off the RR and remove the sdcard.
 6. Power on the RR. the system is the new version.
Linux
on Linux, write sdboot-header.img into beginning of your micro SD card. (you'll lose all data on it)
then, your SD card should have a 1GB FAT partition. format it, mount it, then put rksdfw.tag sd_boot_config.config, and Radxa's update image for SD card as "sdupdate.img" into root directory of SD card.
Download the binaries from http://files.androtab.info/radxa/sdboot.tgz, and unzip it.
   dd if=sdboot-header.img of=/dev/sdX bs=1M conv=fsync
   mkfs.vfat /dev/sdX1
   mount /dev/sdX1 /mnt
   cp rksdfw.tag sd_boot_config.config /mnt/
   cp path/to/radxa_update.img /mnt/sdupdate.img
   umount /mnt


