Difference between revisions of "Rock/windows adb"
PeiYao Wang (Talk | contribs) (→Install menually) |
(→Option 1: Install with RK_DriverAssitant tools) |
||
| (27 intermediate revisions by 2 users not shown) | |||
| Line 1: | Line 1: | ||
| + | {{rock_header}} | ||
{{Languages|rock/windows adb}} | {{Languages|rock/windows adb}} | ||
__TOC__ | __TOC__ | ||
| − | The | + | The ROCK Pi stock android firmware has adb(Android Debugging Bridge) enabled by default. This page describes how to enable android adb debugging under windows. |
=== Requirement === | === Requirement === | ||
| − | * a | + | * a device running official Android image |
* a desktop/laptop running Windows(XP 32/64bit, Windows 7 32/64 bit) | * a desktop/laptop running Windows(XP 32/64bit, Windows 7 32/64 bit) | ||
| − | * | + | * USB cable to connect the device and PC |
=== Install the adb usb driver === | === Install the adb usb driver === | ||
| − | + | There two methods: | |
| − | + | * install with RK_DriverAssitant - The easy way, for Windows 10 | |
| − | + | * install manually - For all Windows versions | |
| − | === Install the android SDK === | + | ==== Option 1: Install with RK_DriverAssitant tools ==== |
| + | |||
| + | There’s no need to connect your Rockchip device during this procedure.Download and extract [https://dl.radxa.com/tools/windows/DriverAssitant_v5.0.zip Rockchip Driver Helper.zip] | ||
| + | |||
| + | Double click on DriverInstall.exe in RK_DriverAssitant directory to start the utility | ||
| + | If you’ve already tried to install USB drivers for Rockchip devices, make sure to click “Uninstall Driver” first | ||
| + | |||
| + | [[File:RK_Driver_Assistant_Install_Uninstall.jpg]] | ||
| + | |||
| + | Then click “Install Driver”, and depending on your version of Windows the Security below may show up twice during installation. Just click “Install” | ||
| + | |||
| + | [[File:RK_Driver_Assistant_Windows_Security.jpg]] | ||
| + | |||
| + | Done. The drivers should be installed, and you’re ready to boot your device, or install or upgrade your firmware via USB. | ||
| + | |||
| + | '''Note:''' | ||
| + | |||
| + | Windows xp has some differences ,read the readme.txt in RK_DriverAssitant directory and do in accordance with it! | ||
| + | |||
| + | ====Option 2: Install manually==== | ||
| + | |||
| + | # Download the driver from http://dl.radxa.com/rock/tools/windows/radxa_adb_driver.zip and extract it. | ||
| + | # Booting your device into Android, and plug the USB cable to board your PC. | ||
| + | # When Windows prompts "Found New Device", points to the radxa_adb_driver folder, Windows will find the driver and install. | ||
| + | |||
| + | ===Install ADB tool === | ||
| + | |||
| + | ==== Option 1: Quick Install ==== | ||
| + | |||
| + | Download the [https://dl.radxa.com/rock/tools/windows/adb_tools.zip adb binaries], extract it somewhere such as the C:\ disk, that's it. | ||
| + | |||
| + | ==== Option 2: Install with the android SDK(Full and latest) ==== | ||
To get adb under Windows, the official way is to install the android SDK provided by Google. The android sdk manager needs JDK to run. Download jdk from [http://www.oracle.com/technetwork/java/javase/downloads/index.html here]. Install the jdk. Download the android windows sdk from Google [http://dl.google.com/android/android-sdk_r22.3-windows.zip here]. Unzip it to somewhere in your hard drive such as C:\, now we have android sdk under C:\android-sdk-windows. | To get adb under Windows, the official way is to install the android SDK provided by Google. The android sdk manager needs JDK to run. Download jdk from [http://www.oracle.com/technetwork/java/javase/downloads/index.html here]. Install the jdk. Download the android windows sdk from Google [http://dl.google.com/android/android-sdk_r22.3-windows.zip here]. Unzip it to somewhere in your hard drive such as C:\, now we have android sdk under C:\android-sdk-windows. | ||
Double click the SDK Manager.exe, choose "Android SDK Tools" and "Android SDK Platform" and click "Install packages" button. SDK Manager will download the adb and other tools for you. The adb tool is under C:\android-sdk-windows\platform-tools | Double click the SDK Manager.exe, choose "Android SDK Tools" and "Android SDK Platform" and click "Install packages" button. SDK Manager will download the adb and other tools for you. The adb tool is under C:\android-sdk-windows\platform-tools | ||
| − | === | + | ===== Setup the environment ===== |
Right click on My Computer -> Property -> Advanced -> Environment, click user environment, New. Add an System variables named ANDROID_SDK_HOME and it's value is where you put your android sdk. Here we set it to "C:\android-sdk-windows". Note:the environment setting will be work after reboot | Right click on My Computer -> Property -> Advanced -> Environment, click user environment, New. Add an System variables named ANDROID_SDK_HOME and it's value is where you put your android sdk. Here we set it to "C:\android-sdk-windows". Note:the environment setting will be work after reboot | ||
| − | === | + | ===== Setup the USB ID ===== |
Open the Windows CMD utility, type the following command. | Open the Windows CMD utility, type the following command. | ||
cd C:\android-sdk-windows ; or where you put the android sdk | cd C:\android-sdk-windows ; or where you put the android sdk | ||
mkdir .android ; create the "special" android folder | mkdir .android ; create the "special" android folder | ||
| − | The open the C:\android-sdk-windows\.android folder in file explorer, and create a new empty file called adb_usb.ini, open adb_usb.ini and edit with | + | The open the C:\android-sdk-windows\.android folder in file explorer, and create a new empty file called adb_usb.ini, open adb_usb.ini and edit with text editor add the following content: |
0x2207 | 0x2207 | ||
Save the file and exit. | Save the file and exit. | ||
| − | === Test adb | + | ===Test adb === |
In CMD, type | In CMD, type | ||
cd C:\android-sdk-windows\platform-tools | cd C:\android-sdk-windows\platform-tools | ||
Latest revision as of 03:09, 17 September 2021
Contents
[hide]The ROCK Pi stock android firmware has adb(Android Debugging Bridge) enabled by default. This page describes how to enable android adb debugging under windows.
Requirement
- a device running official Android image
- a desktop/laptop running Windows(XP 32/64bit, Windows 7 32/64 bit)
- USB cable to connect the device and PC
Install the adb usb driver
There two methods:
- install with RK_DriverAssitant - The easy way, for Windows 10
- install manually - For all Windows versions
Option 1: Install with RK_DriverAssitant tools
There’s no need to connect your Rockchip device during this procedure.Download and extract Rockchip Driver Helper.zip
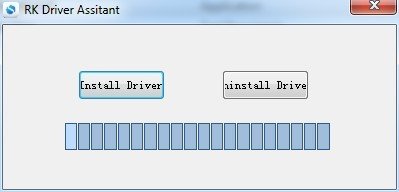
Double click on DriverInstall.exe in RK_DriverAssitant directory to start the utility If you’ve already tried to install USB drivers for Rockchip devices, make sure to click “Uninstall Driver” first
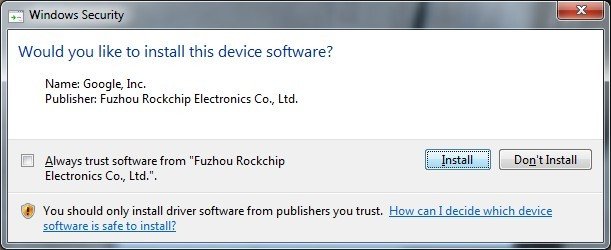
Then click “Install Driver”, and depending on your version of Windows the Security below may show up twice during installation. Just click “Install”
Done. The drivers should be installed, and you’re ready to boot your device, or install or upgrade your firmware via USB.
Note:
Windows xp has some differences ,read the readme.txt in RK_DriverAssitant directory and do in accordance with it!
Option 2: Install manually
- Download the driver from http://dl.radxa.com/rock/tools/windows/radxa_adb_driver.zip and extract it.
- Booting your device into Android, and plug the USB cable to board your PC.
- When Windows prompts "Found New Device", points to the radxa_adb_driver folder, Windows will find the driver and install.
Install ADB tool
Option 1: Quick Install
Download the adb binaries, extract it somewhere such as the C:\ disk, that's it.
Option 2: Install with the android SDK(Full and latest)
To get adb under Windows, the official way is to install the android SDK provided by Google. The android sdk manager needs JDK to run. Download jdk from here. Install the jdk. Download the android windows sdk from Google here. Unzip it to somewhere in your hard drive such as C:\, now we have android sdk under C:\android-sdk-windows.
Double click the SDK Manager.exe, choose "Android SDK Tools" and "Android SDK Platform" and click "Install packages" button. SDK Manager will download the adb and other tools for you. The adb tool is under C:\android-sdk-windows\platform-tools
Setup the environment
Right click on My Computer -> Property -> Advanced -> Environment, click user environment, New. Add an System variables named ANDROID_SDK_HOME and it's value is where you put your android sdk. Here we set it to "C:\android-sdk-windows". Note:the environment setting will be work after reboot
Setup the USB ID
Open the Windows CMD utility, type the following command.
   cd C:\android-sdk-windows            ; or where you put the android sdk
   mkdir .android                       ; create the "special" android folder
The open the C:\android-sdk-windows\.android folder in file explorer, and create a new empty file called adb_usb.ini, open adb_usb.ini and edit with text editor add the following content:
0x2207
Save the file and exit.
Test adb
In CMD, type
   cd C:\android-sdk-windows\platform-tools
   adb kill-server
   adb devices
You should see the device like below:
   List of devices attached
   16EM8P26M8      device


