Difference between revisions of "Rock/SD images"
< Rock
(→Download) |
(→Writing SD image to SD card) |
||
| (14 intermediate revisions by 4 users not shown) | |||
| Line 1: | Line 1: | ||
| + | {{rock_header}} | ||
{{Languages|rock/SD images}} | {{Languages|rock/SD images}} | ||
__TOC__ | __TOC__ | ||
| − | SD images for the rock are images booting and running on the uSD card completely. This is good when you want to try different OS or new version of the firmware without | + | SD images for the rock are images booting and running on the uSD card completely. This is good when you want to try different OS or new version of the firmware without touching the nand flash. |
| − | == | + | == Downloading SD Images== |
| − | + | ||
| − | + | ||
| − | == | + | Check your [[Rock/hardware revision|hardware revision]] (Pro or Full/Lite), then download image '''"for SD card"''' from [[Rock/prebuilt images|here]] |
| + | |||
| + | == Writing SD image to SD card == | ||
=== Windows === | === Windows === | ||
| + | See the readme in the individual image zip file for additional information on which tool to use. | ||
| + | |||
| + | Before beginning, you will need to prepare a high quality SD card of at least 8GB. A poor quality SD card will result in boot failures. | ||
| + | |||
* Download the Win32DiskImager from [https://sourceforge.net/projects/win32diskimager/files/latest/download here]. | * Download the Win32DiskImager from [https://sourceforge.net/projects/win32diskimager/files/latest/download here]. | ||
| − | * Download the | + | * Download the image from above link. |
| − | * | + | * Use the Win32DiskImager to '''Write''' the image into SD card |
[[File:Win32DiskImager.png]] | [[File:Win32DiskImager.png]] | ||
| − | |||
=== Linux === | === Linux === | ||
| − | We use dd | + | We use dd in Linux to write the image: |
| − | sudo dd if=radxa_rock_xxxx_sdcard.img of=/dev/sdx | + | sudo dd if=radxa_rock_xxxx_sdcard.img of=/dev/sdx # x is the disk name of your uSD card on your PC |
| + | |||
| + | === Mac OS X === | ||
| + | We use dd and Apple's diskutil utility to write the image: | ||
| + | #Run '''''diskutil list''''' to determine the drive associated the SD card (ex: /dev/disk4) | ||
| + | #Unmount the existing disk '''''sudo diskutil unmountDisk /dev/diskX''''' where X is the disk name of your uSD card on your PC | ||
| + | #Write the image file to the uSD card '''''sudo dd if=radxa_rock_xxxx_sdcard.img of=/dev/diskX''''' where X is the disk name of your uSD card on your PC | ||
| + | |||
| + | ==Booting to SD Card== | ||
| + | #Power off the Rock | ||
| + | # Insert the SD card | ||
| + | # Power on the Rock and it will boot to the SD card | ||
Latest revision as of 05:49, 13 March 2015
Contents
SD images for the rock are images booting and running on the uSD card completely. This is good when you want to try different OS or new version of the firmware without touching the nand flash.
Downloading SD Images
Check your hardware revision (Pro or Full/Lite), then download image "for SD card" from here
Writing SD image to SD card
Windows
See the readme in the individual image zip file for additional information on which tool to use.
Before beginning, you will need to prepare a high quality SD card of at least 8GB. A poor quality SD card will result in boot failures.
- Download the Win32DiskImager from here.
- Download the image from above link.
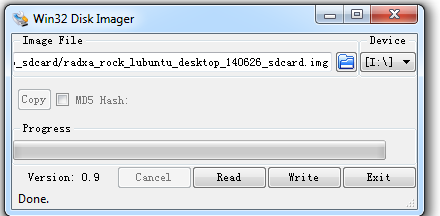
- Use the Win32DiskImager to Write the image into SD card
Linux
We use dd in Linux to write the image:
sudo dd if=radxa_rock_xxxx_sdcard.img of=/dev/sdx # x is the disk name of your uSD card on your PC
Mac OS X
We use dd and Apple's diskutil utility to write the image:
- Run diskutil list to determine the drive associated the SD card (ex: /dev/disk4)
- Unmount the existing disk sudo diskutil unmountDisk /dev/diskX where X is the disk name of your uSD card on your PC
- Write the image file to the uSD card sudo dd if=radxa_rock_xxxx_sdcard.img of=/dev/diskX where X is the disk name of your uSD card on your PC
Booting to SD Card
- Power off the Rock
- Insert the SD card
- Power on the Rock and it will boot to the SD card

