Rock5/install/usb-install-rock-5b
ROCK 5 > Installation > Install the Image to eMMC from USB port
Contents
[hide]Install the image to eMMC from USB port
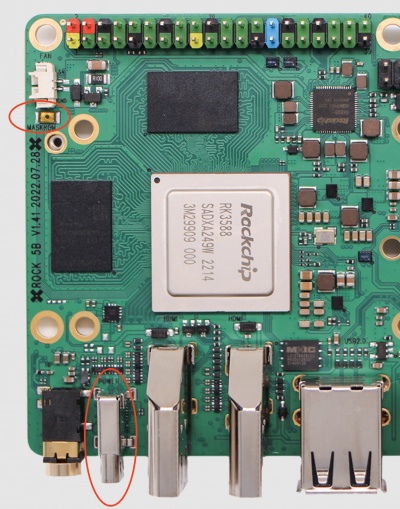
Rock 5 supports Maskrom mode, which is a special operation mode for CPU to wait for USB OTG port command. The PC tools we use to communicate with rock 5 in Maskrom mode are the rkdeveloptool and RKDevTool. We use the rkdeveloptool in Linux/macOS and the RKDevTool under Windows.
Requirement
- Rock 5B
- type-c cable
- emmc module
- Windows/linux/macOS PC
Install Tools&Drivers
Please check this guide, Install rockchip flash tools under Windows/Linux/MacOS PC.
Boot the board to Maskrom mode
To boot ROCK 5B to Maskrom mode is simple:
- Power off the board.
- Press the golden button and hold it.
- Plug the USB-A to Type-C cable to ROCK 5B Type-C port, the other side to PC.
- Release the golded button.
- Check usb device
- For macOS host: lsusb result: Bus 002 Device 032: ID 2207:350b Fuzhou Rockchip Electronics Co., Ltd. Composite Device
- For Linux host: lsusb result: Bus 001 Device 112: ID 2207:350b Fuzhou Rockchip Electronics Company
- For Windows host: Open RKDevTool and you would see the device is in Found One MASKROM Device.
Get RK3588 loader and system image
ROCK 5B
Write system image to eMMC module
Linux/MacOS
On your PC, run the rkdeveloptool
sudo rkdeveloptool ld
DevNo=1	Vid=0x2207,Pid=0x350b,LocationID=106	Maskrom
Download the loader (flash helper) to init the ram and prepare the flashing environment etc. If you don't have it, you can download it from here
sudo rkdeveloptool db /path/to/rk3588_spl_loader_v1.08.111.bin
Write SPI image to SPI Nor Flash on board.
You can use our pre-built files.
sudo rkdeveloptool wl 0 rock-5b-debian-bullseye-xfce4-arm64-20220919-0912-gpt.img
Reboot the device
sudo rkdeveloptool rd
now, the device should boot on eMMC.
Troubleshooting
- If you have issue with flashing via USB OTG, start a new post on the forum, https://forum.radxa.com/c/rock5.

