Difference between revisions of "Zero/install/eMMC erase"
(→Step 1: Install pyamlboot tool) |
RadxaYuntian (Talk | contribs) (Fix some obvious errors and combine Linux/macOS into one part) |
||
| Line 5: | Line 5: | ||
=== How to completely erase the Radxa Zero eMMC === | === How to completely erase the Radxa Zero eMMC === | ||
| − | This guide describes how to completely erase Radxa Zero eMMC. | + | This guide describes how to completely erase Radxa Zero's eMMC. Unlike normal PC where they have a well established and documented way of booting, in embedded world it is a bit chaotic and everyone carries their own bootloader and boot sequence. As such it's best to wipe the eMMC completely and have a clean environment before flashing a new image to eMMC. |
== Requirement == | == Requirement == | ||
* Radxa Zero | * Radxa Zero | ||
| − | + | * A PC/laptop running Windows, Linux, or macOS | |
| − | * A PC/laptop running Windows, Linux | + | * USB A to C cable or C to C cable, depending on your host |
== Windows == | == Windows == | ||
| Line 19: | Line 19: | ||
Press and hold the USB boot button on the Zero, plug in the USB to PC. | Press and hold the USB boot button on the Zero, plug in the USB to PC. | ||
| − | Download [https://github.com/pbatard/libwdi/releases/download/b755/zadig-2.6.exe Zagdig] | + | Download and install [https://github.com/pbatard/libwdi/releases/download/b755/zadig-2.6.exe Zagdig]. |
| − | Confirm that the device is GX-CHIP, USB ID is 1B8E:C003 and choose '''libusb-win32''', then click ''Install Driver''. | + | Confirm that the device is <code>GX-CHIP</code>, USB ID is <code>1B8E:C003</code> and choose '''libusb-win32''', then click '''Install Driver'''. |
[[File:Zagdig-libusb.png]] | [[File:Zagdig-libusb.png]] | ||
| − | + | https://dl.google.com/android/repository/usb_driver_r13-windows.zip Download the Android driver] from Google. | |
| − | + | ||
| − | + | ||
Unzip it and right click the '''.inf''' file to install the driver. | Unzip it and right click the '''.inf''' file to install the driver. | ||
| Line 34: | Line 32: | ||
===== Step 2: Use RZ USB helper ===== | ===== Step 2: Use RZ USB helper ===== | ||
| − | RZ USB helper is a tool by Radxa for | + | RZ USB helper is a Windows tool made by Radxa for easy eMMC wiping. Download it from [https://dl.radxa.com/zero/tools/windows/RZ_USB_Boot_Helper_V1.0.0.zip Radxa DL] and unzip everything to a convenient location. |
| − | + | First locate the USB boot button on the Zero: | |
[[File:Zero_usb_boot.jpg | 300px]] | [[File:Zero_usb_boot.jpg | 300px]] | ||
| − | + | Hold the button while connect you Radxa Zero to PC. '''Maskrom mode''' should be detected by the tool. | |
[[File:Rz-usb-helper-maskrom.png | 500px]] | [[File:Rz-usb-helper-maskrom.png | 500px]] | ||
| − | + | Then select the '''factory-loader.img''' from the unzipped folder and click '''Run'''. | |
[[File:Rz-usb-helper-fastboot.png | 500px]] | [[File:Rz-usb-helper-fastboot.png | 500px]] | ||
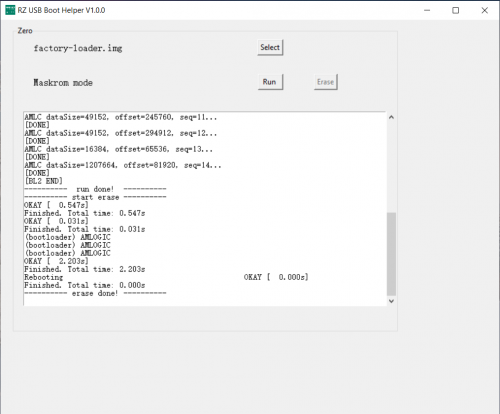
| − | + | Finally, click '''Erase''' to erase the eMMC completely. | |
[[File:Rz-usb-helper-erase.png | 500px]] | [[File:Rz-usb-helper-erase.png | 500px]] | ||
| − | == Linux == | + | == Linux & macOS == |
| − | For Linux, we use amlogic boot tool to download the bootloader and boot the Zero into the fastboot mode to erase the eMMC. | + | For Linux and macOS, we use amlogic boot tool to download the bootloader and boot the Zero into the fastboot mode to erase the eMMC. |
===== Step 1: Install pyamlboot tool ===== | ===== Step 1: Install pyamlboot tool ===== | ||
| − | + | macOS: | |
| − | + | $ brew install python lsusb libusb | |
| + | $ pip3 install pyamlboot | ||
| − | + | Linux: | |
| − | + | $ sudo apt install python3-pip | |
| − | + | $ sudo pip3 install pyamlboot | |
| − | + | ||
| − | + | ||
| − | + | ||
| − | + | ||
| − | + | ||
| − | + | ||
| − | + | ||
| − | + | ||
| − | + | ||
| − | + | ||
| − | + | ||
| − | + | ||
| − | + | ||
| − | + | ||
| − | + | ||
| − | + | ||
| − | + | ||
| − | + | ||
| − | + | ||
| − | + | ||
| − | + | ||
| − | + | ||
| − | + | ||
| − | + | ||
| − | + | ||
| − | + | ||
| − | + | ||
| − | + | ||
| − | + | ||
| − | + | ||
| − | + | ||
| − | + | ||
| − | + | ||
| − | + | ||
| − | + | ||
| − | + | ||
| − | + | ||
| − | + | ||
| − | + | ||
| − | + | ||
| − | + | ||
| − | + | ||
| − | + | ||
| − | + | ||
| − | + | ||
| − | + | ||
| − | + | ||
| − | + | ||
| − | + | ||
| − | + | ||
| − | + | ||
| − | + | ||
| − | + | ||
| − | + | ||
| − | + | ||
| − | + | ||
| − | + | ||
| − | + | ||
| − | + | ||
| − | + | ||
| − | + | ||
| − | + | ||
| − | + | ||
| − | + | ||
| − | + | ||
| − | + | ||
| − | + | ||
| − | + | ||
| − | sudo | + | |
| − | + | ||
| − | + | ||
| − | + | ||
| − | + | ||
| − | + | ||
| − | + | ||
| − | + | ||
| − | + | ||
| − | + | ||
| − | + | ||
| − | + | ||
| − | + | ||
| − | + | ||
| − | + | ||
| − | + | ||
| − | + | ||
| − | + | ||
| − | + | ||
| − | + | ||
| − | + | ||
| − | + | ||
| − | + | Here we are using <code>apt</code> package manager. Please refer to your distro's documentation for help on your distro's package manager. | |
| − | + | ||
===== Step 2: Install fastboot ===== | ===== Step 2: Install fastboot ===== | ||
| Line 161: | Line 69: | ||
Nexus Tools is an installer for the Android SDK Platform Tools package, which includes ADB, Fastboot, and other applications. We use Nexus Tools to install fastboot. If you already have fastboot installed, you can skip this step. | Nexus Tools is an installer for the Android SDK Platform Tools package, which includes ADB, Fastboot, and other applications. We use Nexus Tools to install fastboot. If you already have fastboot installed, you can skip this step. | ||
| − | bash <(curl -s https://raw.githubusercontent.com/corbindavenport/nexus-tools/master/install.sh) | + | $ bash <(curl -s https://raw.githubusercontent.com/corbindavenport/nexus-tools/master/install.sh) |
After it finishes, | After it finishes, | ||
| − | which fastboot | + | $ which fastboot |
should return you the install location. | should return you the install location. | ||
| Line 171: | Line 79: | ||
===== Step 3: Boot into fastboot mode ===== | ===== Step 3: Boot into fastboot mode ===== | ||
| − | Press and hold the USB boot button on Zero, plug in it to | + | Press and hold the USB boot button on Zero, plug in it to your computer. '''lsusb''' should see something like: |
| − | Bus | + | Bus 001 Device 075: ID '''1b8e:c003''' Amlogic, Inc. GX-CHIP |
Download the fastboot loader and run it on Zero | Download the fastboot loader and run it on Zero | ||
| − | wget https://dl.radxa.com/zero/images/loader/ | + | $ wget https://dl.radxa.com/zero/images/loader/rz-fastboot-loader.bin |
| − | boot-g12.py | + | $ boot-g12.py rz-fastboot-loader.bin |
| − | It should output: | + | It should output something similar to this: |
<pre> | <pre> | ||
Firmware Version : | Firmware Version : | ||
| Line 208: | Line 116: | ||
Now lsusb should show the following device: | Now lsusb should show the following device: | ||
| − | Bus | + | Bus 001 Device 076: ID '''18d1:0d02''' Google Inc. USB download gadget Serial: 1234567890 |
===== Step 4: Wipe the eMMC ===== | ===== Step 4: Wipe the eMMC ===== | ||
| − | fastboot devices | + | macOS: |
| + | $ fastboot devices | ||
1234567890 fastboot | 1234567890 fastboot | ||
| + | $ fastboot flashing unlock_critical | ||
| + | $ fastboot flashing unlock | ||
| + | $ fastboot erase bootloader | ||
| + | $ fastboot erase bootloader-boot0 | ||
| + | $ fastboot erase bootloader-boot1 | ||
| + | $ fastboot reboot | ||
| − | + | Linux: | |
| − | + | Run <code>sudo -i</code> and <code>exit</code> before and after the macOS command sequences. | |
| − | + | ||
| − | + | ||
| − | + | ||
| − | + | ||
| − | + | ||
Unplug and plug the power of Zero, lsusb should show the following: | Unplug and plug the power of Zero, lsusb should show the following: | ||
| − | Bus | + | Bus 001 Device 075: ID '''1b8e:c003''' Amlogic, Inc. GX-CHIP |
| − | the eMMC is wiped and Zero is in maskrom mode now. You can [[zero/install/eMMC# | + | the eMMC is wiped and Zero is in maskrom mode now. You can [[zero/install/eMMC#linux | install other OS to eMMC]] now. |
Revision as of 10:21, 1 December 2021
Radxa Zero > Installation > Erase eMMC
Contents
How to completely erase the Radxa Zero eMMC
This guide describes how to completely erase Radxa Zero's eMMC. Unlike normal PC where they have a well established and documented way of booting, in embedded world it is a bit chaotic and everyone carries their own bootloader and boot sequence. As such it's best to wipe the eMMC completely and have a clean environment before flashing a new image to eMMC.
Requirement
- Radxa Zero
- A PC/laptop running Windows, Linux, or macOS
- USB A to C cable or C to C cable, depending on your host
Windows
Step 1: Install drivers
Press and hold the USB boot button on the Zero, plug in the USB to PC.
Download and install Zagdig.
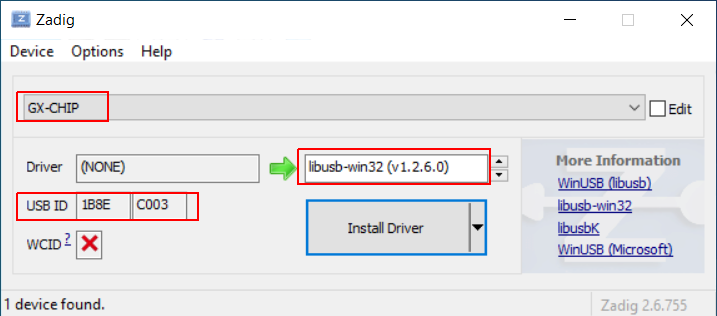
Confirm that the device is GX-CHIP, USB ID is 1B8E:C003 and choose libusb-win32, then click Install Driver.
https://dl.google.com/android/repository/usb_driver_r13-windows.zip Download the Android driver] from Google.
Unzip it and right click the .inf file to install the driver.
Step 2: Use RZ USB helper
RZ USB helper is a Windows tool made by Radxa for easy eMMC wiping. Download it from Radxa DL and unzip everything to a convenient location.
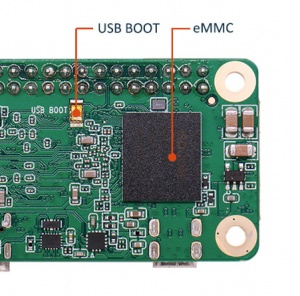
First locate the USB boot button on the Zero:
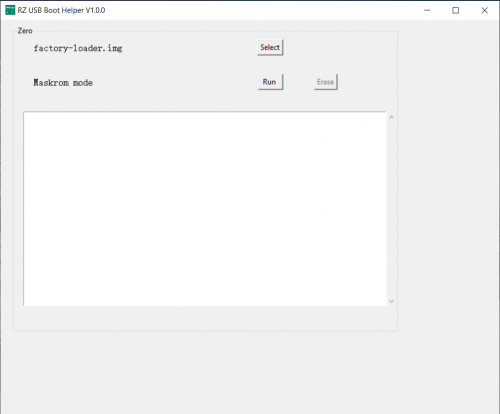
Hold the button while connect you Radxa Zero to PC. Maskrom mode should be detected by the tool.
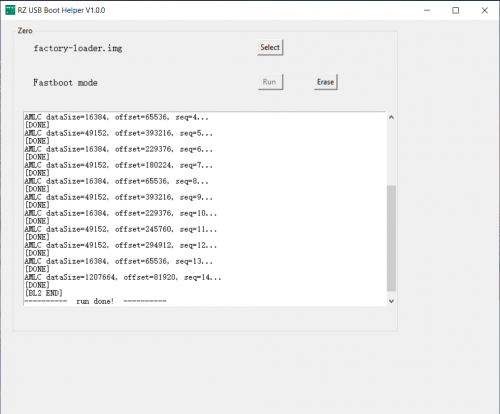
Then select the factory-loader.img from the unzipped folder and click Run.
Finally, click Erase to erase the eMMC completely.
Linux & macOS
For Linux and macOS, we use amlogic boot tool to download the bootloader and boot the Zero into the fastboot mode to erase the eMMC.
Step 1: Install pyamlboot tool
macOS:
   $ brew install python lsusb libusb
   $ pip3 install pyamlboot
Linux:
   $ sudo apt install python3-pip
   $ sudo pip3 install pyamlboot
Here we are using apt package manager. Please refer to your distro's documentation for help on your distro's package manager.
Step 2: Install fastboot
Nexus Tools is an installer for the Android SDK Platform Tools package, which includes ADB, Fastboot, and other applications. We use Nexus Tools to install fastboot. If you already have fastboot installed, you can skip this step.
$ bash <(curl -s https://raw.githubusercontent.com/corbindavenport/nexus-tools/master/install.sh)
After it finishes,
$ which fastboot
should return you the install location.
Step 3: Boot into fastboot mode
Press and hold the USB boot button on Zero, plug in it to your computer. lsusb should see something like:
Bus 001 Device 075: ID 1b8e:c003 Amlogic, Inc. GX-CHIP
Download the fastboot loader and run it on Zero
   $ wget https://dl.radxa.com/zero/images/loader/rz-fastboot-loader.bin
   $ boot-g12.py rz-fastboot-loader.bin
It should output something similar to this:
Firmware Version :
ROM: 3.2 Stage: 0.0
Need Password: 0 Password OK: 1
Writing rz-fastboot-loader.bin at 0xfffa0000...
[DONE]
Running at 0xfffa0000...
[DONE]
AMLC dataSize=16384, offset=65536, seq=0...
[DONE]
AMLC dataSize=49152, offset=393216, seq=1...
[DONE]
AMLC dataSize=16384, offset=229376, seq=2...
[DONE]
AMLC dataSize=49152, offset=245760, seq=3...
[DONE]
AMLC dataSize=49152, offset=294912, seq=4...
[DONE]
AMLC dataSize=16384, offset=65536, seq=5...
[DONE]
AMLC dataSize=1406320, offset=81920, seq=6...
[DONE]
[BL2 END]
Now lsusb should show the following device:
Bus 001 Device 076: ID 18d1:0d02 Google Inc. USB download gadget Serial: 1234567890
Step 4: Wipe the eMMC
macOS:
   $ fastboot devices
   1234567890	fastboot
   $ fastboot flashing unlock_critical
   $ fastboot flashing unlock
   $ fastboot erase bootloader
   $ fastboot erase bootloader-boot0
   $ fastboot erase bootloader-boot1
   $ fastboot reboot
Linux:
Run sudo -i and exit before and after the macOS command sequences.
Unplug and plug the power of Zero, lsusb should show the following:
Bus 001 Device 075: ID 1b8e:c003 Amlogic, Inc. GX-CHIP
the eMMC is wiped and Zero is in maskrom mode now. You can install other OS to eMMC now.

