Difference between revisions of "Zero/dev/u-boot"
(→Run U-boot) |
m (Changed compiler flag to match installed libraries. Added warning as fastboot flashing does not work for current image (as long as nobody figures out the 'magic number' to U-Boot)) |
||
| (6 intermediate revisions by 2 users not shown) | |||
| Line 1: | Line 1: | ||
{{zero_header}} | {{zero_header}} | ||
| + | |||
{{Languages|zero/dev/u-boot}} | {{Languages|zero/dev/u-boot}} | ||
| + | |||
[[zero | Radxa Zero]] > [[zero/dev | Development]] > [[zero/dev/u-boot | U-Boot]] | [[zero | Radxa Zero]] > [[zero/dev | Development]] > [[zero/dev/u-boot | U-Boot]] | ||
| − | === Build U-Boot and | + | === Build U-Boot and flash it on Radxa Zero === |
| + | |||
| + | This guide describes how to build U-Boot and flash it on Radxa Zero. U-Boot image can be flashed on eMMC or microSD, and it can be sideload from USB as well. | ||
| − | + | <font color="#FF0000">WARNING!</font> Flash bootloader incorrectly could result in unbootable system and loss of data. Do not replace bundled bootloader unless you understand the risk. | |
==== Requirement ==== | ==== Requirement ==== | ||
| Line 11: | Line 15: | ||
* Radxa Zero | * Radxa Zero | ||
* USB A to C cable | * USB A to C cable | ||
| − | * A | + | * A computer running Ubuntu 18.04 or higher |
==== Build U-Boot ==== | ==== Build U-Boot ==== | ||
| Line 17: | Line 21: | ||
===== Step 1: Get the source code ===== | ===== Step 1: Get the source code ===== | ||
| − | + | We use git to fetch source code from internet. If you do not have git installed, try following commands: | |
| − | + | sudo apt update | |
| + | sudo apt install git | ||
| − | + | Once you have git installed, you can download the source code: | |
| − | + | ||
| − | + | ||
git clone -b radxa-zero-v2021.07 https://github.com/radxa/u-boot.git | git clone -b radxa-zero-v2021.07 https://github.com/radxa/u-boot.git | ||
| − | FIP(Firmware in Package) is a | + | FIP(Firmware in Package) is a collection of scripts and pre-built binaries (such as first stage loader and so on) for Radxa Zero U-Boot. Get them with following command: |
git clone https://github.com/radxa/fip.git | git clone https://github.com/radxa/fip.git | ||
| − | ===== Step 2: | + | ===== Step 2: Set up build environment ===== |
| − | + | Execute following commands to install build dependencies and the tool chain necessary for building. | |
| − | + | ||
| − | + | ||
| − | + | ||
| + | sudo apt install bc nano mc build-essential autoconf libtool cmake pkg-config git python python-dev swig libpcre3-dev libnode-dev gawk wget diffstat bison flex device-tree-compiler libncurses5 libncurses5-dev gcc-aarch64-linux-gnu g++-aarch64-linux-gnu binfmt-support qemu-user-static dosfstools libssl-dev mtools | ||
wget https://developer.arm.com/-/media/Files/downloads/gnu-a/10.3-2021.07/binrel/gcc-arm-10.3-2021.07-x86_64-aarch64-none-elf.tar.xz | wget https://developer.arm.com/-/media/Files/downloads/gnu-a/10.3-2021.07/binrel/gcc-arm-10.3-2021.07-x86_64-aarch64-none-elf.tar.xz | ||
sudo tar xvf gcc-arm-10.3-2021.07-x86_64-aarch64-none-elf.tar.xz -C /opt | sudo tar xvf gcc-arm-10.3-2021.07-x86_64-aarch64-none-elf.tar.xz -C /opt | ||
| Line 43: | Line 44: | ||
===== Step 3: Build U-boot ===== | ===== Step 3: Build U-boot ===== | ||
| − | export CROSS_COMPILE=/opt/gcc-arm-10. | + | export CROSS_COMPILE=/opt/gcc-arm-10.3-2021.07-x86_64-aarch64-none-elf/bin/aarch64-none-elf- |
export ARCH=arm | export ARCH=arm | ||
cd u-boot | cd u-boot | ||
| Line 49: | Line 50: | ||
make | make | ||
| − | You will | + | You will find <code>u-boot.bin</code> under <code>u-boot</code> folder if everything runs without error. |
===== Step 4: Pack U-boot ===== | ===== Step 4: Pack U-boot ===== | ||
| Line 63: | Line 64: | ||
==== Run U-boot ==== | ==== Run U-boot ==== | ||
| − | * | + | * Sideloading from USB |
| + | |||
| + | When your U-Boot is broken you can sideload a working image to recover an unbootable system. This can also be used to verify the newly generated image is working before flashing it permanently on storage media. | ||
Install the maskrom usb download tool with pip | Install the maskrom usb download tool with pip | ||
sudo apt install pip3 | sudo apt install pip3 | ||
| − | sudo pip3 install | + | sudo pip3 install pyamlboot |
| + | |||
| + | Press and hold the [https://wiki.radxa.com/mw/images/e/e2/Radxa_zero_ports.jpg USB boot button] on the back of Radxa Zero, and connect Zero to your PC. | ||
| − | + | You should see following device connected to your system: | |
$ lsusb | $ lsusb | ||
Bus 002 Device 030: ID 1b8e:c003 Amlogic, Inc. GX-CHIP | Bus 002 Device 030: ID 1b8e:c003 Amlogic, Inc. GX-CHIP | ||
| − | + | Sideloadng u-boot.bin: | |
boot-g12.py /path/to/'''fip/radxa-zero/u-boot.bin''' | boot-g12.py /path/to/'''fip/radxa-zero/u-boot.bin''' | ||
| − | + | If you have serial console attached to Radxa Zero, you will see the boot message from U-Boot. | |
| − | * | + | * Flash U-Boot to microSD |
bin=/path/to/'''fip/radxa-zero/u-boot.bin.sd.bin''' | bin=/path/to/'''fip/radxa-zero/u-boot.bin.sd.bin''' | ||
| Line 87: | Line 92: | ||
sudo dd if=$bin of=/dev/sdx conv=fsync,notrunc bs=512 skip=1 seek=1 | sudo dd if=$bin of=/dev/sdx conv=fsync,notrunc bs=512 skip=1 seek=1 | ||
| − | + | If your Zero has built-in eMMC, we recommend [[Zero/install/eMMC_erase | erase it]] so the microSD's U-Boot will be used. | |
| − | * | + | * Flash U-Boot to eMMC (ONLY FOR BRANCH 2021.01, DOES NOT WORK WITH ABOVE BUILD) |
| − | We use '''fastboot''' to flash | + | We use '''fastboot''' to flash U-Boot to eMMC. Unplug microSD card from Zero and press & hold the [https://wiki.radxa.com/mw/images/e/e2/Radxa_zero_ports.jpg usb boot button], then connect Zero to your PC. |
sudo apt install fastboot | sudo apt install fastboot | ||
| Line 99: | Line 104: | ||
sudo fastboot reboot | sudo fastboot reboot | ||
| − | + | Some forum user also discover a method to [https://forum.radxa.com/t/install-os-direct-to-emmc-with-ubuntu/7435 flash U-Boot with dd] in USB mass storage mode: | |
| + | |||
| + | curl -L https://dl.radxa.com/zero/images/loader/u-boot.bin | sudo dd of=/dev/sdX bs=512 seek=1 && sync | ||
Latest revision as of 13:18, 18 October 2022
Radxa Zero > Development > U-Boot
Contents
Build U-Boot and flash it on Radxa Zero
This guide describes how to build U-Boot and flash it on Radxa Zero. U-Boot image can be flashed on eMMC or microSD, and it can be sideload from USB as well.
WARNING! Flash bootloader incorrectly could result in unbootable system and loss of data. Do not replace bundled bootloader unless you understand the risk.
Requirement
- Radxa Zero
- USB A to C cable
- A computer running Ubuntu 18.04 or higher
Build U-Boot
Step 1: Get the source code
We use git to fetch source code from internet. If you do not have git installed, try following commands:
   sudo apt update
   sudo apt install git
Once you have git installed, you can download the source code:
git clone -b radxa-zero-v2021.07 https://github.com/radxa/u-boot.git
FIP(Firmware in Package) is a collection of scripts and pre-built binaries (such as first stage loader and so on) for Radxa Zero U-Boot. Get them with following command:
git clone https://github.com/radxa/fip.git
Step 2: Set up build environment
Execute following commands to install build dependencies and the tool chain necessary for building.
 sudo apt install bc nano mc build-essential autoconf libtool cmake pkg-config git python python-dev swig libpcre3-dev libnode-dev gawk wget diffstat bison flex device-tree-compiler libncurses5 libncurses5-dev gcc-aarch64-linux-gnu g++-aarch64-linux-gnu binfmt-support qemu-user-static dosfstools libssl-dev mtools
 wget https://developer.arm.com/-/media/Files/downloads/gnu-a/10.3-2021.07/binrel/gcc-arm-10.3-2021.07-x86_64-aarch64-none-elf.tar.xz
 sudo tar xvf gcc-arm-10.3-2021.07-x86_64-aarch64-none-elf.tar.xz -C /opt
Step 3: Build U-boot
 export CROSS_COMPILE=/opt/gcc-arm-10.3-2021.07-x86_64-aarch64-none-elf/bin/aarch64-none-elf-
 export ARCH=arm
 cd u-boot
 make radxa-zero_defconfig
 make
You will find u-boot.bin under u-boot folder if everything runs without error.
Step 4: Pack U-boot
 cp u-boot.bin ../fip/radxa-zero/bl33.bin
 cd ../fip/radxa-zero
 make
This will generate
u-boot.bin u-boot.bin.sd.bin u-boot.bin.usb.bl2 u-boot.bin.usb.tpl
Run U-boot
- Sideloading from USB
When your U-Boot is broken you can sideload a working image to recover an unbootable system. This can also be used to verify the newly generated image is working before flashing it permanently on storage media.
Install the maskrom usb download tool with pip
 sudo apt install pip3
 sudo pip3 install pyamlboot
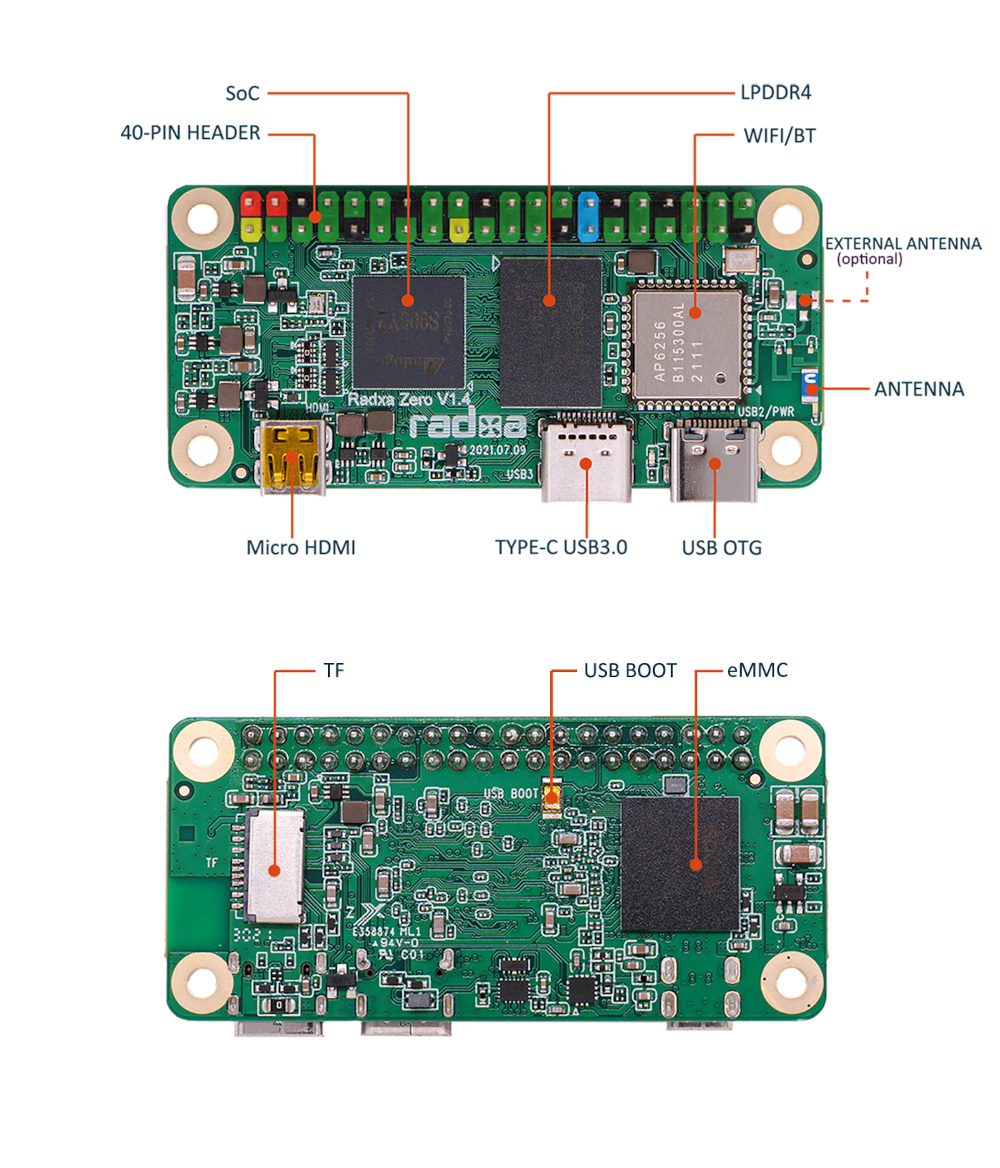
Press and hold the USB boot button on the back of Radxa Zero, and connect Zero to your PC.
You should see following device connected to your system:
 $ lsusb
 Bus 002 Device 030: ID 1b8e:c003 Amlogic, Inc. GX-CHIP
Sideloadng u-boot.bin:
boot-g12.py /path/to/fip/radxa-zero/u-boot.bin
If you have serial console attached to Radxa Zero, you will see the boot message from U-Boot.
- Flash U-Boot to microSD
 bin=/path/to/fip/radxa-zero/u-boot.bin.sd.bin
 sudo dd if=$bin of=/dev/sdx conv=fsync,notrunc bs=1 count=444
 sudo dd if=$bin of=/dev/sdx conv=fsync,notrunc bs=512 skip=1 seek=1
If your Zero has built-in eMMC, we recommend erase it so the microSD's U-Boot will be used.
- Flash U-Boot to eMMC (ONLY FOR BRANCH 2021.01, DOES NOT WORK WITH ABOVE BUILD)
We use fastboot to flash U-Boot to eMMC. Unplug microSD card from Zero and press & hold the usb boot button, then connect Zero to your PC.
 sudo apt install fastboot
 wget https://dl.radxa.com/zero/images/loader/rz-fastboot-loader.bin
 boot-g12.py rz-fastboot-loader.bin
 sudo fastboot flash 0x200 /path/to/fip/radxa-zero/u-boot.bin
 sudo fastboot reboot
Some forum user also discover a method to flash U-Boot with dd in USB mass storage mode:
curl -L https://dl.radxa.com/zero/images/loader/u-boot.bin | sudo dd of=/dev/sdX bs=512 seek=1 && sync