Difference between revisions of "Rockpi4/dev/usb-install/zh cn"
(Created page with "{{rockpi4_header}} {{Languages|rockpi4/dev/usb-install}} ROCK Pi 4 > Development > Install from USB OTG port...") |
|||
| Line 1: | Line 1: | ||
{{rockpi4_header}} | {{rockpi4_header}} | ||
| − | {{Languages|rockpi4/dev/usb-install}} | + | {{Languages|rockpi4/dev/usb-install/zh_cn}} |
[[rockpi4 | ROCK Pi 4]] > [[rockpi4/dev | Development]] > [[rockpi4/dev/usb-install | Install from USB OTG port]] | [[rockpi4 | ROCK Pi 4]] > [[rockpi4/dev | Development]] > [[rockpi4/dev/usb-install | Install from USB OTG port]] | ||
| − | Rock | + | Rock PI支持Maskrom模式,这是一种CPU等待USB OTG口命令的特殊操作模式。'''rkdevelopment和AndroidTool'''是我们在Maskrom模式下用来与Rock PI通信的PC端烧录工具。在Linux/MacOS下使用的是'''rkdevelopment'''工具,而在Windows下使用的是'''AndroidTool'''工具。 |
| − | + | ||
| − | + | ||
| − | === | + | === 准备 === |
| − | * ROCK Pi 4 | + | * ROCK Pi 4 主板 |
| − | * eMMC | + | * eMMC 模块 |
| − | * | + | * 电源适配器 |
| − | * | + | * USB A对A 的数据线 [https://forum.radxa.com/t/otg-flashing-not-working/717 (参考)]. |
| − | === | + | === 安装工具以及驱动 === |
<div class="toccolours mw-collapsible" style="width:800px; overflow:auto;"> | <div class="toccolours mw-collapsible" style="width:800px; overflow:auto;"> | ||
==== Windows ==== | ==== Windows ==== | ||
<div class="mw-collapsible-content"> | <div class="mw-collapsible-content"> | ||
| − | ===== | + | =====步骤 1:安装 Android 工具===== |
| − | + | 这个工具是以压缩包的形式提供的。首先,下载这个工具的压缩包,点击这个链接下载[https://dl.radxa.com/tools/windows/AndroidTool_Release_v2.69.zip (AndroidTool_Release_v2.69.zip)]。下载之后解压并完成安装。 | |
| − | ===== | + | =====步骤 2:安装驱动===== |
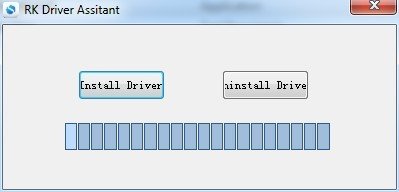
| − | + | 使用RK驱动助手工具来安装驱动。 | |
| − | + | 在此过程中,不需要连接您的Rockchip设备,只需下载压缩包并解压[https://dl.radxa.com/tools/windows/DriverAssitant_v5.0.zip RKDriverAssistant.zip]。 | |
| − | + | 然后双击RKDriverAssistant目录下的DriverInstall.exe,启动工具并点击'''Install Driver'''安装驱动。 | |
| − | + | 如果你已经为其他Rockchip设备安装过Rockchip USB驱动,请先点击 "卸载驱动"。 | |
| − | + | ||
[[File:RK_Driver_Assistant_Install_Uninstall.jpg]] | [[File:RK_Driver_Assistant_Install_Uninstall.jpg]] | ||
| − | |||
| − | |||
</div> | </div> | ||
| Line 39: | Line 34: | ||
==== Linux==== | ==== Linux==== | ||
<div class="mw-collapsible-content"> | <div class="mw-collapsible-content"> | ||
| − | + | 对于Linux,我们从源代码来编译构建'''rkdeveloptool'''工具。 | |
| − | + | 要在基于Debian的Linux发行版上编译rkdeveloptool工具,请按照以下说明操作。 | |
| − | + | ||
| − | + | 安装编译依赖: | |
sudo apt-get install libudev-dev libusb-1.0-0-dev dh-autoreconf | sudo apt-get install libudev-dev libusb-1.0-0-dev dh-autoreconf | ||
| − | + | 克隆源码并编译: | |
git clone https://github.com/rockchip-linux/rkdeveloptool | git clone https://github.com/rockchip-linux/rkdeveloptool | ||
cd rkdeveloptool | cd rkdeveloptool | ||
| Line 53: | Line 47: | ||
make | make | ||
| − | + | 如果你遇到像下面这样的编译错误: | |
./configure: line 4269: syntax error near unexpected token `LIBUSB1,libusb-1.0' | ./configure: line 4269: syntax error near unexpected token `LIBUSB1,libusb-1.0' | ||
./configure: line 4269: `PKG_CHECK_MODULES(LIBUSB1,libusb-1.0)' | ./configure: line 4269: `PKG_CHECK_MODULES(LIBUSB1,libusb-1.0)' | ||
| − | + | 你可以安装 '''pkg-config libusb-1.0''' | |
sudo apt-get install pkg-config libusb-1.0 | sudo apt-get install pkg-config libusb-1.0 | ||
| − | + | 然后重新执行以下操作 | |
autoreconf -i | autoreconf -i | ||
./configure | ./configure | ||
make | make | ||
| − | + | 现在你在当前目录下会有rkdeveloptool的可执行文件,并添加到系统工具中。 | |
sudo cp rkdeveloptool /usr/local/bin/ | sudo cp rkdeveloptool /usr/local/bin/ | ||
</div> | </div> | ||
| Line 74: | Line 68: | ||
==== MacOS ==== | ==== MacOS ==== | ||
<div class="mw-collapsible-content"> | <div class="mw-collapsible-content"> | ||
| − | + | 对于 macOS, 我们从源码来编译redeveloptool工具 | |
| − | + | 为了在macOS上编译rkdeveloptool,你需要安装这个支持包[https://brew.sh/ homebrew]。 | |
| − | + | 安装编译依赖: | |
brew install automake autoconf libusb lsusb | brew install automake autoconf libusb lsusb | ||
| − | + | 克隆源码并编译: | |
git clone https://github.com/rockchip-linux/rkdeveloptool | git clone https://github.com/rockchip-linux/rkdeveloptool | ||
| Line 90: | Line 84: | ||
make | make | ||
| − | + | 如果出现像下面一样的编译错误 | |
./configure: line 4269: syntax error near unexpected token `LIBUSB1,libusb-1.0' | ./configure: line 4269: syntax error near unexpected token `LIBUSB1,libusb-1.0' | ||
./configure: line 4269: `PKG_CHECK_MODULES(LIBUSB1,libusb-1.0)' | ./configure: line 4269: `PKG_CHECK_MODULES(LIBUSB1,libusb-1.0)' | ||
| − | + | 你可以安装 pkg-config libusb-1.0 | |
brew install pkg-config | brew install pkg-config | ||
| − | + | 然后重新编译 | |
autoreconf -i | autoreconf -i | ||
./configure | ./configure | ||
make | make | ||
| − | + | 现在,在当前目录下就会有rkdeveloptool的可执行文件 | |
sudo cp rkdeveloptool /usr/local/bin/ | sudo cp rkdeveloptool /usr/local/bin/ | ||
</div> | </div> | ||
</div> | </div> | ||
| − | === | + | === 引导Rock PI4 进入Maskrom模式 === |
| + | 将ROCK Pi引导到maskrom模式很简单,如下: | ||
| − | + | * 1. 断电 | |
| − | + | ** 拔掉SD卡。 | |
| − | * 1. | + | ** 如果你的rock pi4上有可拆卸的eMMC模块,请将其移除。 |
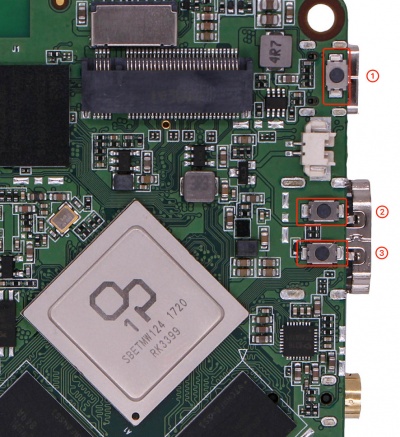
| − | ** | + | ** 如果你的是rock pi4 Plus版本,有焊接的eMMC,则需要按住maskrom键 (1: Maskrom 2: Reset 3: Recovery) |
| − | ** | + | |
| − | ** | + | |
[[File:Rockpi4bplus_key.jpg|400px]] | [[File:Rockpi4bplus_key.jpg|400px]] | ||
| − | * 2. | + | * 2. 用A对A的USB线,连接PC端的USB和ROCK PI4的OTG接口(上面的USB3.0 接口), |
| − | * 3. | + | * 3. 按住Maskrom按键并且给ROCK PI4上电 |
| − | ** 4. | + | ** 4. 对于 Linux/macOS |
| − | + | 在Linux PC端, 使用'''lsusb'''命令可以看到下面的USB设备。 | |
Bus 003 Device 005: ID 2207:330c | Bus 003 Device 005: ID 2207:330c | ||
| − | ** 4. | + | ** 4. 对于 Windows |
| − | + | 在 Windows PC端,打开设备管理器: | |
[[File:RK_Driver_Assistant_Install_Usb_driver.png]] | [[File:RK_Driver_Assistant_Install_Usb_driver.png]] | ||
| − | + | 这就意味着ROCK PI 4已经进入'''maskrom 模式'''. | |
| − | * 5. | + | * 5. 现在插入eMMC模块,并进行下一步的烧写 |
| − | + | 另外,如果你运行的是安卓系统并且可以访问ADB,你可以将设备重启到loader模式'''adb rebootloader''',然后使用rkdeveloptool将设备重置到maskrom模式`'''rkdeveloptool rd 3'''`或者Windows AndroidTool '''Switch'' 按钮来进入maskrom模式。 | |
| − | === | + | === 通过USB烧写镜像到eMMC模块 === |
<div class="toccolours mw-collapsible " style="width:800px; overflow:auto;"> | <div class="toccolours mw-collapsible " style="width:800px; overflow:auto;"> | ||
==== Linux/macOS ==== | ==== Linux/macOS ==== | ||
<div class="mw-collapsible-content"> | <div class="mw-collapsible-content"> | ||
| − | + | 在你的PC端,运行rkdeveloptool工具 | |
rkdeveloptool ld # List the device | rkdeveloptool ld # List the device | ||
DevNo=1 Vid=0x2207,Pid=0x330c,LocationID=305 Maskrom | DevNo=1 Vid=0x2207,Pid=0x330c,LocationID=305 Maskrom | ||
| − | + | loader文件用于启动并初始化RAM,并准备好烧录环境。如果你没有loader的bin文件,可以在[https://dl.radxa.com/rockpi/images/loader/ 这里]下载。 | |
rkdeveloptool db rk3399_loader_vxxxx.bin | rkdeveloptool db rk3399_loader_vxxxx.bin | ||
| − | + | 从'''0'''开始烧写GPT镜像到eMMC | |
rkdeveloptool wl 0 /path/to/rockpi4b-xxx-gpt.img | rkdeveloptool wl 0 /path/to/rockpi4b-xxx-gpt.img | ||
| − | + | 重新启动设备 | |
rkdeveloptool rd | rkdeveloptool rd | ||
| − | + | 现在,设备应该会重新启动eMMC里的新镜像。 | |
| − | + | 请注意,当你想擦除板上的eMMC时,你可以使用这个命令。可以从 [https://dl.radxa.com/rockpi4/images/others/zero.img.gz 这里]下载到zero.img。 | |
rkdeveloptool db rk3399_loader_vxxxx.bin | rkdeveloptool db rk3399_loader_vxxxx.bin | ||
| Line 176: | Line 169: | ||
<div class="mw-collapsible-content"> | <div class="mw-collapsible-content"> | ||
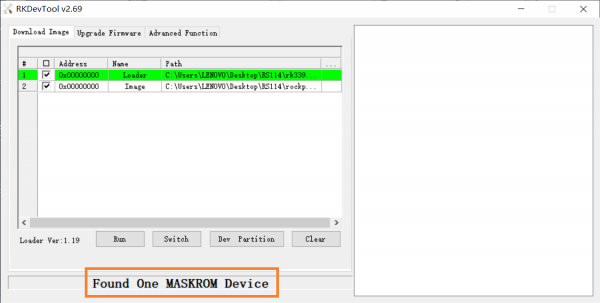
| − | + | 双击 '''AndroidTool.exe''' 会看到下面的界面: | |
| − | + | 如果你的ROCK Pi 4已经进入Maskrom模式并连接上电脑,你可以看到红框里面的字样: | |
[[File:AndroidTool1.PNG | 600px]] | [[File:AndroidTool1.PNG | 600px]] | ||
| − | ===== | + | ===== 步骤 1: 选择 Loader ===== |
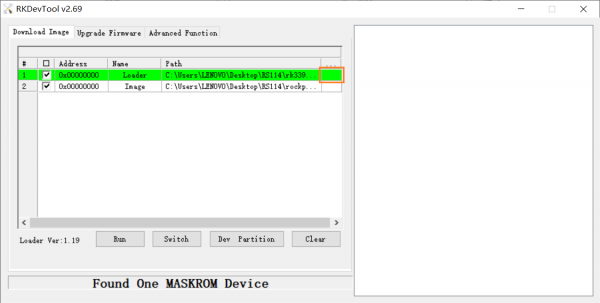
| − | + | 点击下面红框并选择这个"rk3399_ loader_ xxxxx.bin "文件 | |
[[File:AndroidTool8.PNG | 600px]] | [[File:AndroidTool8.PNG | 600px]] | ||
| − | + | 提示:loader用于启动初始化RAM,并准备好烧录环境。如果你没有loader的bin文件,可以在[https://dl.radxa.com/rockpi/images/loader/ 这里]下载。 | |
| + | |||
| − | ===== | + | ===== 步骤 2: 选择镜像 ===== |
| − | + | 点击图片中的右侧最后一列的'''...''',选择你要烧录的镜像 | |
| − | + | 通常情况下,镜像的名字应该以xxx-gpt.img结尾。如果镜像名称以xxx-rkupdate.img结尾,你就不能用这个方法进行烧录。 | |
| − | ===== | + | ===== 步骤 3: 运行 ===== |
| − | + | 点击下面红框中的 "run "按钮,你会看到右边红框中的内容。当进度达到100%时,说明下载就完成了。 | |
[[File:Androidtool5.PNG | 600px]] | [[File:Androidtool5.PNG | 600px]] | ||
| Line 204: | Line 198: | ||
</div> | </div> | ||
| − | === | + | === 按分区进行安装(高级)=== |
<div class="toccolours mw-collapsible mw-collapsed" style="width:800px; overflow:auto;"> | <div class="toccolours mw-collapsible mw-collapsed" style="width:800px; overflow:auto;"> | ||
==== Linux/macOS ==== | ==== Linux/macOS ==== | ||
<div class="mw-collapsible-content"> | <div class="mw-collapsible-content"> | ||
| − | + | 有时我们只想更新镜像的一个分区,比如只更新boot分区,只更新kernel。我们可以通过分区来烧写 | |
<pre> | <pre> | ||
| Line 220: | Line 214: | ||
</pre> | </pre> | ||
| − | + | 当ROCK pi 4处于maskrom模式时,可以根据下面的命令来烧写不同位置的分区 | |
rkdeveloptool db rk3399_loader_*.bin | rkdeveloptool db rk3399_loader_*.bin | ||
| Line 238: | Line 232: | ||
</div> | </div> | ||
| − | === | + | === 常见问题 === |
| − | + | 如果你遇到了类似的问题,你可以试试[https://dl.radxa.com/rockpi/images/loader/ rk3399_loader_v1.20.119.bin]这个bin文件 | |
[[File:error-loader1.png | 500px]] | [[File:error-loader1.png | 500px]] | ||
[[File:error-loader2.png | 500px]] | [[File:error-loader2.png | 500px]] | ||
| − | === | + | === 故障排除 === |
| − | * | + | * 如果你在通过USB OTG烧写时遇到了问题,可以在论坛上发一个新帖子。 https://forum.radxa.com/c/dev |
Revision as of 07:56, 13 September 2021
ROCK Pi 4 > Development > Install from USB OTG port
Rock PI支持Maskrom模式,这是一种CPU等待USB OTG口命令的特殊操作模式。rkdevelopment和AndroidTool是我们在Maskrom模式下用来与Rock PI通信的PC端烧录工具。在Linux/MacOS下使用的是rkdevelopment工具,而在Windows下使用的是AndroidTool工具。
Contents
准备
- ROCK Pi 4 主板
- eMMC 模块
- 电源适配器
- USB A对A 的数据线 (参考).
安装工具以及驱动
Windows
步骤 1:安装 Android 工具
这个工具是以压缩包的形式提供的。首先,下载这个工具的压缩包,点击这个链接下载(AndroidTool_Release_v2.69.zip)。下载之后解压并完成安装。
步骤 2:安装驱动
使用RK驱动助手工具来安装驱动。 在此过程中,不需要连接您的Rockchip设备,只需下载压缩包并解压RKDriverAssistant.zip。 然后双击RKDriverAssistant目录下的DriverInstall.exe,启动工具并点击Install Driver安装驱动。 如果你已经为其他Rockchip设备安装过Rockchip USB驱动,请先点击 "卸载驱动"。
Linux
对于Linux,我们从源代码来编译构建rkdeveloptool工具。 要在基于Debian的Linux发行版上编译rkdeveloptool工具,请按照以下说明操作。
安装编译依赖:
sudo apt-get install libudev-dev libusb-1.0-0-dev dh-autoreconf
克隆源码并编译:
 git clone https://github.com/rockchip-linux/rkdeveloptool
 cd rkdeveloptool
 autoreconf -i
 ./configure
 make
如果你遇到像下面这样的编译错误:
   ./configure: line 4269: syntax error near unexpected token `LIBUSB1,libusb-1.0'
   ./configure: line 4269: `PKG_CHECK_MODULES(LIBUSB1,libusb-1.0)'
你可以安装 pkg-config libusb-1.0
sudo apt-get install pkg-config libusb-1.0
然后重新执行以下操作
   autoreconf -i
   ./configure
   make
现在你在当前目录下会有rkdeveloptool的可执行文件,并添加到系统工具中。
sudo cp rkdeveloptool /usr/local/bin/
MacOS
对于 macOS, 我们从源码来编译redeveloptool工具
为了在macOS上编译rkdeveloptool,你需要安装这个支持包homebrew。
安装编译依赖:
brew install automake autoconf libusb lsusb
克隆源码并编译:
   git clone https://github.com/rockchip-linux/rkdeveloptool
   cd rkdeveloptool
   autoreconf -i
   ./configure
   make
如果出现像下面一样的编译错误
   ./configure: line 4269: syntax error near unexpected token `LIBUSB1,libusb-1.0'
   ./configure: line 4269: `PKG_CHECK_MODULES(LIBUSB1,libusb-1.0)'
你可以安装 pkg-config libusb-1.0
brew install pkg-config
然后重新编译
   autoreconf -i
   ./configure
   make
现在,在当前目录下就会有rkdeveloptool的可执行文件
sudo cp rkdeveloptool /usr/local/bin/
引导Rock PI4 进入Maskrom模式
将ROCK Pi引导到maskrom模式很简单,如下:
- 1. 断电
- 拔掉SD卡。
- 如果你的rock pi4上有可拆卸的eMMC模块,请将其移除。
- 如果你的是rock pi4 Plus版本,有焊接的eMMC,则需要按住maskrom键 (1: Maskrom 2: Reset 3: Recovery)
- 2. 用A对A的USB线,连接PC端的USB和ROCK PI4的OTG接口(上面的USB3.0 接口),
- 3. 按住Maskrom按键并且给ROCK PI4上电
- 4. 对于 Linux/macOS
在Linux PC端, 使用lsusb命令可以看到下面的USB设备。
Bus 003 Device 005: ID 2207:330c
- 4. 对于 Windows
在 Windows PC端,打开设备管理器:
这就意味着ROCK PI 4已经进入maskrom 模式.
- 5. 现在插入eMMC模块,并进行下一步的烧写
另外,如果你运行的是安卓系统并且可以访问ADB,你可以将设备重启到loader模式adb rebootloader,然后使用rkdeveloptool将设备重置到maskrom模式`rkdeveloptool rd 3'`或者Windows AndroidTool Switch 按钮来进入maskrom模式。
通过USB烧写镜像到eMMC模块
Linux/macOS
在你的PC端,运行rkdeveloptool工具
   rkdeveloptool ld        # List the device
   DevNo=1	Vid=0x2207,Pid=0x330c,LocationID=305	Maskrom
loader文件用于启动并初始化RAM,并准备好烧录环境。如果你没有loader的bin文件,可以在这里下载。
rkdeveloptool db rk3399_loader_vxxxx.bin
从0开始烧写GPT镜像到eMMC
rkdeveloptool wl 0 /path/to/rockpi4b-xxx-gpt.img
重新启动设备
rkdeveloptool rd
现在,设备应该会重新启动eMMC里的新镜像。
请注意,当你想擦除板上的eMMC时,你可以使用这个命令。可以从 这里下载到zero.img。
   rkdeveloptool db rk3399_loader_vxxxx.bin
   rkdeveloptool wl 0 zero.img
Windows
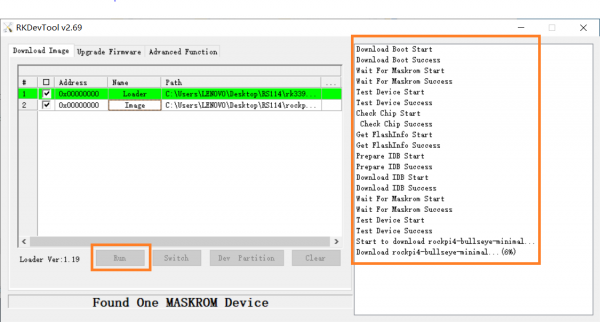
双击 AndroidTool.exe 会看到下面的界面: 如果你的ROCK Pi 4已经进入Maskrom模式并连接上电脑,你可以看到红框里面的字样:
步骤 1: 选择 Loader
点击下面红框并选择这个"rk3399_ loader_ xxxxx.bin "文件
提示:loader用于启动初始化RAM,并准备好烧录环境。如果你没有loader的bin文件,可以在这里下载。
步骤 2: 选择镜像
点击图片中的右侧最后一列的...,选择你要烧录的镜像
通常情况下,镜像的名字应该以xxx-gpt.img结尾。如果镜像名称以xxx-rkupdate.img结尾,你就不能用这个方法进行烧录。
步骤 3: 运行
点击下面红框中的 "run "按钮,你会看到右边红框中的内容。当进度达到100%时,说明下载就完成了。
按分区进行安装(高级)
Linux/macOS
有时我们只想更新镜像的一个分区,比如只更新boot分区,只更新kernel。我们可以通过分区来烧写
| Part Number | Offset | Name    | Description                |
| ----------- | ------ | ------- | -------------------------- |
| 1           | 32KB   | loader1 | First stage loader         |
| 2           | 8MB    | loader2 | U-boot image               |
| 3           | 12MB   | trust   | ATF                        |
| 4           | 16MB   | boot    | Kernel partition, bootable |
| 5           | 128MB  | rootfs  | Rootfs                     |
当ROCK pi 4处于maskrom模式时,可以根据下面的命令来烧写不同位置的分区
   rkdeveloptool db rk3399_loader_*.bin
   rkdeveloptool wl 64 idbloader.img
   rkdeveloptool wl 16384 uboot.img
   rkdeveloptool wl 24576 trust.img
   rkdeveloptool wl 32768 boot.img
   rkdeveloptool wl 262144 rootfs.img
Windows
TBD.
常见问题
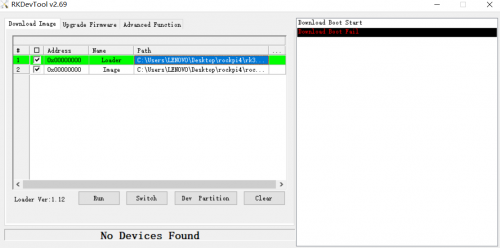
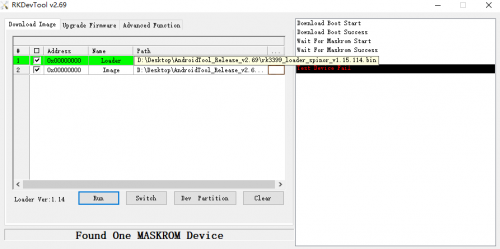
如果你遇到了类似的问题,你可以试试rk3399_loader_v1.20.119.bin这个bin文件
故障排除
- 如果你在通过USB OTG烧写时遇到了问题,可以在论坛上发一个新帖子。 https://forum.radxa.com/c/dev

