Difference between revisions of "Rock3/installusb-install-radxa-cm3-io"
(Created page with "{{rock3_header}} {{Languages|rock3/install/microSD}} ROCK 3 > Installation > rock3/install/usb-install | Install to eMMC from USB port...") |
|||
| Line 1: | Line 1: | ||
{{rock3_header}} | {{rock3_header}} | ||
| − | {{Languages|rock3/install | + | {{Languages|rock3/installusb-install-radxa-cm3-io}} |
| − | [[rock3 | ROCK 3]] > [[rock3/install | Installation]] > [[rock3/ | + | [[rock3 | ROCK 3]] > [[rock3/install | Installation]] > [[rock3/installusb-install-radxa-cm3-io | Install Image to eMMC from USB port (Radxa CM3 IO) ]] |
| − | === Install | + | === Install Image to eMMC from USB port (Radxa CM3 IO) === |
Radxa CM3 IO supports Maskrom mode, which is a special operation mode for CPU to wait for USB OTG port command. | Radxa CM3 IO supports Maskrom mode, which is a special operation mode for CPU to wait for USB OTG port command. | ||
| − | The PC tools we use to communicate with Radxa cm3 io in Maskrom mode are the '''rkdeveloptool''' and '''RKDevTool'''. | + | The PC tools we use to communicate with Radxa cm3 io in Maskrom mode are the '''rkdeveloptool on linux/macOS PC''' and '''RKDevTool on Windows PC'''. |
| − | + | ||
=== Requirement === | === Requirement === | ||
* Radxa CM3 IO (with Radxa CM3 ) | * Radxa CM3 IO (with Radxa CM3 ) | ||
| − | * | + | * DC 12V power adapter |
| − | * USB Male A to Micro | + | * USB Male A to Micro USB cable |
| + | * Radxa CM3 IO system image: [https://github.com/radxa/debos-radxa/releases Radxa CM3 IO Github Release] | ||
| + | * RK356X loader: [https://dl.radxa.com/rock3/images/loader/rock-3a/rk356x_spl_loader_ddr1056_v1.10.111.bin rk356x_spl_loader_ddr1056_v1.10.111.bin] | ||
=== Install Tools&Drivers === | === Install Tools&Drivers === | ||
| − | |||
Please check this guide, [[rock3/install/rockchip-flash-tools | Install rockchip flash tools under Windows/Linux/MacOS PC]]. | Please check this guide, [[rock3/install/rockchip-flash-tools | Install rockchip flash tools under Windows/Linux/MacOS PC]]. | ||
| − | === Boot the | + | === Boot the Board to Maskrom Mode === |
| − | + | ||
To boot Radxa CM3 IO into maskrom mode is simple: | To boot Radxa CM3 IO into maskrom mode is simple: | ||
| − | |||
* Power off the board | * Power off the board | ||
| − | * | + | * Remove microSD card |
| − | * Plug the USB Male A to Micro USB cable to Radxa CM3 IO | + | * Plug the USB Male A to Micro USB cable to Radxa CM3 IO OTG port(see the following picture), the other side to PC |
[[File:Cm3 io micro usb.jpeg | 400px]] | [[File:Cm3 io micro usb.jpeg | 400px]] | ||
| − | * Press and hold the golden button (see | + | * Press and hold the golden button (see the following picture) |
[[File:Cm3-io-key.jpeg | 400px]] | [[File:Cm3-io-key.jpeg | 400px]] | ||
| − | * | + | * Plug in DC 12V power adapter |
| − | * | + | * Check usb device |
** For Linux/macOS: lsusb result: '''Bus 001 Device 112: ID 2207:350a Fuzhou Rockchip Electronics Company''' | ** For Linux/macOS: lsusb result: '''Bus 001 Device 112: ID 2207:350a Fuzhou Rockchip Electronics Company''' | ||
Alternatively, if you are running Android and can access ADB, you can reboot the device to loader mode 'adb reboot bootloader' then use the rkdeveloptool to reset the device into maskrom mode 'rkdeveloptool rd 3' or Windows RKDevTool '''Switch''' button to go to maskrom mode. | Alternatively, if you are running Android and can access ADB, you can reboot the device to loader mode 'adb reboot bootloader' then use the rkdeveloptool to reset the device into maskrom mode 'rkdeveloptool rd 3' or Windows RKDevTool '''Switch''' button to go to maskrom mode. | ||
| − | === | + | === Flash Images to eMMC on Board === |
| − | ==== Linux/macOS ==== | + | ==== On Linux/macOS PC ==== |
| − | + | Make sure that board is in Maskrom mode. Run rkdeveloptool | |
rkdeveloptool ld | rkdeveloptool ld | ||
DevNo=1 Vid=0x2207,Pid=0x350a,LocationID=104 Maskrom | DevNo=1 Vid=0x2207,Pid=0x350a,LocationID=104 Maskrom | ||
| − | Download the loader (flash helper) to init the ram and prepare the flashing environment etc. If you don't have it, you can download it from | + | Download the loader (flash helper) to init the ram and prepare the flashing environment etc. If you don't have it, you can download it from here |
| − | + | rkdeveloptool db rk356x_spl_loader_ddr1056_v1.10.111.bin | |
| − | Write the GPT image to eMMC, start to write from offset | + | Write the GPT image to eMMC, start to write from offset 0. For example. |
| − | For example. | + | |
| − | + | rkdeveloptool wl 0 /path/to/radxa-cm3-io-xxx-gpt.img | |
Reboot the device | Reboot the device | ||
| − | + | rkdeveloptool rd | |
| − | |||
| − | + | ==== On Windows PC ==== | |
| + | |||
| + | |||
| + | === Erase eMMC on Board === | ||
| + | |||
| + | ==== On Linux/macOS PC ==== | ||
| + | |||
| + | Make sure that board is in Maskrom mode. Run rkdeveloptool | ||
| + | |||
| + | rkdeveloptool ld | ||
| + | DevNo=1 Vid=0x2207,Pid=0x350a,LocationID=104 Maskrom | ||
| + | |||
| + | Create zero.img | ||
| + | |||
| + | dd if=/dev/zero of=./zero.img bs=1024 count=16000 | ||
| + | |||
| + | Erase eMMC | ||
rkdeveloptool db rk356x_spl_loader_ddr1056_v1.10.111.bin | rkdeveloptool db rk356x_spl_loader_ddr1056_v1.10.111.bin | ||
rkdeveloptool wl 0 zero.img | rkdeveloptool wl 0 zero.img | ||
| + | rkdeveloptool rd | ||
| + | |||
| + | ==== On Windows PC ==== | ||
| + | |||
| + | |||
| + | |||
=== Troubleshooting === | === Troubleshooting === | ||
* If you have issue with flashing via USB OTG, start a new post on the forum, https://forum.radxa.com/c/rock3. | * If you have issue with flashing via USB OTG, start a new post on the forum, https://forum.radxa.com/c/rock3. | ||
Revision as of 07:22, 17 February 2022
ROCK 3 > Installation > Install Image to eMMC from USB port (Radxa CM3 IO)
Contents
Install Image to eMMC from USB port (Radxa CM3 IO)
Radxa CM3 IO supports Maskrom mode, which is a special operation mode for CPU to wait for USB OTG port command. The PC tools we use to communicate with Radxa cm3 io in Maskrom mode are the rkdeveloptool on linux/macOS PC and RKDevTool on Windows PC.
Requirement
- Radxa CM3 IO (with Radxa CM3 )
- DC 12V power adapter
- USB Male A to Micro USB cable
- Radxa CM3 IO system image: Radxa CM3 IO Github Release
- RK356X loader: rk356x_spl_loader_ddr1056_v1.10.111.bin
Install Tools&Drivers
Please check this guide, Install rockchip flash tools under Windows/Linux/MacOS PC.
Boot the Board to Maskrom Mode
To boot Radxa CM3 IO into maskrom mode is simple:
- Power off the board
- Remove microSD card
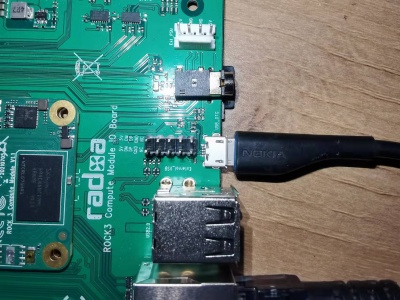
- Plug the USB Male A to Micro USB cable to Radxa CM3 IO OTG port(see the following picture), the other side to PC
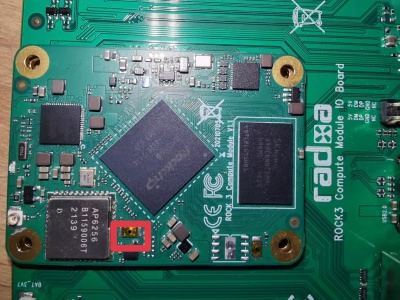
- Press and hold the golden button (see the following picture)
- Plug in DC 12V power adapter
- Check usb device
- For Linux/macOS: lsusb result: Bus 001 Device 112: ID 2207:350a Fuzhou Rockchip Electronics Company
Alternatively, if you are running Android and can access ADB, you can reboot the device to loader mode 'adb reboot bootloader' then use the rkdeveloptool to reset the device into maskrom mode 'rkdeveloptool rd 3' or Windows RKDevTool Switch button to go to maskrom mode.
Flash Images to eMMC on Board
On Linux/macOS PC
Make sure that board is in Maskrom mode. Run rkdeveloptool
 rkdeveloptool ld
 DevNo=1	Vid=0x2207,Pid=0x350a,LocationID=104	Maskrom
Download the loader (flash helper) to init the ram and prepare the flashing environment etc. If you don't have it, you can download it from here
rkdeveloptool db rk356x_spl_loader_ddr1056_v1.10.111.bin
Write the GPT image to eMMC, start to write from offset 0. For example.
rkdeveloptool wl 0 /path/to/radxa-cm3-io-xxx-gpt.img
Reboot the device
rkdeveloptool rd
On Windows PC
Erase eMMC on Board
On Linux/macOS PC
Make sure that board is in Maskrom mode. Run rkdeveloptool
 rkdeveloptool ld
 DevNo=1	Vid=0x2207,Pid=0x350a,LocationID=104	Maskrom
Create zero.img
dd if=/dev/zero of=./zero.img bs=1024 count=16000
Erase eMMC
 rkdeveloptool db rk356x_spl_loader_ddr1056_v1.10.111.bin
 rkdeveloptool wl 0 zero.img
 rkdeveloptool rd
On Windows PC
Troubleshooting
- If you have issue with flashing via USB OTG, start a new post on the forum, https://forum.radxa.com/c/rock3.


