Difference between revisions of "Rock3/CM3/IO/getting started"
(Created page with "{{rock3_header}} {{Languages|rock3/cm3/IO}} ROCK 3 > Compute Module 3 > Radxa CM3 IO Board > Rock3/CM3/IO/getting_started...") |
|||
| Line 3: | Line 3: | ||
[[rock3 | ROCK 3]] > [[rock3/CM3 | Compute Module 3]] > [[Rock3/CM3/IO | Radxa CM3 IO Board]] > [[Rock3/CM3/IO/getting_started | Getting started]] | [[rock3 | ROCK 3]] > [[rock3/CM3 | Compute Module 3]] > [[Rock3/CM3/IO | Radxa CM3 IO Board]] > [[Rock3/CM3/IO/getting_started | Getting started]] | ||
| + | |||
| + | == Introduction == | ||
| + | |||
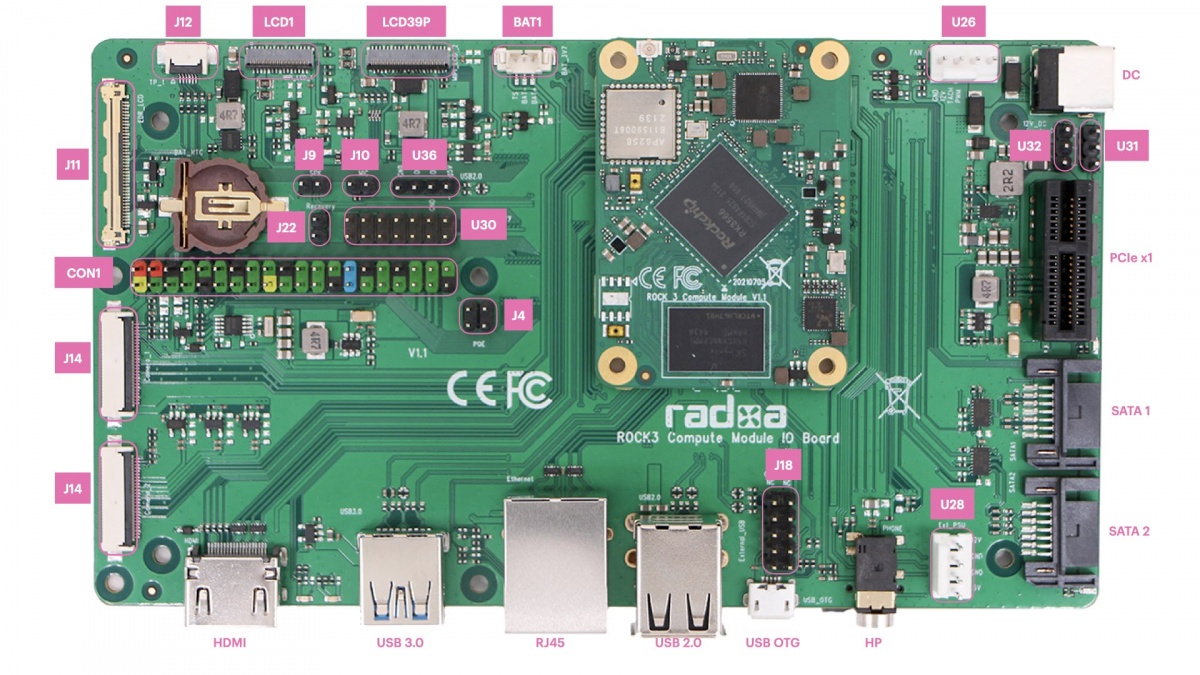
| + | This guide is written for using Radxa CM3 SoM with the CM3 IO board. The purpose is to learn the details of the boards as well as how to prepare and set up for basic use. | ||
| + | |||
| + | == Overview == | ||
| + | |||
| + | [[File:Cm3_io_label.jpg | 1200px]] | ||
| + | |||
| + | == What you need == | ||
| + | |||
| + | === Necessary === | ||
| + | * CM3(any variant) + CM3 IO board | ||
| + | |||
| + | * If the CM3 doesn't have eMMC, a micro SD card larger than 8GB is required for OS | ||
| + | |||
| + | * Power supply | ||
| + | ** The main PSU input (DC) is a 2.1mm DC tip positive +12V input. | ||
| + | |||
| + | * Monitor and HDMI Cable | ||
| + | ** CM3 IO board is equipped with a full sized HDMI connector. HDMI capable monitor is recommended. | ||
| + | ** HDMI EDID display data is used to determine the best display resolution. On monitors and TVs that support 1080p (or 4K) this resolution will be selected. If 1080p is not supported the next available resolution reported by EDID will be used. This selected mode will work with MOST but not all monitors/TVs. | ||
| + | |||
| + | *USB to TTL serial cable | ||
| + | **CM3 IO board exports a dedicated serial console for CPU, which can access the low level debug message. | ||
| + | |||
| + | *Micro USB cable | ||
| + | **If you want write image to CM3 eMMC from USB OTG port or use fastboot/adb commands you need a micro USB cable to connect CM3 IO board and PC. | ||
Revision as of 09:44, 18 January 2022
ROCK 3 > Compute Module 3 > Radxa CM3 IO Board > Getting started
Introduction
This guide is written for using Radxa CM3 SoM with the CM3 IO board. The purpose is to learn the details of the boards as well as how to prepare and set up for basic use.
Overview
What you need
Necessary
- CM3(any variant) + CM3 IO board
- If the CM3 doesn't have eMMC, a micro SD card larger than 8GB is required for OS
- Power supply
- The main PSU input (DC) is a 2.1mm DC tip positive +12V input.
- Monitor and HDMI Cable
- CM3 IO board is equipped with a full sized HDMI connector. HDMI capable monitor is recommended.
- HDMI EDID display data is used to determine the best display resolution. On monitors and TVs that support 1080p (or 4K) this resolution will be selected. If 1080p is not supported the next available resolution reported by EDID will be used. This selected mode will work with MOST but not all monitors/TVs.
- USB to TTL serial cable
- CM3 IO board exports a dedicated serial console for CPU, which can access the low level debug message.
- Micro USB cable
- If you want write image to CM3 eMMC from USB OTG port or use fastboot/adb commands you need a micro USB cable to connect CM3 IO board and PC.

