Difference between revisions of "Rockpi4/Core/Fuhai"
(→2. Get System Image) |
|||
| Line 73: | Line 73: | ||
* See [https://github.com/radxa/rock-pi-4-images-released/releases Fuhai Ubuntu/Debian] | * See [https://github.com/radxa/rock-pi-4-images-released/releases Fuhai Ubuntu/Debian] | ||
| + | * See [https://github.com/radxa/manifests/releases Fuhai Android] | ||
=== 3. Flash System Image === | === 3. Flash System Image === | ||
Revision as of 10:02, 26 October 2021
ROCK Pi 4 > ROCK Pi 4 Core SoM > Fuhai EVB
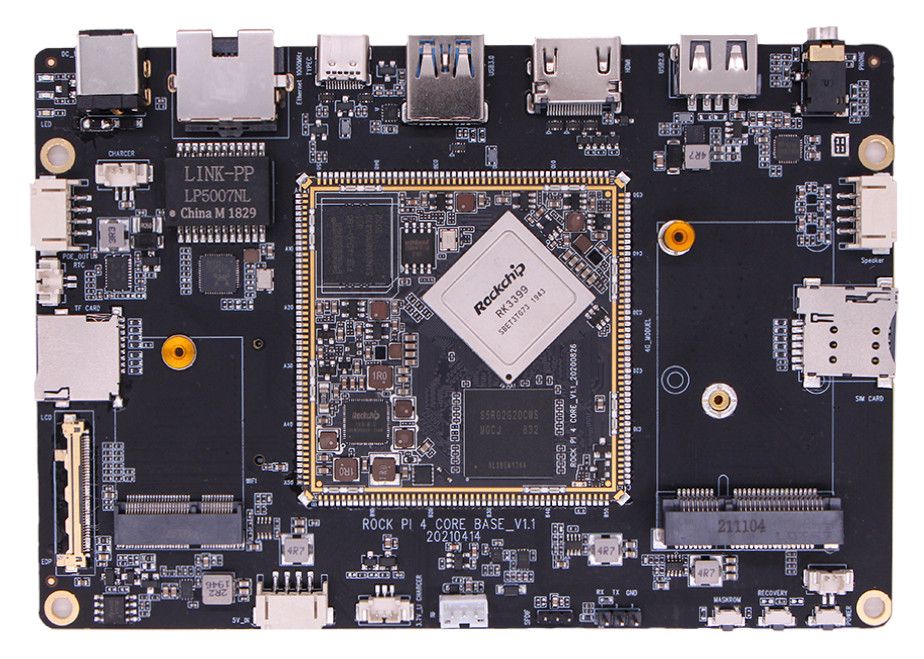
Fuhai EVB
Features
| SoC | Rockchip RK3399 |
| CPU | Dual Cortex-A72@1.8GHz, Quad Cortext-A35@1.4GHz |
| GPU | Mali T860MP4 |
| RAM | 4GB LPDDR4 |
| Storage | - 32GB eMMC - 1x SD card slot - 1x M.2 M Key for NVMe SSD |
| Dispaly | - 1x HDMI up to 4K x 2K@60HZ - 1x eDP four lanes, up to 4Kx2K@60 - 1x MIPI four lanes up to 1920x1080@60 - 1x USB C, support DP Alt mode up to 4K x 2K@60HZ |
| Touch | 6P connector for I2C touch panel |
| Audio | - 3.5mm headphone jack with mic in - 1x 4P speaker connector |
| Wireless | - 1x M.2 E Key for sdio+uart WiFi module - 1x Mini PCIe for 4G LET module |
| Ethernet | 1000M Ethernet with optional PoE support |
| USB | - 1x full function USB C - 1x USB HOST 3.0 - 1x USB HOST 2.0 |
| Camera | 2x MIPI CSI, dual ISP, 1x max 13Mpx sensor or 2x 8M sensor |
| Battery | Support 3.7V lion battery |
| Power | 12V/2A |
| Operation Temperature | 0~80 degree, optional wider temperature range RK3399K |
| Dimension | |
| Form Factor | 3.5 inch slim SBC |
| Size | 150 * 100 |
| PCB Layer | 6 layers |
Fuhai Hardware Revisions
V1.1
Getting Started
1. Essential Things
- ROCK Pi 4 Core and Fuhai board
- Power supply
- DC 12V Adapter
- USB to TTL serial cable
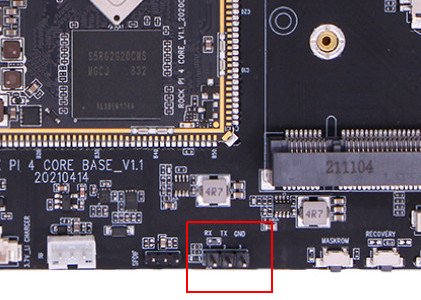
- Fuhai exports a dedicated serial console, which can access the low level debug message.
- USB Male A to Male C cable
- If you want write image to Fuhai from USB OTG port or use fastboot/adb commands, you need an USB Male A to Male C cable to connect Fuhai and PC.
2. Get System Image
- See Fuhai Ubuntu/Debian
- See Fuhai Android
3. Flash System Image
eMMC is on board. Now we introduce one method of install image to eMMC.
3.1. Method of installation on eMMC
3.1.1 Boot Fuhai to Maskrom mode
- Plug DC 12V Adapter to turn on the Green Power Led.
- Keep pressing Maskrom Key.
- Plug one USB Male A to Male C cable, which also connect to PC, to Type-C port. You would see Red LED becomes red.
- Release Maskrom Key
3.1.2. Use rkdeveloptool to flash image
Please refer to Install from USB OTG port.
4. Power on Fuhai
4.1. Method one
- Step 1: Plug in the DC 12V adapter and make sure the Green LED is on.
- Step 2: keep pressing Power key until Red LED is on.
4.2. Method two
- Step 1: Plug in the DC 12V adapter and make sure the Green LED is on.
- Step 2: Plug one USB Male A to Male C cable, which also connect to PC, to Type-C port. Make sure Red LED becomes red.
5. Access from the Host PC/Laptop
Option 1: Serial Console
See the serial console port.
The baud rate of serial console is 1500000(8N1). As for the serial tool setting, refer to Serial Console.
6. LED
Fuhai has Power LED and User LED.
- Power LED
- The steady Green LED on carrier board indicates that the DC 12V adapter is plugged in.
- The flashing Red LED on carrier board indicates that the carrier board is given power.
- User LED
- The flashing Green LED on SoM board indicates that kernel is running.


