Difference between revisions of "Rock3/install/spi"
(→Option two: Update U-Boot images to SPI Nor Flash) |
RadxaYuntian (Talk | contribs) (→Option three: Erase SPI Nor Flash) |
||
| (4 intermediate revisions by 4 users not shown) | |||
| Line 42: | Line 42: | ||
=== Get RK356X loader and U-Boot images === | === Get RK356X loader and U-Boot images === | ||
* [https://dl.radxa.com/rock3/images/loader/rock-3a/rk356x_spl_loader_ddr1056_v1.10.111.bin RK356X loader] | * [https://dl.radxa.com/rock3/images/loader/rock-3a/rk356x_spl_loader_ddr1056_v1.10.111.bin RK356X loader] | ||
| − | * [https://dl.radxa.com/rock3/images/loader/rock-3a/idbloader.img ROCK 3A idbloader] | + | * [https://dl.radxa.com/rock3/images/loader/rock-3a/rock-3a-idbloader-gef9f6b1caad.img ROCK 3A idbloader] |
| − | * [https://dl.radxa.com/rock3/images/loader/rock-3a/u-boot.itb ROCK 3A u-boot.itb] | + | * [https://dl.radxa.com/rock3/images/loader/rock-3a/rock-3a-u-boot-gef9f6b1caad.itb ROCK 3A u-boot.itb] |
=== Create GPT U-Boot image === | === Create GPT U-Boot image === | ||
| Line 60: | Line 60: | ||
dd if=./idbloader.img of=spi_image.img seek=64 conv=notrunc | dd if=./idbloader.img of=spi_image.img seek=64 conv=notrunc | ||
dd if=./u-boot.itb of=spi_image.img seek=16384 conv=notrunc | dd if=./u-boot.itb of=spi_image.img seek=16384 conv=notrunc | ||
| + | |||
| + | There is an image made by the above commands using the u-boot file from [https://dl.radxa.com/rock3/images/loader/rock-3a/rock-3a-spi-image-gef9f6b1caad.img ROCK 3A SPI image]. You can unzip it to use in the following step. | ||
=== Write U-Boot images to SPI Nor Flash or erase SPI Nor Flash === | === Write U-Boot images to SPI Nor Flash or erase SPI Nor Flash === | ||
| Line 89: | Line 91: | ||
===== Option two: Update U-Boot images to SPI Nor Flash by partitions ===== | ===== Option two: Update U-Boot images to SPI Nor Flash by partitions ===== | ||
| + | |||
| + | There is no need to write the whole uboot image to SPI Nor Flash if you have already done that before. You can just update the idbloader.img and u-boot.itb to prevent overwriting the saved mac address in SPI Nor Flash. | ||
On PC, run command rkdeveloptool. | On PC, run command rkdeveloptool. | ||
| Line 114: | Line 118: | ||
===== Option three: Erase SPI Nor Flash ===== | ===== Option three: Erase SPI Nor Flash ===== | ||
| − | Please notice that when you want to erase SPI Nor Flash, | + | Please notice that when you want to erase SPI Nor Flash, run following commands. |
rkdeveloptool db rk356x_spl_loader_ddr1056_v1.10.111.bin | rkdeveloptool db rk356x_spl_loader_ddr1056_v1.10.111.bin | ||
| − | rkdeveloptool | + | rkdeveloptool ef |
rkdeveloptool rd | rkdeveloptool rd | ||
| Line 147: | Line 151: | ||
===== Option two: Update U-Boot images to SPI Nor Flash by partitions ===== | ===== Option two: Update U-Boot images to SPI Nor Flash by partitions ===== | ||
| + | |||
| + | There is no need to write the whole uboot image to SPI Nor Flash if you have already done that before. You can just update the idbloader.img and u-boot.itb to prevent overwriting the saved mac address in SPI Nor Flash. | ||
Double click the '''RKDevTool.exe''' and click button '''Download Image'''. | Double click the '''RKDevTool.exe''' and click button '''Download Image'''. | ||
| Line 197: | Line 203: | ||
Erasing job is done. | Erasing job is done. | ||
| + | |||
| + | === RK3568 SB-variant === | ||
| + | |||
| + | Due to the version difference of the RK3568 chip, it may fail to burn the image to EMMC in MASKROM mode. If you find that your ROCK 3A cannot burn the image to EMMC through MASKROM mode, you need to use a specific loader to burn it [https://dl.radxa.com/rock3/images/loader/rk356x_spl_loader_ddr1056_v1.12.109_no_check_todly.bin rk356x_spl_loader_ddr1056_v1.12.109_no_check_todly.bin] | ||
| + | more information on forum: https://forum.radxa.com/t/radxa-rock-3-model-a-maskrom-mode-cannot-burn-the-image-to-emmc-solution/11373 | ||
=== Troubleshooting === | === Troubleshooting === | ||
* If you have issue with flashing via USB OTG, start a new post on the forum, https://forum.radxa.com/c/rock3. | * If you have issue with flashing via USB OTG, start a new post on the forum, https://forum.radxa.com/c/rock3. | ||
Latest revision as of 08:51, 20 March 2023
ROCK 3 > Installation > Install the image to SPI Nor Flash
Contents
- 1 Install the image to SPI Nor Flash from USB port
- 1.1 Requirement
- 1.2 Install Tools&Drivers
- 1.3 Boot the board to maskrom mode
- 1.4 Get RK356X loader and U-Boot images
- 1.5 Create GPT U-Boot image
- 1.6 Write U-Boot images to SPI Nor Flash or erase SPI Nor Flash
- 1.7 RK3568 SB-variant
- 1.8 Troubleshooting
Install the image to SPI Nor Flash from USB port
ROCK 3 supports Maskrom mode, which is a special operation mode for CPU to wait for USB OTG port command. The Linux/macOS PC tool we use to communicate with ROCK 3 in Maskrom mode are the rkdeveloptool and RKDevTool. We use tool rkdeveloptool in Linux/macOS and RKDevTool tool under Windows.
Available boards:
- ROCK 3A
Here we do the test on ROCK 3A.
Requirement
- ROCK 3A with SPI Nor Flash (You can find SPI Nor Flash from ROCK 3 Model A Main Board)
- Power adapter
- USB Male A to Male A cable(important) USB-C has been seen as not working, an adaptor for USB-C to USB-A has worked. See discussion.
Install Tools&Drivers
Please check this guide, Install rockchip flash tools under Windows/Linux/MacOS PC.
Boot the board to maskrom mode
To boot ROCK 3A into maskrom mode is simple:
- Power off the board
- Remove bootable devices like microSD card, eMMC module, etc
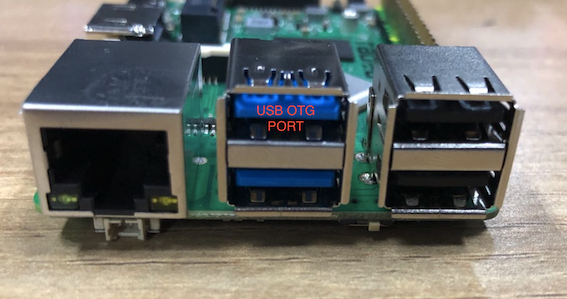
- Plug the USB Male A to Male A cable to ROCK 3A OTG port(the upper USB3.0 port), the other side to PC
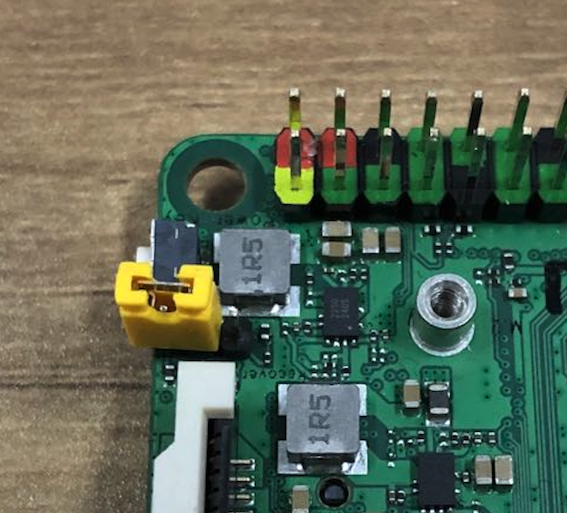
- Short-circuit the following pins. See the left yellow hat.
- Power on the board
- Take off the yellow hat.
- Check usb device
- For macOS host: lsusb result: Bus 000 Device 004: ID 2207:350a Fuzhou Rockchip Electronics Co., Ltd. Composite Device
- For Linux host: lsusb result: Bus 001 Device 112: ID 2207:350a Fuzhou Rockchip Electronics Company
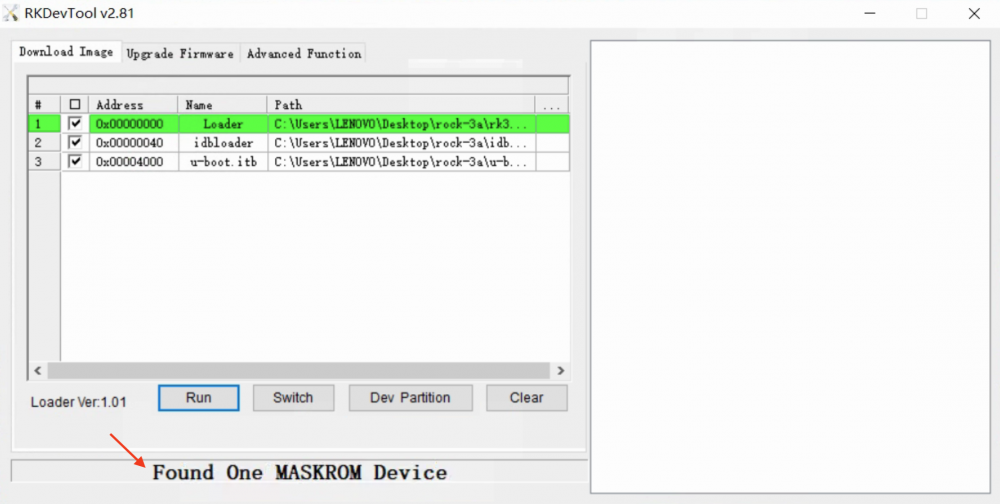
- For Windows host: Open RKDevTool and you would see the device is in Found One MASKROM Device.
Alternatively, if you are running Android and can access ADB, you can reboot the device to loader mode 'adb reboot bootloader' then use the rkdeveloptool to reset the device into maskrom mode 'rkdeveloptool rd 3' or Windows RKDevTool Switch button to go to maskrom mode.
Get RK356X loader and U-Boot images
Create GPT U-Boot image
To avoid random mac address after every reboot, it is recommended to create a 16MB size gpt uboot image which contains idbloader.img and u-boot.itb. Use these command on Linux to create the image:
dd if=/dev/zero of=spi_image.img bs=1M count=0 seek=16
/usr/sbin/parted -s spi_image.img mklabel gpt
/usr/sbin/parted -s spi_image.img unit s mkpart idbloader 64 7167
/usr/sbin/parted -s spi_image.img unit s mkpart vnvm 7168 7679
/usr/sbin/parted -s spi_image.img unit s mkpart reserved_space 7680 8063
/usr/sbin/parted -s spi_image.img unit s mkpart reserved1 8064 8127
/usr/sbin/parted -s spi_image.img unit s mkpart uboot_env 8128 8191
/usr/sbin/parted -s spi_image.img unit s mkpart reserved2 8192 16383
/usr/sbin/parted -s spi_image.img unit s mkpart uboot 16384 32734
dd if=./idbloader.img of=spi_image.img seek=64 conv=notrunc
dd if=./u-boot.itb of=spi_image.img seek=16384 conv=notrunc
There is an image made by the above commands using the u-boot file from ROCK 3A SPI image. You can unzip it to use in the following step.
Write U-Boot images to SPI Nor Flash or erase SPI Nor Flash
Linux/macOS PC
Option one: Write U-Boot images to SPI Nor Flash
On PC, run command rkdeveloptool.
Confirm that ROCK 3A is in maskrom mode.
rkdeveloptool ld
DevNo=1	Vid=0x2207,Pid=0x350a,LocationID=104	Maskrom
Download the loader (flash helper) to init the ram and prepare the flashing environment etc.
rkdeveloptool db rk356x_spl_loader_ddr1056_v1.10.111.bin
Write bootloader
rkdeveloptool wl 0 spi_image.img
Reboot the device
rkdeveloptool rd
Now the device should boot on SPI Nor Flash. And the blue led is on.
Option two: Update U-Boot images to SPI Nor Flash by partitions
There is no need to write the whole uboot image to SPI Nor Flash if you have already done that before. You can just update the idbloader.img and u-boot.itb to prevent overwriting the saved mac address in SPI Nor Flash.
On PC, run command rkdeveloptool.
Confirm that ROCK 3A is in maskrom mode.
rkdeveloptool ld
DevNo=1	Vid=0x2207,Pid=0x350a,LocationID=104	Maskrom
Download the loader (flash helper) to init the ram and prepare the flashing environment etc.
rkdeveloptool db rk356x_spl_loader_ddr1056_v1.10.111.bin
Write bootloader
rkdeveloptool wl 64 idbloader.img
rkdeveloptool wl 16384 u-boot.itb
Reboot the device
rkdeveloptool rd
Now the device should boot on SPI Nor Flash. And the blue led is on.
Option three: Erase SPI Nor Flash
Please notice that when you want to erase SPI Nor Flash, run following commands.
rkdeveloptool db rk356x_spl_loader_ddr1056_v1.10.111.bin
rkdeveloptool ef
rkdeveloptool rd
Windows PC
Option one: Write U-Boot images to SPI Nor Flash
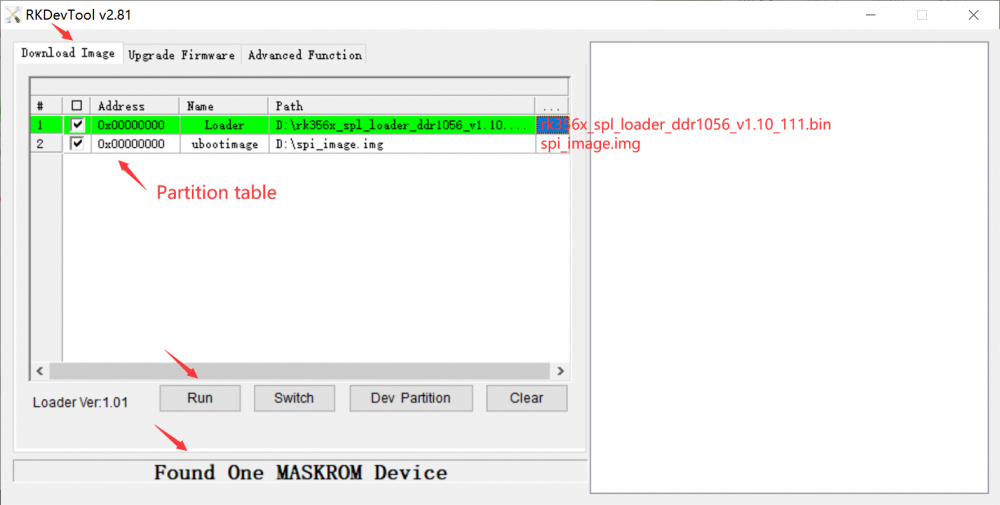
Double click the RKDevTool.exe and click button Download Image.
Step 1: Write config
| # | Address | Name | Path |
|---|---|---|---|
| 1 | 0x00000000 | Loader | /path/to/rk356x_spl_loader_ddr1056_v1.10.111.bin |
| 2 | 0x00000000 | ubootimage | /path/to/spi_image.img |
Step 2: Confirm "Found One Maskrom Device"
If your ROCK 3A is in maskrom mode and connects to PC, you can see that RKDevTool shows Found one MASKROM Device.
Step 3: Run
Finally, click the "run" button, and you will see the content on the right side. When RKDevTool shows Download image OK, the download job is completed.
Option two: Update U-Boot images to SPI Nor Flash by partitions
There is no need to write the whole uboot image to SPI Nor Flash if you have already done that before. You can just update the idbloader.img and u-boot.itb to prevent overwriting the saved mac address in SPI Nor Flash.
Double click the RKDevTool.exe and click button Download Image.
Step 1: Write config
| # | Address | Name | Path |
|---|---|---|---|
| 1 | 0x00000000 | Loader | /path/to/rk356x_spl_loader_ddr1056_v1.10.111.bin |
| 2 | 0x00000040 | idbloader | /path/to/idbloader.img |
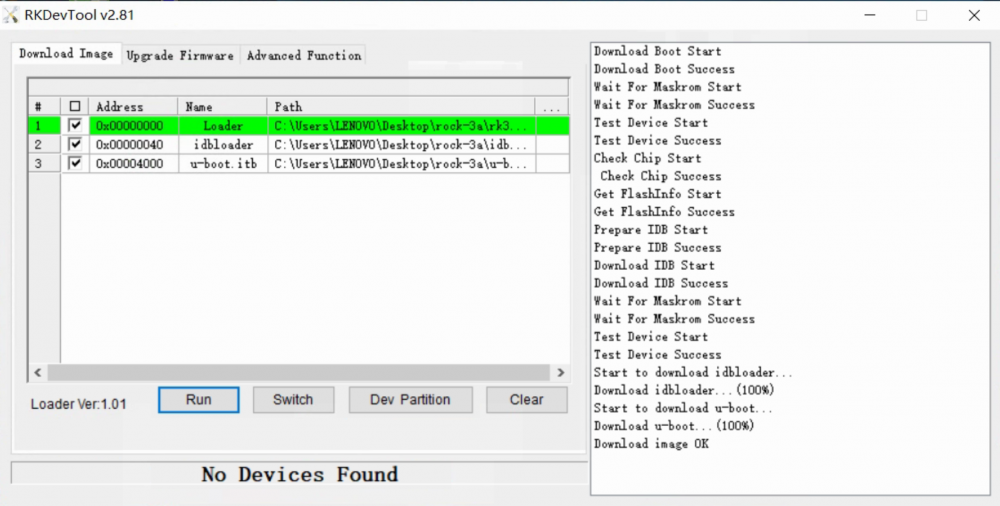
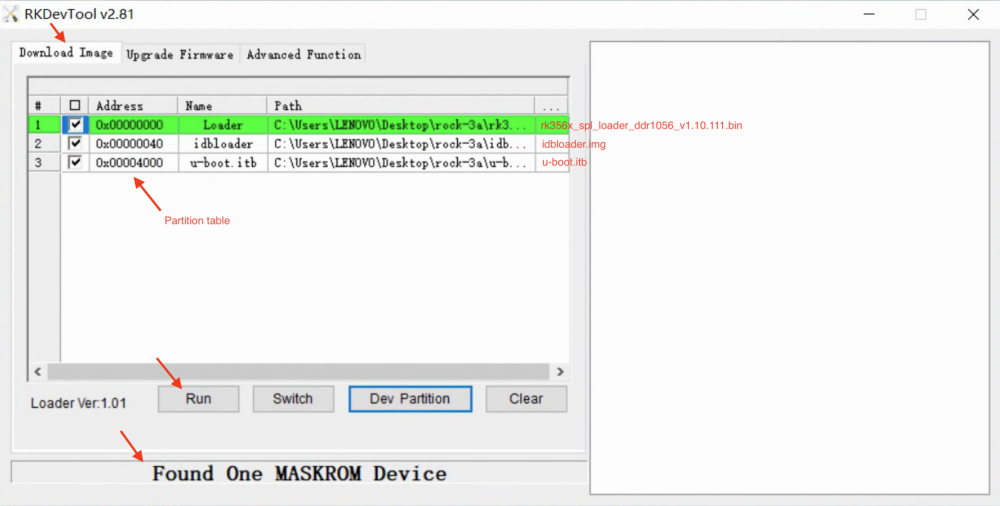
| 3 | 0x00004000 | u-boot.itb | /path/to/u-boot.itb |
Step 2: Confirm "Found One Maskrom Device"
If your ROCK 3A is in maskrom mode and connects to PC, you can see that RKDevTool shows Found one MASKROM Device.
Step 3: Run
Finally, click the "run" button, and you will see the content on the right side. When RKDevTool shows Download image OK, the download job is completed.
Option three: Erase SPI Nor Flash
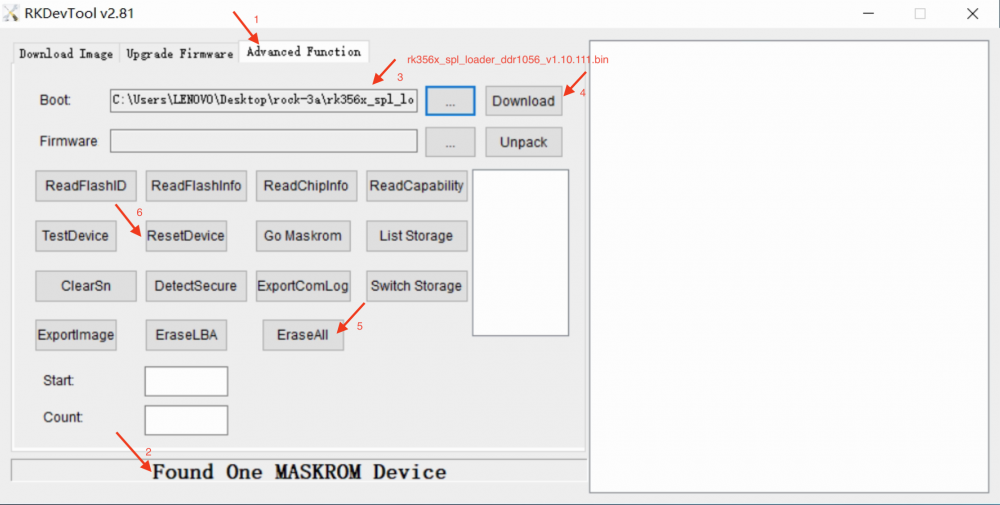
Double click the RKDevTool.exe and click button "Advanced Function" to get into Advanced Function window.
Step 1: Confirm "Found One Maskrom Device"
If your ROCK 3A is in maskrom mode and connects to PC, you can see that RKDevTool shows Found one MASKROM Device.
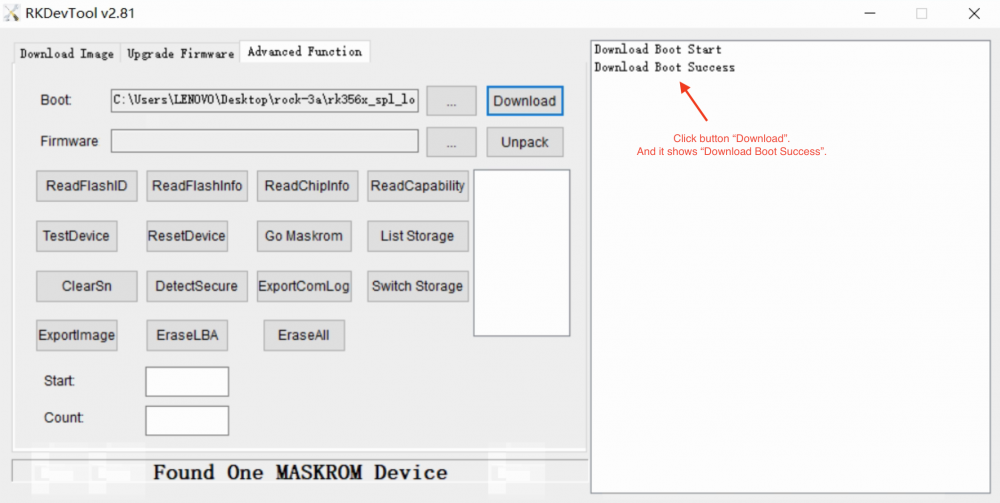
Step 2: Download RK356X Loader
Choose loader rk356x_spl_loader_ddr1056_v1.10.111.bin and download it.
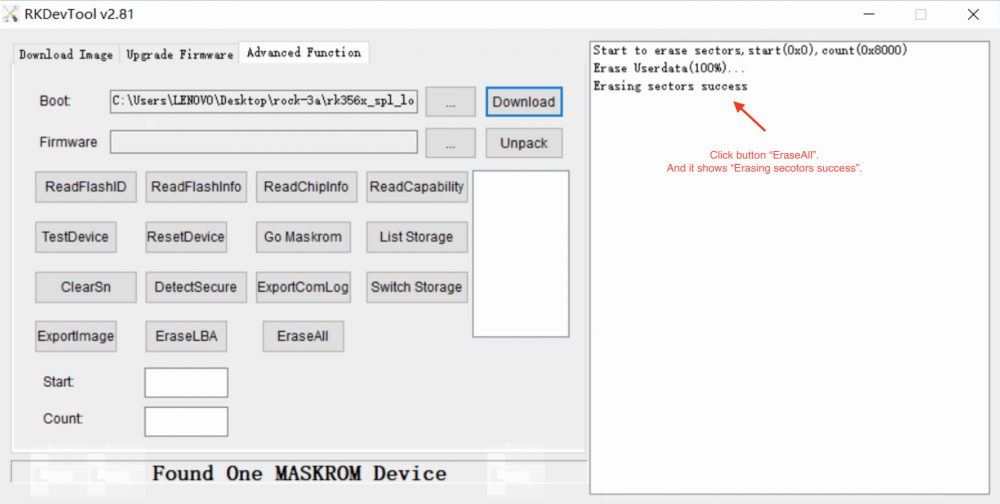
Step 3: Erase device
Click button "EraseAll" to erase device.
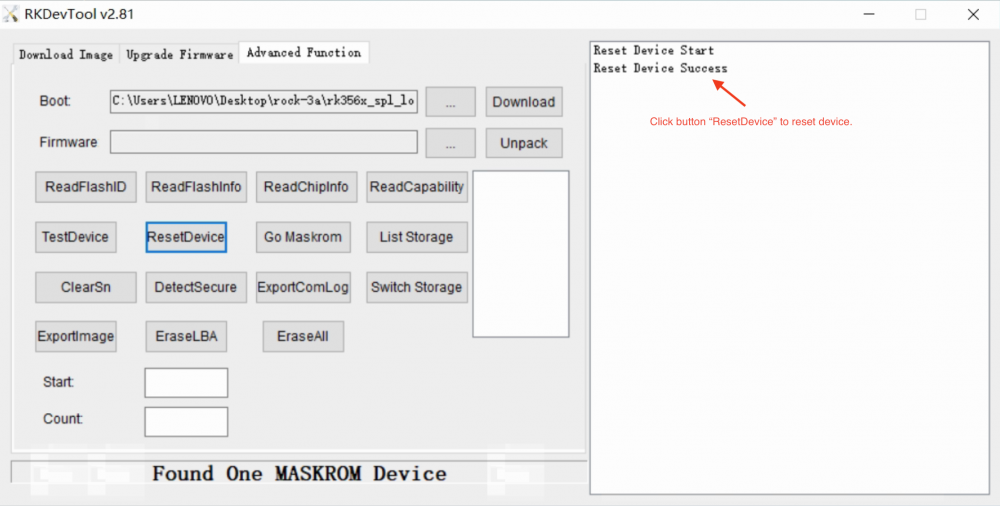
Step 4: Reset device
Click button "ResetDevice" to reset device.
Erasing job is done.
RK3568 SB-variant
Due to the version difference of the RK3568 chip, it may fail to burn the image to EMMC in MASKROM mode. If you find that your ROCK 3A cannot burn the image to EMMC through MASKROM mode, you need to use a specific loader to burn it rk356x_spl_loader_ddr1056_v1.12.109_no_check_todly.bin more information on forum: https://forum.radxa.com/t/radxa-rock-3-model-a-maskrom-mode-cannot-burn-the-image-to-emmc-solution/11373
Troubleshooting
- If you have issue with flashing via USB OTG, start a new post on the forum, https://forum.radxa.com/c/rock3.

