Difference between revisions of "RockpiS/dev/sdnand-install"
(→Step 3: Write to SD Nand via USB) |
|||
| Line 4: | Line 4: | ||
[[rockpiS | ROCK Pi S]] > [[rockpiS/install | Installation]] > [[RockpiS/dev/sdnand-install | Install on SD NAND Flash]] | [[rockpiS | ROCK Pi S]] > [[rockpiS/install | Installation]] > [[RockpiS/dev/sdnand-install | Install on SD NAND Flash]] | ||
| + | |||
| + | == install from linux == | ||
===Install on SD NAND Flash=== | ===Install on SD NAND Flash=== | ||
| Line 85: | Line 87: | ||
It means the SD Nand is erased successfully. | It means the SD Nand is erased successfully. | ||
| + | == install from windows == | ||
| + | |||
| + | |||
| + | [[sss.jpeg | 300px]] | ||
| + | |||
| + | Download the loader (flash helper, important) to init the ram and prepare the flashing environment etc. If you don't have it, you can download it from [hhh here] | ||
====FAQs==== | ====FAQs==== | ||
Revision as of 09:05, 13 September 2022
ROCK Pi S > Installation > Install on SD NAND Flash
Contents
[hide]install from linux
Install on SD NAND Flash
ROCK Pi S supports maskrom mode, which is a special running mode the CPU is waiting for command from USB OTG port. The PC tool we use to communicate with ROCK Pi S in maskrom mode is rkdeveloptool, an open source tool by Rockchip.
Requirement
- ROCK Pi S mainboard
- ROCK Pi S model with SD Nand on board(Check models)
- USB Male A to Male C cable
- Linux or other OS image for ROCK Pi S (< 1GB)
ROCK Pi S hardware details can be found here
Step 1: Make sure rkdeveloptool is set up on host computer
Follow https://wiki.radxa.com/RockpiS/dev/otg to install rkdeveloptool tool.
Step 2: Boot the board to maskrom mode
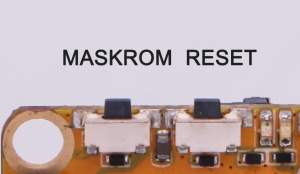
The ROCK Pi S Board presents two buttons. They are Reset key and Maskrom key.
The Reset button serves as the hardware reset button. short press and release the button,the system will be rebooted.
The Maskrom Button is for firmware flash/upgrade.
To boot ROCK Pi S into maskrom mode, you need
- plug the ROCK Pi S to Linux desktop with the USB Male A to Male C cable
- press and hold the maskrom key, then short press reset key
- release maskrom key(important!)
Now on your Linux PC, lsusb command shows the following usb devices
Bus 001 Device 014: ID 2207:330e
It means the device is in maskrom mode now.
Now we can proceed the next step to flash.
Step 3: Write to SD Nand via USB
On your PC, run the rkdeveloptool
 rkdeveloptool ld        # List the device
 DevNo=1	Vid=0x2207,Pid=0x330e,LocationID=104	Maskrom
Download the loader (flash helper, important) to init the ram and prepare the flashing environment etc. If you don't have it, you can download it from here
 sudo rkdeveloptool db /path/to/rk3308_loader_ddr589MHz_uart0_m0_v2.06.136sd.bin  # will output: Downloading bootloader succeeded.
 sudo rkdeveloptool wl 0 /path/to/system.img    # will output: Write LBA from file (100%)
 sudo rkdeveloptool rd    # will output: Reset Device OK.
Now the device should boot from the SD Nand now.
Optional: Erase image on SD Nand
This step serves for someone who want to boot ROCK Pi S on uSD Card when there is one system image on SD Nand.
To erase images on SD Nand, just need the following steps.
Firstly, follow Step 2: Boot the board to maskrom mode, Case 2: Update system image on SD Nand to boot ROCK Pi S to maskrom mode.
Secondly, on your Linux PC, create zero.img.
dd if=/dev/zero of=./zero.img bs=4M count=10
Thirdly, flash zero.img to SD Nand.
 rkdeveloptool db /path/to/rk3308_loader_ddr589MHz_uart0_m0_v2.06.136sd.bin
 rkdeveloptool wl 0 zero.img
 rkdeveloptool rd    # will output: Reset Device OK.
Finally, on your Linux PC, lsusb command show show the following usb devices
Bus 001 Device 014: ID 2207:330e
It means the SD Nand is erased successfully.
install from windows
Download the loader (flash helper, important) to init the ram and prepare the flashing environment etc. If you don't have it, you can download it from [hhh here]
FAQs
Troubleshooting
If you have issue with flashing via USB OTG, start a new post on the forum. https://forum.radxa.com/c/dev

