Difference between revisions of "Rock5/5b/singleindex"
| Line 186: | Line 186: | ||
Development for GPIO. ROCK 5B supports libmraa GPIO library, click [[rock5/dev/libmraa | here]] to get more information. | Development for GPIO. ROCK 5B supports libmraa GPIO library, click [[rock5/dev/libmraa | here]] to get more information. | ||
| + | |||
| + | |||
| + | == Downloads == | ||
| + | |||
| + | Official ROCK Pi system images can also be downloaded from | ||
| + | |||
| + | * '''[http://rock.sh/rockpi-baidupan ROCK Pi BaiduPan]''' | ||
| + | * '''[https://github.com/radxa/debos-radxa/releases/latest ROCK 5 Image Release]''' - The latest system images. | ||
| + | |||
| + | For usernames and passwords please check the [https://wiki.radxa.com/Rock/FAQ#What.27s_the_user_and_password_in_Lubuntu FAQ]. | ||
| + | |||
| + | <div class="col-md-12"> | ||
| + | ====<span class="label forest"><i class="fa fa-wrench" ></i> Tools</span>==== | ||
| + | <div class="table-responsive"> | ||
| + | <table class="table table-hover table-bordered table-striped"> | ||
| + | <tr> | ||
| + | <th>Description</th> | ||
| + | <th>Linux</th> | ||
| + | <th>MacOS</th> | ||
| + | <th>Windows</th> | ||
| + | </tr> | ||
| + | <tr> | ||
| + | <td><small>Etcher - A user friendly Image Writer</small></td> | ||
| + | <td>[https://github.com/balena-io/etcher/releases/download/v1.4.9/balena-etcher-electron-1.4.9-linux-x64.zip Linux 64bit] | [https://github.com/balena-io/etcher/releases/download/v1.4.9/balena-etcher-electron-1.4.9-linux-ia32.zip Linux 32bit]</td> | ||
| + | <td>[https://github.com/balena-io/etcher/releases/download/v1.4.9/balenaEtcher-1.4.9.dmg balenaEtcher-1.4.9.dmg]</td> | ||
| + | <td>[https://github.com/balena-io/etcher/releases/download/v1.4.9/balenaEtcher-Setup-1.4.9-x86.exe balenaEtcher-Setup-1.4.9-x86.exe]</td> | ||
| + | </tr> | ||
| + | </table> | ||
| + | </div> | ||
| + | </div> | ||
| + | |||
| + | <div class="col-md-12"> | ||
| + | ====<span class="label forest"><i class="fa fa-android" ></i> Official Images</span>==== | ||
| + | <div class="table-responsive"> | ||
| + | <table class="table table-hover table-bordered table-striped"> | ||
| + | <tr> | ||
| + | <th>Distribution</th> | ||
| + | <th>Supoprted Boards</th> | ||
| + | <th>Description</th> | ||
| + | </tr> | ||
| + | |||
| + | <tr> | ||
| + | <td>[[File:Android-Logo.jpg | 200px | link=https://github.com/radxa/manifests]]</td> | ||
| + | |||
| + | <td> | ||
| + | |||
| + | </td> | ||
| + | <td> | ||
| + | |||
| + | </td> | ||
| + | |||
| + | </tr> | ||
| + | |||
| + | <tr> | ||
| + | <td>[[File:Debian-logo.png | 200px | link=https://github.com/radxa-build]]</td> | ||
| + | <td> | ||
| + | * [https://github.com/radxa-build/rock-5b/releases/latest ROCK 5B] | ||
| + | </td> | ||
| + | <td> | ||
| + | Debian Product. | ||
| + | |||
| + | [https://wiki.radxa.com/Rock5/linux/debian Install Wiki.] | ||
| + | |||
| + | Debian Bullseye(11). | ||
| + | |||
| + | [https://github.com/radxa/debos-radxa/releases/latest Change Log]. | ||
| + | </td> | ||
| + | </tr> | ||
| + | |||
| + | |||
| + | <tr> | ||
| + | <td>[[File:Ubuntu_logo.png | 200px | link=https://github.com/radxa-build]]</td> | ||
| + | <td> | ||
| + | * [https://github.com/radxa-build/rock-3b/releases/latest ROCK 5B] | ||
| + | </td> | ||
| + | <td> | ||
| + | Ubuntu Server Product. | ||
| + | |||
| + | [https://wiki.radxa.com/Rock5/linux/ubuntu Install Wiki.] | ||
| + | |||
| + | Ubuntu Server 20.04. | ||
| + | |||
| + | [https://github.com/radxa/debos-radxa/releases/latest Change Log]. | ||
| + | </td> | ||
| + | </tr> | ||
| + | |||
| + | </table> | ||
| + | </div> | ||
| + | </div> | ||
| + | |||
| + | <div class="col-md-12"> | ||
| + | |||
| + | ====<span class="label forest" style="margin-bottom:5px;"><i class="fa fa-linux"></i> Third Party Images</span>==== | ||
| + | |||
| + | </div> | ||
| + | |||
| + | <div class="col-md-12"> | ||
| + | |||
| + | ====<span class="label forest" style="margin-bottom:5px;"><i class="fa fa-linux"></i> Community Built Images</span>==== | ||
| + | |||
| + | </div> | ||
== Hardware == | == Hardware == | ||
Revision as of 11:10, 18 June 2022
Contents
- 1 Welcome to the ROCK 5B Documentation
- 1.1 Getting Started
- 1.1.1 Close look of ROCK 5B
- 1.1.2 Features
- 1.1.3 What you need
- 1.1.4 Starting the board for the first time
- 1.2 Downloads
- 1.3 Hardware
- 1.4 Radxa OS
- 1.1 Getting Started
Welcome to the ROCK 5B Documentation
Getting Started
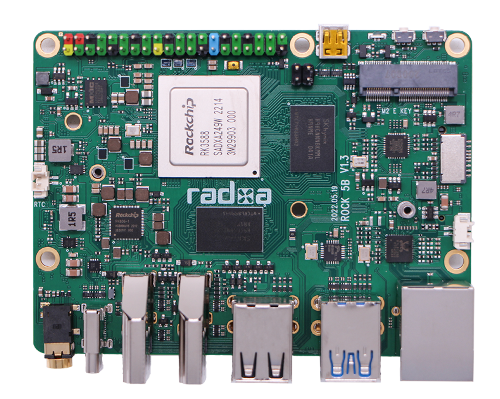
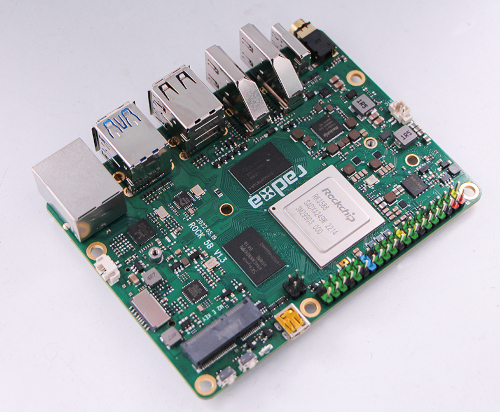
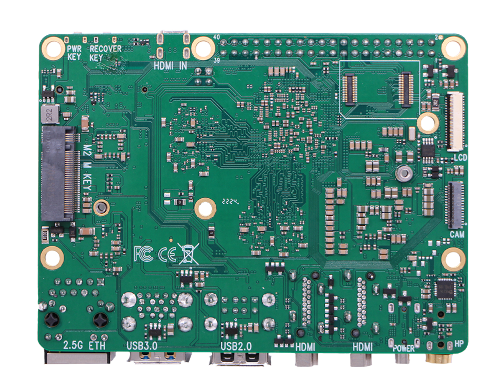
This guide is designed for ROCK 5B enthusiast. The purpose is to learn about ROCK 5B as well as how to prepare and set up for basic use. When you get a board, you need to know what model it is and which hardware version it is. The information is printed in the top side of the board. We will introduce the board information as much as possible.
Close look of ROCK 5B
- ROCK 5B front view
- ROCK 5B front with an angle view
- ROCK 5B back view
Features
What you need
Necessary
- ROCK 5B main board
- One of the Storage media below:
- microSD, larger than 8GB
- eMMC module, larger than 8GB
- Power supply
- The ROCK 5B is powered by Type-C port and has a wide range of input voltage, from 5V to 21V. ROCK 5B supports USB Type-C PD 2.0 with 9V/2A, 12V/2A, 15V/2A and 20V/2A.
- The Type-C cable you using needs to support data communication. We call it USB Type-C charging data cable.
- USB Keyboard and Mouse
- With four USB-A connectors, ROCK 5B can be equipped with a full sized keyboard and mouse.
- Monitor and HDMI Cable
- ROCK 5B is equipped with a full sized HDMI connector. HDMI capable monitor is recommended.
- HDMI EDID display data is used to determine the best display resolution. On monitors and TVs that support 1080p (or 4K/8K) this resolution will be selected. If 1080p is not supported the next available resolution reported by EDID will be used. This selected mode will work with MOST but not all monitors/TVs.
- USB to TTL serial cable
- ROCK 5B exports a dedicated serial console for CPU, which can access the low level debug message.
- USB type A to typec C cable
- If you want to write image on ROCK 5B from USB OTG port or use fastboot/adb commands you need an USB typec A to type C cable to connect ROCK 5B and PC.
Optional
- microSD Card Reader
- For flashing the image into microSD Card
- USB type A to type C cable
- This is needed for fastboot/adb commands.
- USB to TTL serial cable
- This is needed for serial console.
- Ethernet cable
- ROCK 5B supports Internet access via Ethernet.
- An Ethernet cable is used to connect your ROCK 5B to a local network and the Internet.
- Camera Module
- ROCK 5B supports camera function.
- LCD Module
- ROCK 5B supports LCD display function.
- Audio cable
- Audio can be played through speaker or headphones using a standard 3.5mm jack.
Starting the board for the first time
ROCK 5B can be started with eMMC Module or μSD Card. Now, you are presented with three options when installing your new operating system onto your ROCK 5B.
Prepare
- When starting system with eMMC Module
(Option a) Inster the eMMC Module into ROCK Pi eMMC USB Reader. Then plug the ROCK Pi eMMC USB Reader into host PC.
(Option b) Insert eMMC Module into eMMC to μSD card converter board. Insert the converter board into μSD Card Reader. Then plug the Card Reader into host PC.
- When starting system with μSD Card
(Option c) Insert the μSD Card into μSD Card Reader. Then plug the Card Reader into host PC.
Write Image
- Download the official Ubuntu/Debian system image from Downloads.
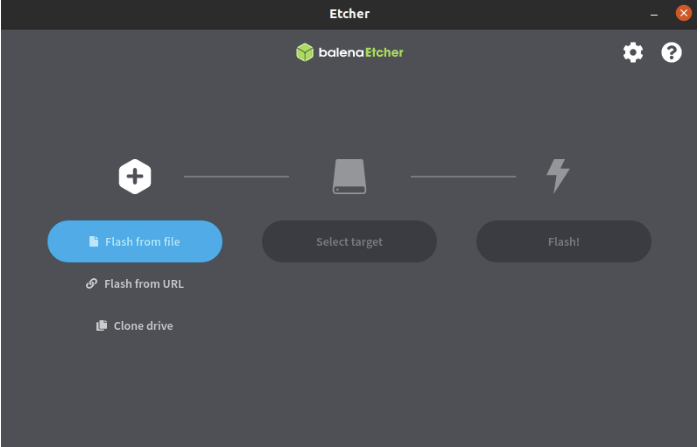
- Download the flash tool, etcher, from Downloads. Choose the right version for your host operation system. Here we operate on host Ubuntu 20.04.
- After unpacking the package, we run the tool by double-clicking BalenaEtcher icon.
If you get an error message: "No polkit authentication agent found" you can try and start it with sudo, but do know that this is running the tool as root.
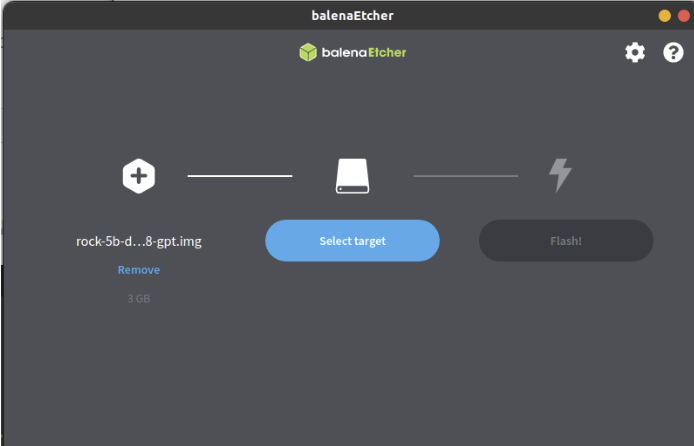
- In the etcher window, click Select image.
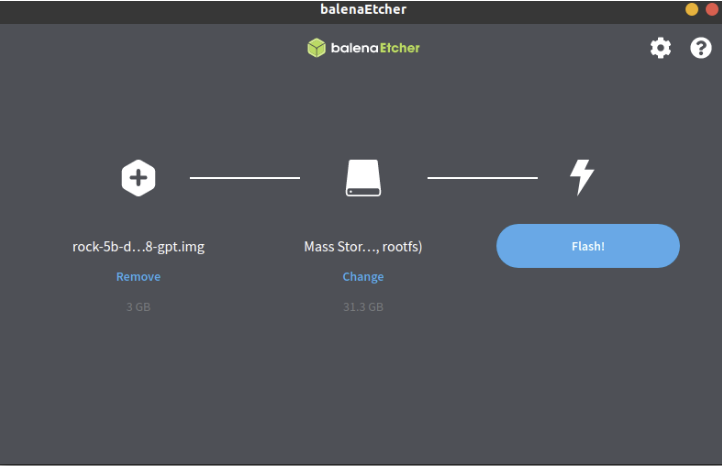
- In the etcher window, click Select Drive.
- In the etcher window, click Flash.
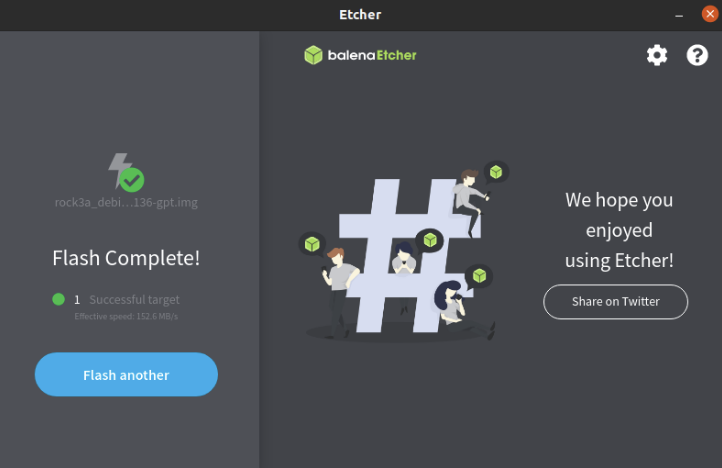
- In the etcher window, once it shows us Flash Complete! It is done and can be put into the RockPi.
3. Boot the board
- Now insert the system storage media, μSD Card or eMMC Module into the socket on the board.
- (Optional) Use the USB to TTL serial cable to setup a connection between PC and ROCK 5B board. See Serial Console.
- Power on ROCK 5B by adapter with type C port.
- ROCK 5B will boot with the green power LED on. And after a while, another blue LED starts blinking.
4. Access from the Host PC/Laptop
Option 1: HDMI monitor and Mouse
You would see Desktop on HDMI monitor.
Option 2: Serial console
Check Serial Console
Option 3: SSH
SSH server is enabled on port 22 of ROCK 5B default image.
Please use angryip to find your board IP address.
To access ROCK 5B by SSH, try
ping rock-5b.local
ssh rock@rock-5b.local
or if your router/network doesn't support Local Domain, you need to check your network/router administrator page and look for the ROCK 5B ip address.
ping ip-of-device
ssh rock@ip-of-device
Note: You can also get the IP of ROCK 5B from option 1 if you can not access network administrator page.
5.Network state
- Look at network configure:
$ sudo ifconfig
- Test network:
$ ping -c 5 www.google.com
6.WIFI Connection
Check WIFI Connection.
7.Bluetooth
Check Bluetooth.
8.LED
ROCK 5B has Power LED and User LED.
- Power LED
The power LED is green. It is always on when ROCK 5B is given power by default,
- User LED
The user LED is blue. By default, its blink status shows the running kernel.
9.GPIO
ROCK 5B has one 40-pin expansion headers. Each pin is distinguished by color, more information click ROCK 5B GPIO.
Development for GPIO. ROCK 5B supports libmraa GPIO library, click here to get more information.
Downloads
Official ROCK Pi system images can also be downloaded from
- ROCK Pi BaiduPan
- ROCK 5 Image Release - The latest system images.
For usernames and passwords please check the FAQ.
Tools
| Description | Linux | MacOS | Windows |
|---|---|---|---|
| Etcher - A user friendly Image Writer | Linux 64bit | Linux 32bit | balenaEtcher-1.4.9.dmg | balenaEtcher-Setup-1.4.9-x86.exe |
Official Images
Third Party Images
Community Built Images
Hardware
Technical information about ROCK 5 Series hardware
ROCK 5B
- ROCK 5 Model B
- v1.1 schematic pdf - Download Schematic of ROCK 5 Model B
- v1.1 2D Top&Bottom dxf - Download 2D CAD of ROCK 5 Model B
- v1.1 CAM pdf - Download components Position Reference of ROCK 5 Model B
- Compliance
- CE RED - EU
Datasheets
- Datasheet
- RK3588 datasheet - The SoC of ROCK 5
- RK3588S datasheet - The SoC of ROCK 5 in small package
Accessories
- Official heatsink
- 3D drawing - 3D model of official heatsink
- Display
- Camera module
Radxa OS
Radxa OS is built based on Debian.
ROCK 5 Debian uses systemd to manage system.
Command prepended by $ means the command may be executed by an unprivileged user. And command prepended by # means the command may be executed by an privileged user. But the symbol, $ or #, is not part of the command.
List of boards supported
- ROCK 5B
Access from the Host PC/Laptop
Option 1: HDMI monitor and Mouse
You would see Desktop on HDMI monitor.
Option 2: Serial console
See Serial Console
Option 3: SSH
SSH server is enabled on port 22 of ROCK 5 default image.
Please use angryip to find your board IP address.
$ ping ip-of-device
$ ssh rock@ip-of-device
Debian Default User Account
Non-root User:
User Name : rock
Password  : rock
Radxa APT
Radxa APT source includes stable one and testing one. Stable source includes stable packages while testing source includes latest but maybe unstable packages.
Radxa APT stable source is added by default while testing source is not added.
You can uncomment line like "deb http://apt.radxa.com/bullseye-testing/ buster main" in file /etc/apt/sources.list.d/apt-radxa-com.list to add testing source.
See file /etc/apt/sources.list.d/apt-radxa-com.list
deb http://apt.radxa.com/bullseye-stable/ buster main
deb http://apt.radxa.com/bullseye-testing/ buster main
After adding testing source, you need to update APT and install your needed packages.
$ sudo apt-get update
For more detail about Radxa APT, please see Radxa APT.
Upgrade necessary packages
Here is the example of upgrading rockchip-overlay and kernel packages.
$ sudo apt-get update
$ sudo apt-get install -y rockchip-overlay
Ethernet
5B Ethernet
ROCK 5B is equipped with one 2.5G Ethernet port. You can use a network cable (one end connected to the external network port or route) to connect your ROCK 5B to the network. The ROCK 5B will automatically configure the network for your surfing on the Internet.
Ethernet throughput test result table.
| Direction | Bitrate |
|---|---|
| Upstream | 2.34 Gbits/sec |
| Downstream | 2.35 Gbits/sec |
To test the Ethernet, we need to follow the steps:
- Switch to super user mode by command
$ sudo su
- Check whether the Ethernet is normal by command, ifconfig, which would show us a network card, eth0 or enP4p65s0 , and the Ethernet IP address. Also, use tool, ping, to connect to a normal domain.
$ ifconfig
$ ping www.baidu.com
- If failed to connect to a normal domain. , try
$ sudo dhclient eth0
or
$ sudo dhclient enP4p65s0
Storage device
- uSD Card: /dev/mmcblk0
- eMMC: /dev/mmcblk1
- NVME M.2 SDD: /dev/nvme0n1

