Difference between revisions of "RockpiX/install/ubuntu"
(Created page with "{{rockpiX_header}} {{Languages|RockpiX/install/Ubuntu}} ROCK Pi X > Install > RockpiX/install/Ubuntu | Install Ubuntu to ROCK Pi X (...") |
|||
| (One intermediate revision by one other user not shown) | |||
| Line 3: | Line 3: | ||
[[rockpiX | ROCK Pi X]] > [[RockpiX/install | Install]] > [[RockpiX/install/Ubuntu | Install Ubuntu to ROCK Pi X (eMMC)]] | [[rockpiX | ROCK Pi X]] > [[RockpiX/install | Install]] > [[RockpiX/install/Ubuntu | Install Ubuntu to ROCK Pi X (eMMC)]] | ||
| + | |||
| + | == Introduction == | ||
| + | |||
| + | This article will teach you how to install ubuntu system to ROCK PI X. | ||
| + | |||
| + | == Prepare == | ||
| + | * Ubuntu ISO image - You need a copy of the ubuntu ISO image, which can be downloaded from [https://ubuntu.com/download/desktop Ubuntu]. | ||
| + | * USB drive - We need this as the installation media | ||
| + | * ROCK Pi X - It doesn't matter if the board has OS running already or not, as long as we have proper BIOS installed, we can install a new OS | ||
| + | * Keyboard/mouse and HDMI monitor for ROCK Pi X - We need to operate on ROCK Pi X | ||
| + | * Another PC(HOST PC) running Ubuntu - We need to make bootable USB drive from iso on this PC | ||
| + | |||
| + | == Step 1: Make a bootable USB disk from Ubuntu ISO == | ||
| + | === Linux Host === | ||
| + | |||
| + | Plug in the U disk and use the command to view the device node of the U disk: | ||
| + | |||
| + | $ dmesg | ||
| + | ... | ||
| + | [152495.190420] usb 2-1.1: new SuperSpeed Gen 1 USB device number 9 using xhci_hcd | ||
| + | [152495.211005] usb 2-1.1: New USB device found, idVendor=2537, idProduct=1081, bcdDevice= 1.00 | ||
| + | [152495.211010] usb 2-1.1: New USB device strings: Mfr=1, Product=2, SerialNumber=3 | ||
| + | [152495.211013] usb 2-1.1: Product: NS1081 | ||
| + | [152495.211016] usb 2-1.1: Manufacturer: Norelsys | ||
| + | [152495.211018] usb 2-1.1: SerialNumber: 81E22742AB574A1DAAB8A9FB1763CC | ||
| + | [152495.213235] usb-storage 2-1.1:1.0: USB Mass Storage device detected | ||
| + | [152495.213869] scsi host4: usb-storage 2-1.1:1.0 | ||
| + | [152498.161965] scsi 4:0:0:0: Direct-Access NORELSYS 1081 0 PQ: 0 ANSI: 6 | ||
| + | [152498.163651] scsi 4:0:0:0: Attached scsi generic sg2 type 0 | ||
| + | [152498.164259] sd 4:0:0:0: [sdc] 122683136 512-byte logical blocks: (62.8 GB/58.5 GiB) | ||
| + | [152498.164602] sd 4:0:0:0: [sdc] Write Protect is off | ||
| + | [152498.164606] sd 4:0:0:0: [sdc] Mode Sense: 43 00 00 00 | ||
| + | [152498.164874] sd 4:0:0:0: [sdc] Write cache: disabled, read cache: enabled, doesn't support DPO or FUA | ||
| + | [152498.182278] sdc: sdc1 sdc2 | ||
| + | [152498.184061] sd 4:0:0:0: [sdc] Attached SCSI removable disk | ||
| + | |||
| + | After querying that the device node is sdc, use the dd command to install the ubuntu ISO image file to the U disk: | ||
| + | |||
| + | $ ls | ||
| + | ubuntu-12.04.5-desktop-amd64.iso ubuntu-16.04.6-desktop-amd64.iso ubuntu-20.04-desktop-amd64.iso | ||
| + | ubuntu-14.04.6-desktop-amd64.iso ubuntu-18.04.4-desktop-amd64.iso | ||
| + | |||
| + | $ sudo dd if=ubuntu-20.04-desktop-amd64.iso of=/dev/sdc bs=8M status=progress | ||
| + | 301989888 bytes (302 MB, 288 MiB) copied, 8 s, 36.8 MB/s | ||
| + | |||
| + | Wait for the installation is finished, U disk start disk production is completed. | ||
| + | |||
| + | == Step 2: Boot from USB disk == | ||
| + | |||
| + | 1. Plug the USB drive on ROCK Pi X, if your USB drive is USB 3.0, plug it to the ROCK Pi X USB 3.0 port is preferred. | ||
| + | |||
| + | 2. Plug keyboard and HDMI monitor on ROCK Pi X | ||
| + | |||
| + | 3. Power on the ROCK Pi X, keep pressing DEL on the keyboard until the BIOS screen is on HDMI | ||
| + | |||
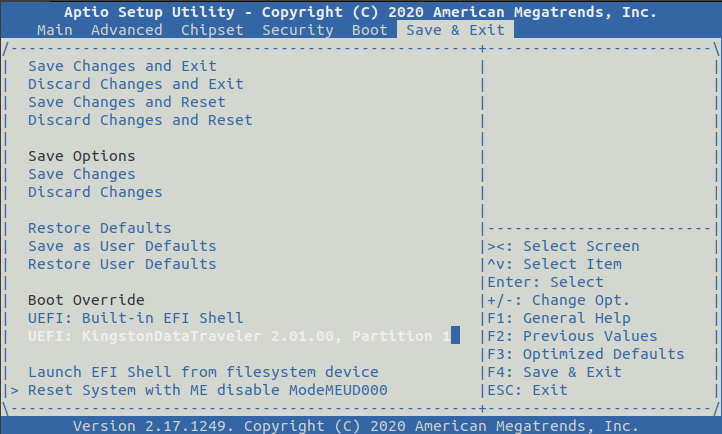
| + | 4. Go the last tab [Save & Exit] -> [Boot Override] of BIOS menu, select your USB drive and press '''Enter''' to boot. | ||
| + | |||
| + | [[File:Install_ubuntu_BIOS.png]] | ||
| + | |||
| + | == Step 3: Installation == | ||
| + | |||
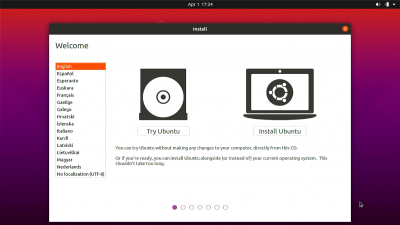
| + | Wait for some seconds and you see the familiar ubuntu installation screen, now you are ready to go. | ||
| + | |||
| + | [[File:install_ubuntu_interface.png | 400px]] | ||
| + | |||
| + | |||
| + | == FAQ == | ||
| + | 1. [https://gist.github.com/cx-sawyer/f4f0a6198f738a986acbb71632af446a#file-readme-md How to enable AP6254 WiFi module] | ||
Latest revision as of 09:56, 14 February 2022
ROCK Pi X > Install > Install Ubuntu to ROCK Pi X (eMMC)
Contents
[hide]Introduction
This article will teach you how to install ubuntu system to ROCK PI X.
Prepare
- Ubuntu ISO image - You need a copy of the ubuntu ISO image, which can be downloaded from Ubuntu.
- USB drive - We need this as the installation media
- ROCK Pi X - It doesn't matter if the board has OS running already or not, as long as we have proper BIOS installed, we can install a new OS
- Keyboard/mouse and HDMI monitor for ROCK Pi X - We need to operate on ROCK Pi X
- Another PC(HOST PC) running Ubuntu - We need to make bootable USB drive from iso on this PC
Step 1: Make a bootable USB disk from Ubuntu ISO
Linux Host
Plug in the U disk and use the command to view the device node of the U disk:
$ dmesg
...
[152495.190420] usb 2-1.1: new SuperSpeed Gen 1 USB device number 9 using xhci_hcd
[152495.211005] usb 2-1.1: New USB device found, idVendor=2537, idProduct=1081, bcdDevice= 1.00
[152495.211010] usb 2-1.1: New USB device strings: Mfr=1, Product=2, SerialNumber=3
[152495.211013] usb 2-1.1: Product: NS1081
[152495.211016] usb 2-1.1: Manufacturer: Norelsys
[152495.211018] usb 2-1.1: SerialNumber: 81E22742AB574A1DAAB8A9FB1763CC
[152495.213235] usb-storage 2-1.1:1.0: USB Mass Storage device detected
[152495.213869] scsi host4: usb-storage 2-1.1:1.0
[152498.161965] scsi 4:0:0:0: Direct-Access     NORELSYS 1081             0    PQ: 0 ANSI: 6
[152498.163651] scsi 4:0:0:0: Attached scsi generic sg2 type 0
[152498.164259] sd 4:0:0:0: [sdc] 122683136 512-byte logical blocks: (62.8 GB/58.5 GiB)
[152498.164602] sd 4:0:0:0: [sdc] Write Protect is off
[152498.164606] sd 4:0:0:0: [sdc] Mode Sense: 43 00 00 00
[152498.164874] sd 4:0:0:0: [sdc] Write cache: disabled, read cache: enabled, doesn't support DPO or FUA
[152498.182278]  sdc: sdc1 sdc2
[152498.184061] sd 4:0:0:0: [sdc] Attached SCSI removable disk
After querying that the device node is sdc, use the dd command to install the ubuntu ISO image file to the U disk:
$ ls
ubuntu-12.04.5-desktop-amd64.iso  ubuntu-16.04.6-desktop-amd64.iso  ubuntu-20.04-desktop-amd64.iso
ubuntu-14.04.6-desktop-amd64.iso  ubuntu-18.04.4-desktop-amd64.iso

$ sudo dd if=ubuntu-20.04-desktop-amd64.iso of=/dev/sdc bs=8M status=progress
301989888 bytes (302 MB, 288 MiB) copied, 8 s, 36.8 MB/s
Wait for the installation is finished, U disk start disk production is completed.
Step 2: Boot from USB disk
1. Plug the USB drive on ROCK Pi X, if your USB drive is USB 3.0, plug it to the ROCK Pi X USB 3.0 port is preferred.
2. Plug keyboard and HDMI monitor on ROCK Pi X
3. Power on the ROCK Pi X, keep pressing DEL on the keyboard until the BIOS screen is on HDMI
4. Go the last tab [Save & Exit] -> [Boot Override] of BIOS menu, select your USB drive and press Enter to boot.
Step 3: Installation
Wait for some seconds and you see the familiar ubuntu installation screen, now you are ready to go.


