Difference between revisions of "RockpiS/dev/serial-console"
(→Windows) |
|||
| (2 intermediate revisions by 2 users not shown) | |||
| Line 5: | Line 5: | ||
ROCK Pi S exports a dedicated serial console, which can access the low level debug message. | ROCK Pi S exports a dedicated serial console, which can access the low level debug message. | ||
| − | == Requirement == | + | === Requirement === |
* ROCK Pi S | * ROCK Pi S | ||
| Line 15: | Line 15: | ||
[[File:usb2ttl-cable-definition.jpeg | 500px ]] | [[File:usb2ttl-cable-definition.jpeg | 500px ]] | ||
| − | === Note === | + | ==== Note ==== |
* The default baudrate of ROCK Pi S is 1500000(1.5Mbps), please check if your USB to TTL cable support 1.5Mbps baudrate. Some model of [https://www.silabs.com/products/interface/usb-bridges CP210X] and [http://www.prolific.com.tw/US/ShowProduct.aspx?pcid=41 PL2303x] have baudrate limitation, please check the specified model. We also tested that some cheap PL2303x based cable does not work well. Make sure choose a high quality one. The instructions below use a [http://www.ftdichip.com/Products/ICs/FT232R.htm FT232RL] based cable. | * The default baudrate of ROCK Pi S is 1500000(1.5Mbps), please check if your USB to TTL cable support 1.5Mbps baudrate. Some model of [https://www.silabs.com/products/interface/usb-bridges CP210X] and [http://www.prolific.com.tw/US/ShowProduct.aspx?pcid=41 PL2303x] have baudrate limitation, please check the specified model. We also tested that some cheap PL2303x based cable does not work well. Make sure choose a high quality one. The instructions below use a [http://www.ftdichip.com/Products/ICs/FT232R.htm FT232RL] based cable. | ||
| Line 21: | Line 21: | ||
* It seems that the serial tool on macOS platform can not support custom baudrate such as 1.5Mbps due to driver restriction. If you know how to set custom baudrate on macOS, please add an item here to show your findings. | * It seems that the serial tool on macOS platform can not support custom baudrate such as 1.5Mbps due to driver restriction. If you know how to set custom baudrate on macOS, please add an item here to show your findings. | ||
| − | == Connection == | + | === Connection === |
Connect the USB to TTL serial cable as below. '''Don't connect the red wire.''' | Connect the USB to TTL serial cable as below. '''Don't connect the red wire.''' | ||
| Line 38: | Line 38: | ||
|} | |} | ||
| − | * ROCK Pi S V11 Board | + | * ROCK Pi S V11 Board and later |
{| class="wikitable" | {| class="wikitable" | ||
| Line 53: | Line 53: | ||
[[File:rockpis-serial-connection.jpeg | 500px ]] | [[File:rockpis-serial-connection.jpeg | 500px ]] | ||
| − | == Serial setting on host PC == | + | === Serial setting on host PC === |
The default serial setting for ROCK Pi S u-boot and kernel console is: | The default serial setting for ROCK Pi S u-boot and kernel console is: | ||
| Line 63: | Line 63: | ||
flow control: none | flow control: none | ||
| − | === Linux === | + | ==== Linux ==== |
Minicom is the serial tool that supports wide range baud rate. | Minicom is the serial tool that supports wide range baud rate. | ||
| Line 85: | Line 85: | ||
'''/dev/ttyUSB0''' is our device here. | '''/dev/ttyUSB0''' is our device here. | ||
| − | ==== Setup minicom==== | + | ===== Setup minicom===== |
First add current user to plugdev group to use minicom without sudo or root. | First add current user to plugdev group to use minicom without sudo or root. | ||
| Line 108: | Line 108: | ||
Now run '''minicom rockpiS''' to use the config above and connects to the ROCK Pi S serial console. | Now run '''minicom rockpiS''' to use the config above and connects to the ROCK Pi S serial console. | ||
| − | === Windows === | + | ==== Windows ==== |
Putty is also great serial tool that supports wide range baud rate. | Putty is also great serial tool that supports wide range baud rate. | ||
| Line 128: | Line 128: | ||
Once finish the setting, press '''Open''' button to start. | Once finish the setting, press '''Open''' button to start. | ||
| − | == Troubleshooting == | + | ==== macOS ==== |
| + | |||
| + | ===== Tool picocom ===== | ||
| + | |||
| + | Install picocom | ||
| + | |||
| + | <pre> | ||
| + | % brew install --build-from-source radxa/picocom/picocom | ||
| + | </pre> | ||
| + | |||
| + | Start picocom | ||
| + | |||
| + | <pre> | ||
| + | % picocom -b 1500000 -d 8 /dev/tty.usbserial-2130 | ||
| + | </pre> | ||
| + | |||
| + | === FAQs === | ||
| + | |||
| + | ====1.While using debug console, there is system startup information on the screen, but the keyboard cannot be used to input text?==== | ||
| + | |||
| + | One of the reason would be the wrong setting of the serial tool, such as the Hardware Flow Control, etc. Here we should disable the Hardware Flow Control. | ||
| + | |||
| + | === Troubleshooting === | ||
* Post your issue at the forum: https://forum.radxa.com/c/dev | * Post your issue at the forum: https://forum.radxa.com/c/dev | ||
Latest revision as of 09:35, 29 January 2022
ROCK Pi S > Development > Serial Console
ROCK Pi S exports a dedicated serial console, which can access the low level debug message.
Contents
Requirement
- ROCK Pi S
- USB Type-C power adapter and USB Type-C charging data cable
- Host PC with Windows or Linux
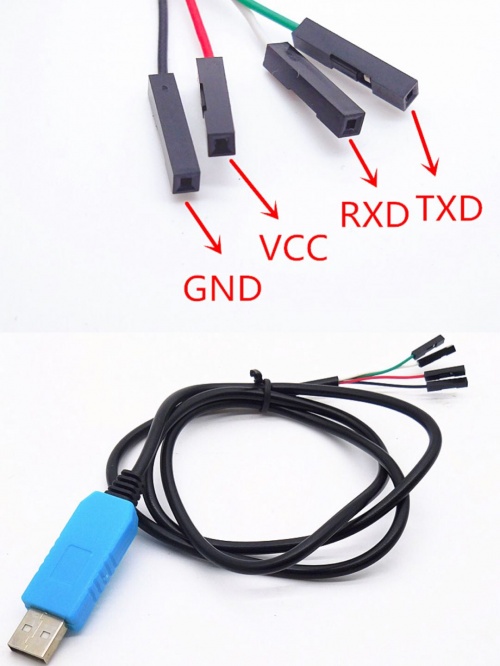
- USB to TTL serial cable
- The definition of each pin of USB to TTL cable is showing like this:
Note
- The default baudrate of ROCK Pi S is 1500000(1.5Mbps), please check if your USB to TTL cable support 1.5Mbps baudrate. Some model of CP210X and PL2303x have baudrate limitation, please check the specified model. We also tested that some cheap PL2303x based cable does not work well. Make sure choose a high quality one. The instructions below use a FT232RL based cable.
- It seems that the serial tool on macOS platform can not support custom baudrate such as 1.5Mbps due to driver restriction. If you know how to set custom baudrate on macOS, please add an item here to show your findings.
Connection
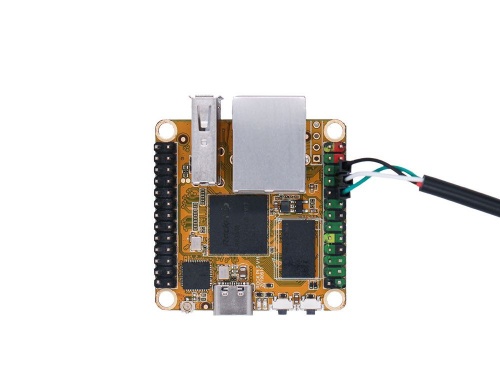
Connect the USB to TTL serial cable as below. Don't connect the red wire.
- ROCK Pi S V10 Board
| ROCK Pi S | <---> | USB to TTL cable |
|---|---|---|
| RX(pin 9) | <---> | Green wire |
| TX(pin 11) | <---> | White wire |
| GND(pin 25) | <---> | Black wire |
- ROCK Pi S V11 Board and later
| ROCK Pi S | <---> | USB to TTL cable |
|---|---|---|
| RX(pin 10) | <---> | Green wire |
| TX(pin 8) | <---> | White wire |
| GND(pin 6) | <---> | Black wire |
Serial setting on host PC
The default serial setting for ROCK Pi S u-boot and kernel console is:
   baudrate: 1500000
   data bit: 8
   stop bit: 1
   parity  : none
   flow control: none
Linux
Minicom is the serial tool that supports wide range baud rate.
Install minicom:
   sudo apt-get update
   sudo apt-get install minicom
Plug in the USB to TTL cable, kernel `dmesg | tail` should show the following device:
   [1036835.654076] usb 1-6.4.3: new full-speed USB device number 103 using xhci_hcd
   [1036835.755730] usb 1-6.4.3: New USB device found, idVendor=0403, idProduct=6001
   [1036835.755732] usb 1-6.4.3: New USB device strings: Mfr=1, Product=2, SerialNumber=0
   [1036835.755733] usb 1-6.4.3: Product: USB <-> Serial
   [1036835.755734] usb 1-6.4.3: Manufacturer: FTDI
   [1036835.756728] ftdi_sio 1-6.4.3:1.0: FTDI USB Serial Device converter detected
   [1036835.756750] usb 1-6.4.3: Detected FT232BM
   [1036835.757195] usb 1-6.4.3: FTDI USB Serial Device converter now attached to ttyUSB0
/dev/ttyUSB0 is our device here.
Setup minicom
First add current user to plugdev group to use minicom without sudo or root.
sudo usermod -a -G plugdev $USER
Edit your ~/.bashrc and add the following line with some default parameter
alias minicom='minicom -w -t xterm -l -R UTF-8'
Login to a new terminal to take effect.
Create and edit file ~/.minirc.rockpiS, add the following content:
   pu port             /dev/ttyUSB0
   pu baudrate         1500000
   pu bits             8
   pu parity           N
   pu stopbits         1
   pu rtscts           No
Now run minicom rockpiS to use the config above and connects to the ROCK Pi S serial console.
Windows
Putty is also great serial tool that supports wide range baud rate.
Plug in the USB to TTL cable to you windows PC. Viewing the device manager you can find the COM number. Here it is COM3.
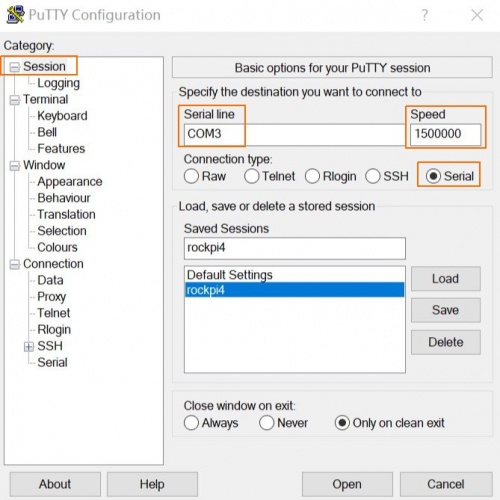
Launch the application Putty on your windows PC. And do the setting as follows:
For category Session, set serial line as COM3, speed ad 1500000, connection type as Serial.
Write rockpiS in the Saved Sessions column and press Save.
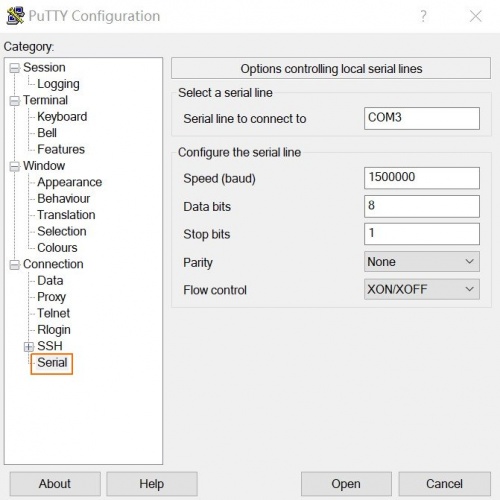
For category Connection---Serial, do the setting:
Once finish the setting, press Open button to start.
macOS
Tool picocom
Install picocom
% brew install --build-from-source radxa/picocom/picocom
Start picocom
% picocom -b 1500000 -d 8 /dev/tty.usbserial-2130
FAQs
1.While using debug console, there is system startup information on the screen, but the keyboard cannot be used to input text?
One of the reason would be the wrong setting of the serial tool, such as the Hardware Flow Control, etc. Here we should disable the Hardware Flow Control.
Troubleshooting
- Post your issue at the forum: https://forum.radxa.com/c/dev


