Difference between revisions of "Rock3/install/usb-install"
(→Boot the board to maskrom mode) |
(→Install Tools&Drivers) |
||
| Line 18: | Line 18: | ||
=== Install Tools&Drivers === | === Install Tools&Drivers === | ||
| − | + | Please check this guide, [[rock3/install/rockchip-flash-tools | Install rockchip flash tools]]. | |
| − | + | ||
| − | + | ||
| − | + | ||
| − | + | ||
| − | + | ||
| − | + | ||
| − | + | ||
| − | + | ||
| − | + | ||
| − | + | ||
| − | + | ||
| − | + | ||
| − | + | ||
| − | + | ||
| − | + | ||
| − | + | ||
| − | + | ||
| − | + | ||
| − | + | ||
| − | + | ||
| − | + | ||
| − | + | ||
| − | + | ||
| − | + | ||
| − | + | ||
| − | + | ||
| − | + | ||
| − | + | ||
| − | + | ||
| − | + | ||
| − | + | ||
| − | + | ||
| − | + | ||
| − | + | ||
| − | + | ||
| − | + | ||
| − | + | ||
| − | + | ||
| − | + | ||
| − | + | ||
| − | + | ||
| − | + | ||
| − | + | ||
| − | + | ||
| − | + | ||
| − | + | ||
| − | + | ||
| − | + | ||
| − | + | ||
| − | + | ||
| − | + | ||
| − | + | ||
| − | + | ||
| − | Install | + | |
| − | + | ||
| − | + | ||
| − | + | ||
| − | + | ||
| − | + | ||
| − | + | ||
| − | + | ||
| − | + | ||
| − | + | ||
| − | + | ||
| − | + | ||
| − | + | ||
| − | + | ||
| − | + | ||
| − | + | ||
| − | + | ||
| − | + | ||
| − | + | ||
| − | + | ||
| − | + | ||
| − | + | ||
| − | + | ||
| − | + | ||
| − | + | ||
| − | + | ||
| − | + | ||
| − | + | ||
| − | + | ||
| − | + | ||
=== Boot the board to maskrom mode === | === Boot the board to maskrom mode === | ||
Revision as of 03:58, 27 December 2021
ROCK 3 > Installation > Install to eMMC from USB port
Contents
Install on eMMC from USB port
Rock 3 supports Maskrom mode, which is a special operation mode for CPU to wait for USB OTG port command. The PC tools we use to communicate with rock 3 in Maskrom mode are the rkdeveloptool and AndroidTool tool. We use the rkdeveloptool in Linux/macOS and the AndroidTool tool under Windows.
Requirement
- ROCK 3A mainboard
- eMMC module
- Power adapter
- USB Male A to Male A cable(important) USB-C has been seen as not working, an adaptor for USB-C to USB-A has worked. See discussion.
Install Tools&Drivers
Please check this guide, Install rockchip flash tools.
Boot the board to maskrom mode
To boot ROCK 3A into maskrom mode is simple:
- Power off the board
- remove microSD card
- insert the eMMC module to eMMC socket
- Plug the USB Male A to Mail A cable to ROCK 3A OTG port(the upper USB3 port), the other side to PC
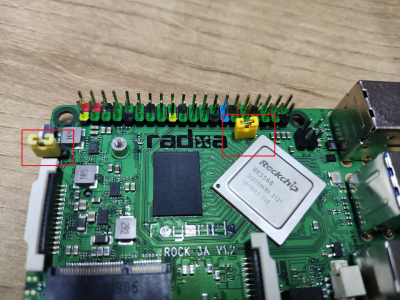
- Short the following pins. See the two yellow hats.
- Power on the board
- Take off the yellow hat on the right. Keep the yellow hat on the left there.
- See usb device
- For Linux/macOS: lsusb result: Bus 001 Device 112: ID 2207:350a Fuzhou Rockchip Electronics Company
- For Windows: Open RKDevTool and you would see the device is in "maskrom mode".
Alternatively, if you are running Android and can access ADB, you can reboot the device to loader mode 'adb reboot bootloader' then use the rkdeveloptool to reset the device into maskrom mode 'rkdeveloptool rd 3' or Windows AndroidTool Switch button to go to maskrom mode.
Begin Installation USB -> eMMC
Linux/macOS
On your PC, run the rkdeveloptool
 rkdeveloptool ld
 DevNo=1	Vid=0x2207,Pid=0x350a,LocationID=104	Maskrom
Download the loader (flash helper) to init the ram and prepare the flashing environment etc. If you don't have it, you can download it from here
rkdeveloptool db rk356x_spl_loader_ddr1056_v1.06.110.bin
Write the GPT image to eMMC, start to write from offset 0. For example.
rkdeveloptool wl 0 /path/to/rock3a-xxx-gpt.img
Reboot the device
rkdeveloptool rd
Now the device should boot the new image on eMMC.
Please notice that when you want to erase eMMC on board, you can use this command. Get zero.img from here.
 rkdeveloptool db rk356x_spl_loader_ddr1056_v1.06.110.bin
 rkdeveloptool wl 0 zero.img
Windows
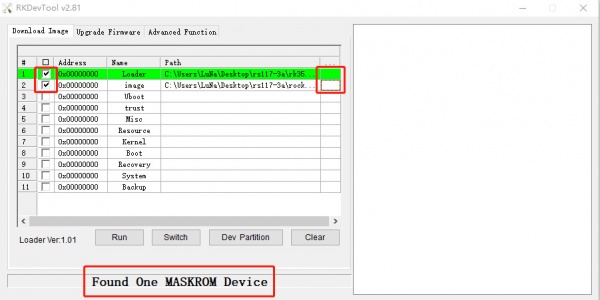
Double click the RKDevTool.exe and you will see the following interface:
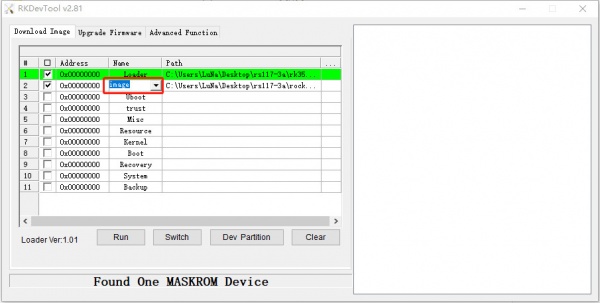
Double click this red box and modify it to image in the second row.
Step 1: Select Loader
If your ROCK 3 is in maskrom mode and connects to PC, you can see that the program detect it Found one MASKROM Device in the red box
Next, click the button in the first row on the right last columns select the loader "rk356x_xxx_ loader_ xxxxx.bin ",
Note: the loader (flash helper) is used to init the ram and prepare the flashing environment etc. If you don't have it, you can download it from here
Step 2: Select Image
Then click the right last columns to in the Image row and choose the image you want to flash.You can download the image from here
Note: Normally the image name should ends with xxx-gpt.img. If the image name ends with xxx-rkupdate.img, you can not flash with this method.
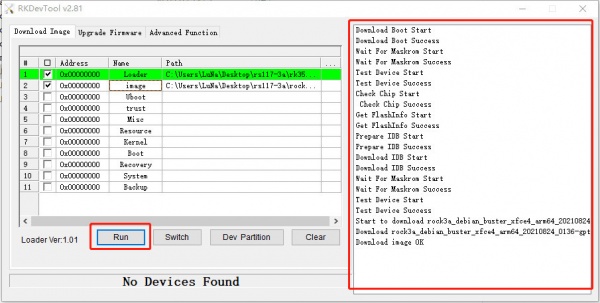
Step 3: Run
Finally, click the "run" button, and you will see the content on the right. When the progress reaches 100% or show Download image OK in the red box, the download is completed.
Troubleshooting
- If you have issue with flashing via USB OTG, start a new post on the forum, https://forum.radxa.com/c/rock3.


