Difference between revisions of "Zero/install/eMMC"
RadxaYuntian (Talk | contribs) |
RadxaYuntian (Talk | contribs) |
||
| Line 1: | Line 1: | ||
{{zero_header}} | {{zero_header}} | ||
| + | |||
{{Languages|zero/install/eMMC}} | {{Languages|zero/install/eMMC}} | ||
| + | |||
[[zero | Radxa Zero]] > [[zero/install | Installation]] > [[zero/install/eMMC | Install image to eMMC]] | [[zero | Radxa Zero]] > [[zero/install | Installation]] > [[zero/install/eMMC | Install image to eMMC]] | ||
| − | === How to install raw | + | === How to install raw image to Radxa Zero eMMC === |
| − | This guide describes how to install the raw images to Radxa Zero eMMC. Raw | + | This guide describes how to install the raw images to Radxa Zero eMMC. Raw image is the standard method to install Linux distro on single board computers, since they don't have standardized way to boot and initialized their hardware. |
| − | + | ||
| − | + | ||
== Requirement == | == Requirement == | ||
| Line 18: | Line 18: | ||
== Windows == | == Windows == | ||
| − | + | Please follow [[Zero/dev/maskrom#Enable_maskrom | maskrom guide]] to load extracted <code>rz-udisk-loader.bin</code>. Google driver and nexus-tools are not required. | |
| − | + | Your computer should detect a new storage device after the file is loaded. | |
| − | + | You can now flash your Linux image using balenaEtcher similar to [[Zero/getting_started#Write_Image | flash microSD card]]. Choose the newly detected device in your target drive and proceed as normal. | |
| − | + | Once you are done flashing, unplug and replug Radxa Zero to quit maskrom mode and boot normally. | |
| − | + | ||
| − | + | ||
| − | + | ||
| − | + | ||
== Linux & macOS == | == Linux & macOS == | ||
| − | |||
| − | |||
| − | |||
| − | |||
| − | |||
| − | |||
| − | |||
| − | |||
| − | |||
| − | + | Please follow [[Zero/dev/maskrom#Enable_maskrom | maskrom guide]] to load extracted <code>rz-udisk-loader.bin</code>. nexus-tools is not required. | |
| − | + | ||
It should output: | It should output: | ||
| Line 111: | Line 97: | ||
sync | sync | ||
| − | + | Once you are done flashing, unplug and replug Radxa Zero to quit maskrom mode and boot normally. | |
Revision as of 08:40, 6 December 2021
Radxa Zero > Installation > Install image to eMMC
How to install raw image to Radxa Zero eMMC
This guide describes how to install the raw images to Radxa Zero eMMC. Raw image is the standard method to install Linux distro on single board computers, since they don't have standardized way to boot and initialized their hardware.
Requirement
- Radxa Zero
- A PC/laptop running Windows, Linux, or macOS
- USB A to C cable or C to C cable, depending on your host
- A supported Linux image
Windows
Please follow maskrom guide to load extracted rz-udisk-loader.bin. Google driver and nexus-tools are not required.
Your computer should detect a new storage device after the file is loaded.
You can now flash your Linux image using balenaEtcher similar to flash microSD card. Choose the newly detected device in your target drive and proceed as normal.
Once you are done flashing, unplug and replug Radxa Zero to quit maskrom mode and boot normally.
Linux & macOS
Please follow maskrom guide to load extracted rz-udisk-loader.bin. nexus-tools is not required.
It should output:
Firmware Version :
ROM: 3.2 Stage: 0.0
Need Password: 0 Password OK: 1
Writing rz-udisk-loader.bin at 0xfffa0000...
[DONE]
Running at 0xfffa0000...
[DONE]
AMLC dataSize=16384, offset=65536, seq=0...
[DONE]
AMLC dataSize=49152, offset=393216, seq=1...
[DONE]
AMLC dataSize=16384, offset=229376, seq=2...
[DONE]
AMLC dataSize=49152, offset=245760, seq=3...
[DONE]
AMLC dataSize=49152, offset=294912, seq=4...
[DONE]
AMLC dataSize=16384, offset=65536, seq=5...
[DONE]
AMLC dataSize=1406320, offset=81920, seq=6...
[DONE]
[BL2 END]
Now lsusb should show the following device:
Bus 001 Device 082: ID 1b8e:2200 Amlogic, Inc. USB download gadget Serial: AMLG12A-RADXA-ZERO
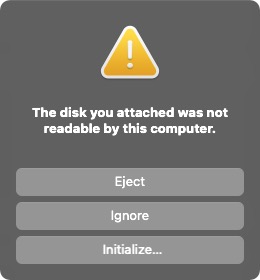
The Zero is in USB disk mode now, your computer should popup a new USB drive. On macOS you will get a disk not readable popup. Just click Ignore:
On Linux you will get following output from sudo dmesg:
[74292.229573] usb 1-10.2.3: new high-speed USB device number 84 using xhci_hcd
[74292.330483] usb 1-10.2.3: New USB device found, idVendor=1b8e, idProduct=c003, bcdDevice= 0.20
[74292.330487] usb 1-10.2.3: New USB device strings: Mfr=1, Product=2, SerialNumber=0
[74292.330488] usb 1-10.2.3: Product: GX-CHIP
[74292.330489] usb 1-10.2.3: Manufacturer: Amlogic
[74303.432510] usb 1-10.2.3: USB disconnect, device number 84
[74303.665204] usb 1-10.2.3: new high-speed USB device number 85 using xhci_hcd
[74303.769674] usb 1-10.2.3: New USB device found, idVendor=1b8e, idProduct=2200, bcdDevice=99.99
[74303.769678] usb 1-10.2.3: New USB device strings: Mfr=1, Product=2, SerialNumber=3
[74303.769679] usb 1-10.2.3: Product: USB download gadget
[74303.769680] usb 1-10.2.3: Manufacturer: Radxa
[74303.769681] usb 1-10.2.3: SerialNumber: AMLG12A-RADXA-ZERO
[74303.771008] usb-storage 1-10.2.3:1.0: USB Mass Storage device detected
[74303.771133] scsi host4: usb-storage 1-10.2.3:1.0
[74304.785353] scsi 4:0:0:0: Direct-Access     Linux    Radxa Zero UDisk  0ff PQ: 0 ANSI: 2
[74304.785506] sd 4:0:0:0: Attached scsi generic sg2 type 0
[74304.785679] sd 4:0:0:0: [sdc] 60749504 512-byte logical blocks: (31.1 GB/29.0 GiB)
[74304.785796] sd 4:0:0:0: [sdc] Write Protect is off
[74304.785798] sd 4:0:0:0: [sdc] Mode Sense: 0f 00 00 00
[74304.785916] sd 4:0:0:0: [sdc] Write cache: enabled, read cache: enabled, doesn't support DPO or FUA
[74304.833523]  sdc: sdc1
[74304.861751] sd 4:0:0:0: [sdc] Attached SCSI removable disk
[74305.424709] EXT4-fs (sdc1): recovery complete
[74305.425517] EXT4-fs (sdc1): mounted filesystem with writeback data mode. Opts: (null). Quota mode: none.
You can now use dd to write the raw image to the eMMC on Zero now.
   sudo dd if=/path/to/image of=/dev/new_dev bs=1M
   sync
Once you are done flashing, unplug and replug Radxa Zero to quit maskrom mode and boot normally.

