Difference between revisions of "Rock/flash the image/zh cn"
(→Troubleshooting) |
(→Linux) |
||
| Line 136: | Line 136: | ||
== Linux == | == Linux == | ||
| − | + | 从Android 4.4起,Rockchip提供了一个在Linux系统下的升级工具(闭源)。叫做“upgrade_tool”。 | |
| − | + | 它支持烧写update.img、parameter、bootloader和其他分区,注意它是基于命令行的工具。 | |
| − | rkflashkit | + | rkflashkit 是一个用于烧写瑞芯微设备的开源图形界面版本软件。它不能烧写bootloader或者parameter,只支持烧写内核和其他分区,但是它支持备份这些分区。 |
| − | + | ||
| + | 针对开发者: | ||
''The initial RE work of the Rockchip bootloader updating protocol is by naobsd and has been improved by some in '''rkflashtool'''. linuxerwang has made a GUI version of the rkflashtool called '''rkflashkit'''. Please note: both '''rkflashtool''' and '''rkflashkit''' can '''not''' flash the [[rock/update.img]] and can only flash within [[rock/bootloader]] mode and not [[rock/mask rom]] mode because the [[rock/mask rom]] updating protocol is not RE yet. If you are interested in the RE protocol ping naobsd at #radxa on IRC. Since the [[rock/bootloader]] has remained unchanged for a long time it's enough for normal usage. If you don't know what this means, just ignore it.'' | ''The initial RE work of the Rockchip bootloader updating protocol is by naobsd and has been improved by some in '''rkflashtool'''. linuxerwang has made a GUI version of the rkflashtool called '''rkflashkit'''. Please note: both '''rkflashtool''' and '''rkflashkit''' can '''not''' flash the [[rock/update.img]] and can only flash within [[rock/bootloader]] mode and not [[rock/mask rom]] mode because the [[rock/mask rom]] updating protocol is not RE yet. If you are interested in the RE protocol ping naobsd at #radxa on IRC. Since the [[rock/bootloader]] has remained unchanged for a long time it's enough for normal usage. If you don't know what this means, just ignore it.'' | ||
| − | === | + | === Rockchip的升级工具 === |
| − | + | 从 [http://dl.radxa.com/rock/tools/linux/Linux_Upgrade_Tool_v1.16.zip 这里]下载Rockchip的Linux升级工具并解压,然后你会得到一个在Linux下二进制可执行文件,叫做“upgrade_tool”。 | |
| − | + | ||
| − | + | ||
| − | + | ||
| − | + | ==== 烧写 update.img ==== | |
| + | 让板子进入 [[rock/recovery 模式]] 并运行以下命令烧写[[rock/update.img]]: | ||
| + | sudo ./upgrade_tool '''uf''' /path/to/update.img #(UF Upgrade Flash) | ||
| + | |||
| + | 如果你在升级过程中有一个错误,你可以首先使用以下命令来低格nandflash: | ||
sudo ./upgrade_tool '''lf''' #(LF Lowlevel Format) This will erase everything on nand | sudo ./upgrade_tool '''lf''' #(LF Lowlevel Format) This will erase everything on nand | ||
| − | ==== | + | ==== 烧写 parameter ==== |
sudo ./upgrade_tool '''di''' -p /path/to/parameter #(DI Download Image) | sudo ./upgrade_tool '''di''' -p /path/to/parameter #(DI Download Image) | ||
| − | ==== | + | ==== 烧写 bootloader ==== |
sudo ./upgrade_tool '''ul''' /path/to/bootloader #(UL Upgrade Loader) | sudo ./upgrade_tool '''ul''' /path/to/bootloader #(UL Upgrade Loader) | ||
| − | ==== | + | ==== 烧写内核(boot.img) ==== |
sudo ./upgrade_tool '''di''' -b /path/to/boot.img #(DI Download Image) | sudo ./upgrade_tool '''di''' -b /path/to/boot.img #(DI Download Image) | ||
| − | ==== | + | ==== 其他==== |
| − | + | 有一些在upgrade_tool中使用的其他命令,比如: | |
| − | UL: | + | UL: 升级loader |
| − | EF: | + | EF: 擦除nand flash |
=== Rkflashkit with GUI === | === Rkflashkit with GUI === | ||
| − | + | 你可以从 [http://dl.radxa.com/rock/tools/linux/rkflashkit_0.1.1_all.deb 这里]下载已经编译好的rkflashkit,或者使用以下命令自己编译它: | |
| − | + | ||
git clone https://github.com/linuxerwang/rkflashkit | git clone https://github.com/linuxerwang/rkflashkit | ||
cd rkflashkit | cd rkflashkit | ||
./waf debian | ./waf debian | ||
| − | + | 并使用以下命令安装: | |
sudo apt-get install python-gtk2 | sudo apt-get install python-gtk2 | ||
sudo dpkg -i rkflashkit_0.1.1_all.deb | sudo dpkg -i rkflashkit_0.1.1_all.deb | ||
| − | + | 使用以下命令运行: | |
sudo rkflashkit | sudo rkflashkit | ||
| − | + | 你会看到如下的界面: | |
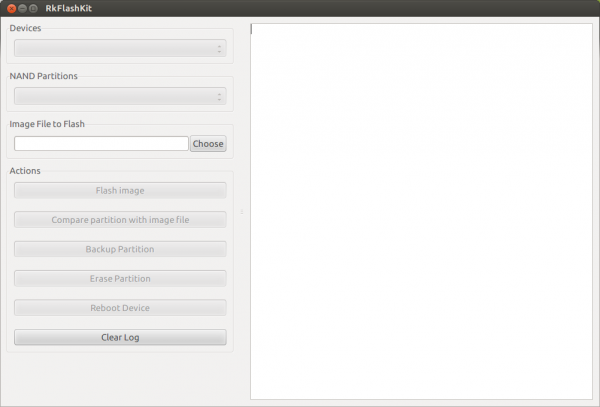
[[File:rkflashkit1.png| 600px]] | [[File:rkflashkit1.png| 600px]] | ||
| − | + | 连接Radxa Rock开发板和计算机,并且让板子进入[[rock/recovery 模式]] ,你将看到程序在Recovery模式下检测到板子。 | |
| − | # | + | # 单击 Nand partition,然后你会看到板子的分区列表,然后从其中选择一个你要烧写的分区。 |
| − | # | + | # 选择你想烧写到这个分区的镜像文件目录 |
| − | # | + | # 单击 “Flash image” 按钮,就会开始烧写。 |
| − | # | + | # 烧写结束后,单击“Reboot Device”按钮重启板子 |
Revision as of 06:26, 27 March 2014
这个页面描述怎么往Radxa Rock的NAND flash上装系统,即大家喜闻乐见的刷机. 你可以选择完全刷机(就是刷 update.img格式的固件)或者只刷特定的某个 分区. 你可以从radxa网站download下载radxa或者第三方 编译好的固件 或者制作你自己的固件.
开始之前
记住:
Radxa Rock是刷不死的,正如它的名字一样。除非你把硬件损坏了。
烧写固件所需要的硬件环境:
 * 一块Radxa Rock的开发板(全功能版本或者精简版本)
 * 一台运行windows XP/Windows 7(32位/64位)或者Linux(32位/64位)的计算机
 * 一根用于连接Radxa Rock开发板的OTG口和计算机USB口的microUSB线
Windows
Windows下烧写镜像的工具是由Rockchip提供的。你可以使用RKBatch Tool来烧写镜像文件 update.img,并使用RKDevelop Tool来烧写partitions配置文件 partitions。不过这两种工具都依赖于RK USB驱动,所以你首先需要根据以下步骤安装RK USB驱动:
Install driver
在Windows下有两种方式安装该驱动:
- 使用RKDriverAssistant tools安装 - 比较容易的方式
- 手动安装
如果你已经安装好了USB驱动,请跳过此步骤。
使用RK Driver Assistant tools安装
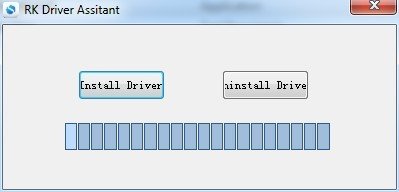
在此安装过程中不需要连接Rockchip设备,只需要下载并解压RKDriverAssistant.zip,然后在RKDriverAssistant目录下的DriveInstall.exe上双击运行即可。 如果你之前为其他Rockchip设备安装过Rockchip USB驱动,确保首先点击"Uninstall Driver"。
然后点击 “Install Driver” 。当安装完成时,关闭Radxa Rock开发板,并将开发板与你的计算机连接起来(使用MicroUSB线)(注意不要使用USB3.0接口),然后使开发板进入 recovery 模式,此时你的计算机将检测到开发板,并且你将在设备管理器中看到它。
现在驱动应该已经安装成功了。
手动安装
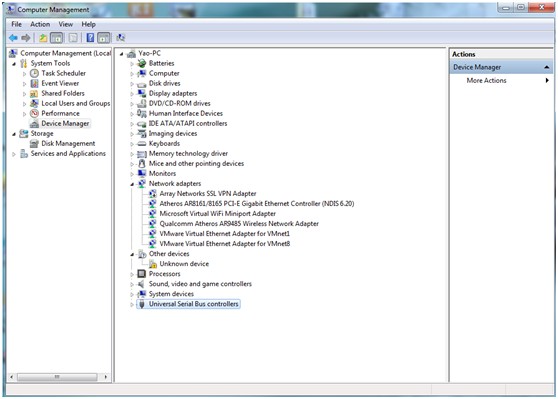
从 这里 下载(usb_driver_v3.5.zip) 文件,并解压该文件,关闭Radxa Rock开发板,然后使用MicroUSB线连接开发板和计算机,并让开发板进入 recovery 模式,然后你的计算机应该检测到开发板,同时你在设备管理器中会看到一个未知设备。
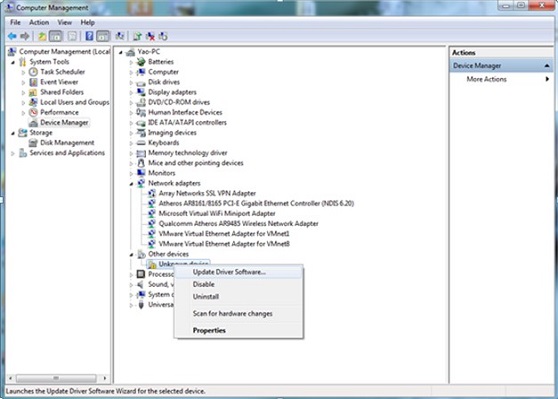
选择该未知设备,并右键点击它,然后选择“更新驱动程序软件”。
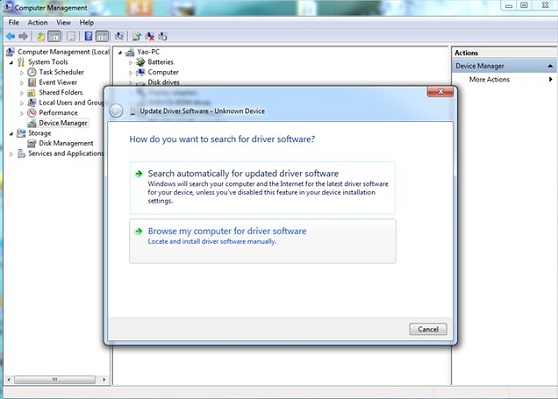
选择“浏览计算机以查找驱动程序”
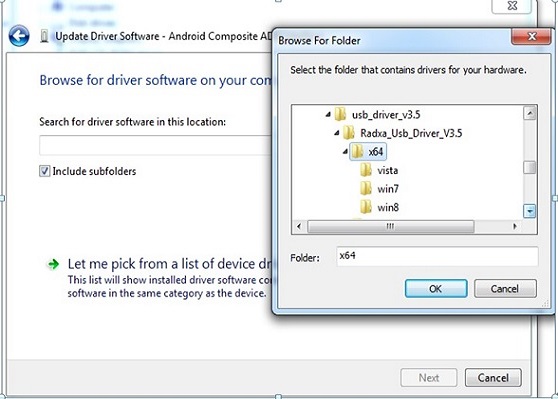
选择浏览,并在弹出的窗口中找到之前下载并解压的 (usb_driver_v3.5.zip)文件夹,选择32/64位文件夹其中之一,然后点击OK来安装
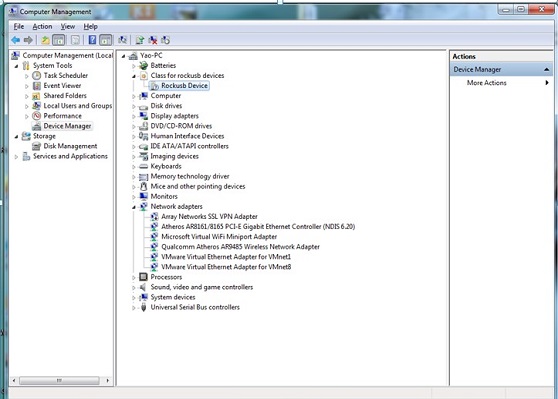
当驱动安装成功,你将在设备管理器中看到一个Rockusb设备
现在驱动程序已经安装成功了。
烧写镜像
要烧写一个镜像文件,我们有两种方式.
- 使用 RKBatchTool (工厂用来升级固件的工具,只能烧写update.img,注意会擦除原有的任何东西)
- 使用 RKAndroidTool (开发工具,可以按区块烧写)
使用 RKBatchTool 烧写 update.img
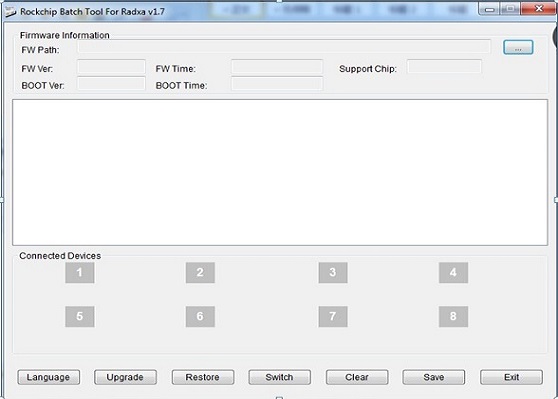
从这里下载RKBatchTool,然后解压,双击RKBatchTool.exe,你将看到如下界面:
选择一个镜像(rockdev/update.img)。如果需要如何制作一个update.img文件的话,查看 update.img。
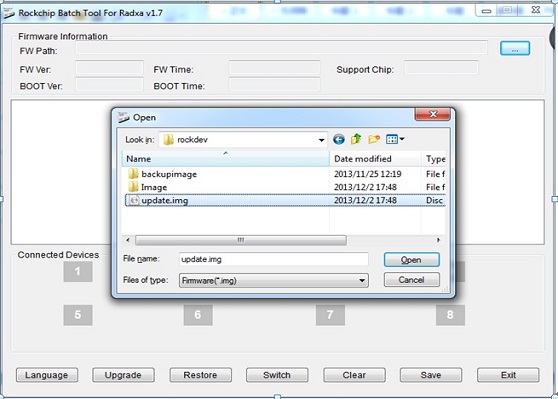
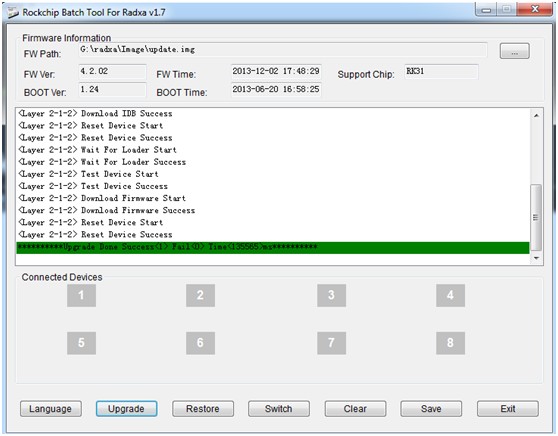
拔掉Radxa Rock开发板的电源,并使用MicroUSB线连接开发板与你的计算机,然后让开发板进入rock/recovery 模式 ,此时程序应该能检测到设备。
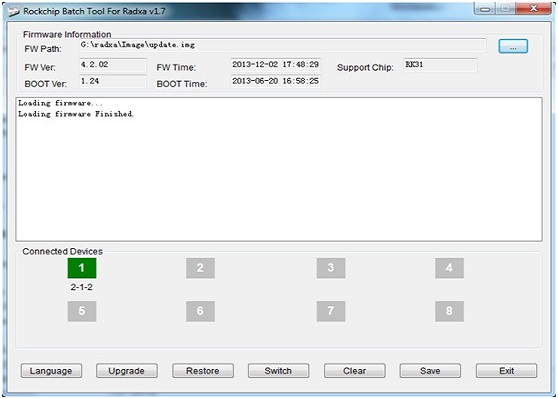
如果烧写操作失败,那么可能是update.img存在错误,你可以尝试重做以上操作或者重新制作update.img!
Using RKAndroidTool to falsh image by selection
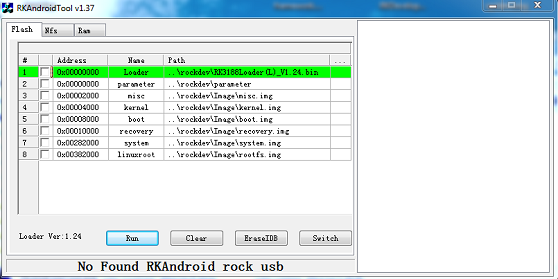
从这里下载RKAndroidTools,并解压,然后双击RKAndroidTool.exe,你将看到以下界面:
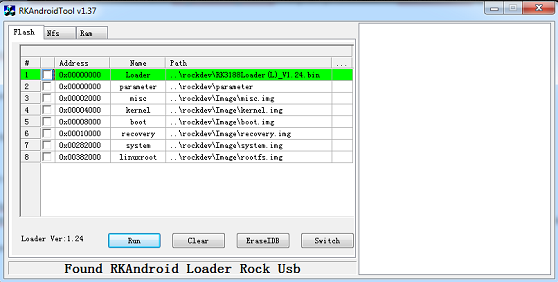
拔掉Radxa Rock开发板的电源,连接开发板和计算机,并让开发板进入rock/recovery 模式 ,然后程序会自动检测到设备。
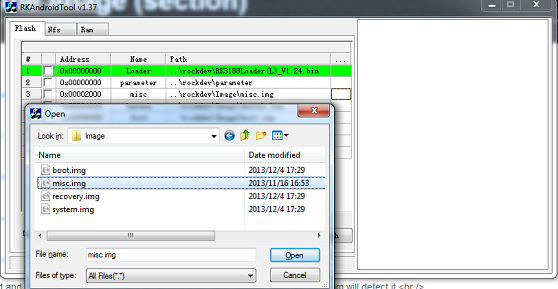
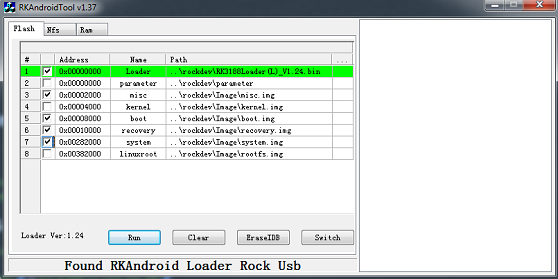
界面上有8个可选项,选择正确的行并且选中左边的选择框,然后你必须单击该行右侧的按钮,选择你想烧写的文件路径。你可以一次选择一个或者多个文件并烧写它们。最后单击“Run”烧写镜像(程序右侧的框里面会显示过程日志)。
如果成功的话,板子会自动断开,并且引导到系统。
请注意:
- 当你通过“./mkimage.sh.ota”打包镜像文件时,内核是包含在boot.img中的。详情请查看 Rock/Android_Build。
- 你可以根据需要一次烧写一个或者多个镜像文件
故障排除
RKBatchTool 检测不到开发板
1.Recovery 模式 : USB 设备硬件: VID_2207&PID_310B
2.引导进Android: USB 设备硬件: VID_2207&PID_0006
Recovery 模式
我已经手动安装了驱动,并且Recovery模式的USB为PID_310B,“Rockusb device”驱动在Vista上安装成功了,但是RKBatchTool连接不到RK3188的板子,导致无法烧写镜像。
对于Recovery模式无法连接的问题[已解决] 根本原因:RK3188板通过USB3.0 PMMCIA卡连接到笔记本电脑。这是一个USB2.0到USB3.0的兼容性问题,所以USB3.0端口换成USB 2.0端口,然后RKBatchTool应该连接到RK3188板子来烧写镜像了。
烧写失败
烧写后,串口打印:
DDR Version 1.04 20130517 In DDR3 300MHz Bus Width=32 Col=10 Bank=8 Row=15 CS=2 Die Bus-Width=16 Size=2048MB Memory OK OUT BUILD=====6 SdmmcInit=0 20 F:32 1061 0 0 40 FlashReadRetry error!!,row = fff000 FlashReadRetry error!!,row = fff000
同时无法引导。
如果烧写失败,尝试在烧写前格式化NandFlash。
- RKAndroidTool - 单击 “Erease IDB”按钮,格式化NandFlash。
- RKBatchTool - 单击 “Restore”按钮格式化,然后烧写镜像。
Preparing IDB failed
这发生在升级bootloader的时候,如果你需要升级bootloader或update.img中包含了一个新的引导程序,那么你可能会遇到这个问题。板子这是“变砖”了。。。按照这个 unbrick 说明解决它。
Linux
从Android 4.4起,Rockchip提供了一个在Linux系统下的升级工具(闭源)。叫做“upgrade_tool”。 它支持烧写update.img、parameter、bootloader和其他分区,注意它是基于命令行的工具。
rkflashkit 是一个用于烧写瑞芯微设备的开源图形界面版本软件。它不能烧写bootloader或者parameter,只支持烧写内核和其他分区,但是它支持备份这些分区。
针对开发者: The initial RE work of the Rockchip bootloader updating protocol is by naobsd and has been improved by some in rkflashtool. linuxerwang has made a GUI version of the rkflashtool called rkflashkit. Please note: both rkflashtool and rkflashkit can not flash the rock/update.img and can only flash within rock/bootloader mode and not rock/mask rom mode because the rock/mask rom updating protocol is not RE yet. If you are interested in the RE protocol ping naobsd at #radxa on IRC. Since the rock/bootloader has remained unchanged for a long time it's enough for normal usage. If you don't know what this means, just ignore it.
Rockchip的升级工具
从 这里下载Rockchip的Linux升级工具并解压,然后你会得到一个在Linux下二进制可执行文件,叫做“upgrade_tool”。
烧写 update.img
让板子进入 rock/recovery 模式 并运行以下命令烧写rock/update.img:
sudo ./upgrade_tool uf /path/to/update.img #(UF Upgrade Flash)
如果你在升级过程中有一个错误,你可以首先使用以下命令来低格nandflash:
sudo ./upgrade_tool lf #(LF Lowlevel Format) This will erase everything on nand
烧写 parameter
sudo ./upgrade_tool di -p /path/to/parameter #(DI Download Image)
烧写 bootloader
sudo ./upgrade_tool ul /path/to/bootloader #(UL Upgrade Loader)
烧写内核(boot.img)
sudo ./upgrade_tool di -b /path/to/boot.img #(DI Download Image)
其他
有一些在upgrade_tool中使用的其他命令,比如:
   UL: 升级loader
   EF: 擦除nand flash
Rkflashkit with GUI
你可以从 这里下载已经编译好的rkflashkit,或者使用以下命令自己编译它:
   git clone https://github.com/linuxerwang/rkflashkit
   cd rkflashkit
   ./waf debian
并使用以下命令安装:
   sudo apt-get install python-gtk2
   sudo dpkg -i rkflashkit_0.1.1_all.deb
使用以下命令运行:
sudo rkflashkit
你会看到如下的界面:
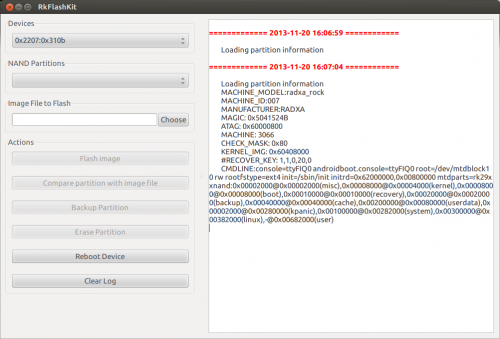
连接Radxa Rock开发板和计算机,并且让板子进入rock/recovery 模式 ,你将看到程序在Recovery模式下检测到板子。
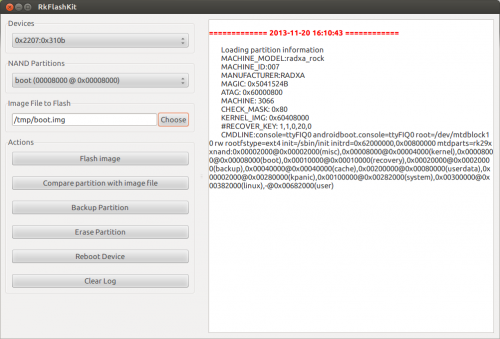
- 单击 Nand partition,然后你会看到板子的分区列表,然后从其中选择一个你要烧写的分区。
- 选择你想烧写到这个分区的镜像文件目录
- 单击 “Flash image” 按钮,就会开始烧写。
- 烧写结束后,单击“Reboot Device”按钮重启板子
Install the image on RR without PC
If you want to write the image on RR without any other host PC, you can download the image and write with dd:
sudo dd if=XXX.img of=/dev/block/mtd/by-name/XXX bs=16384 conv=sync,fsync

