Difference between revisions of "Dual Quad SATA HAT"
(→Introduction) |
(→Software support) |
||
| (16 intermediate revisions by 3 users not shown) | |||
| Line 1: | Line 1: | ||
| − | |||
{{Languages|Dual_Quad_SATA_HAT}} | {{Languages|Dual_Quad_SATA_HAT}} | ||
| Line 6: | Line 5: | ||
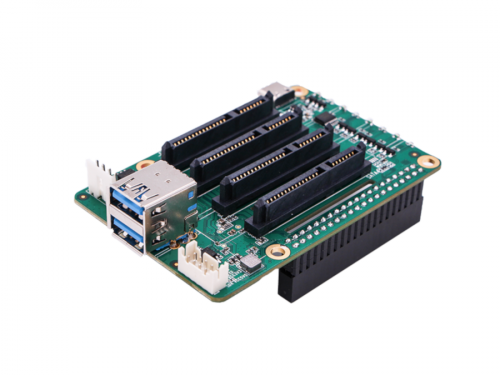
=== Introduction === | === Introduction === | ||
| − | + | __TOC__ | |
| − | ROCK Pi Dual/Quad SATA HAT is an addon HAT designed for Raspberry Pi 4. It utilizes the high speed USB3 buses on Raspberry Pi 4 and providing a complete NAS solution based on Raspberry Pi 4. It has the following features: | + | |
| + | ROCK Pi Dual/Quad SATA HAT is an addon HAT designed for Raspberry Pi 4. It utilizes the high-speed USB3 buses on Raspberry Pi 4 and providing a complete NAS solution based on Raspberry Pi 4. It has the following features: | ||
* Up to 4x HDD/SSD, support 2.5inch or 3.5inch SSD | * Up to 4x HDD/SSD, support 2.5inch or 3.5inch SSD | ||
| Line 19: | Line 19: | ||
* Optional PWM control fan for HDD heat dispatching | * Optional PWM control fan for HDD heat dispatching | ||
* Optional OLED display for IP/Storage info | * Optional OLED display for IP/Storage info | ||
| + | |||
| + | [[File:Quad_sata_hat_angle.png | 500px]] | ||
=== Software support === | === Software support === | ||
| − | We provide | + | We provide an install script to help you get the SATA software that works in Raspberry Pi 4B. |
| + | |||
| + | sudo apt update | ||
| + | sudo apt install python3-dev | ||
| + | wget https://github.com/radxa/rockpi-quad/releases/download/0.3.0/rockpi-quad.deb | ||
| + | sudo apt install -y ./rockpi-quad.deb | ||
| + | |||
| + | Just copy the commands above and paste it into the terminal and press enter. If you want more settings, check out section Software Configuration at the bottom of the page. | ||
| + | |||
| + | === Upgrade firmware === | ||
| + | |||
| + | 1. [https://forum.radxa.com/t/how-to-upgrade-f-w-with-jms561-under-raspberry-pi/3560 How to upgrade F/W with jms561 under Raspberry Pi] | ||
| + | |||
| + | 2. [https://forum.radxa.com/t/how-to-upgrade-f-w-with-jms561-under-windows/4437 How to upgrade F/W with jms561 under Windows] (recommend) | ||
| + | |||
| + | === Common NAS OS issues === | ||
| + | |||
| + | ===== OpenMediaVault ===== | ||
| + | |||
| + | '''OMV does not support using USB storage as RAID device. If this is your use case you will have to create the RAID yourself (using either MD-RAID or btrfs), update /etc/fstab to mount on boot, and use openmediavault-sharerootfs package to share it via OMV.''' | ||
| + | |||
| + | Install: [https://github.com/OpenMediaVault-Plugin-Developers/docs/blob/master/Adden-B-Installing_OMV5_on_an%20R-PI.pdf Installing OMV5 on Raspberry PI's] | ||
| + | |||
| + | Troubleshooting: | ||
| + | |||
| + | 1. [https://forum.radxa.com/t/quad-sata-kit-and-openmediavault-5-raspberry-pi-4/3193 OMV WebUI only shows two HDD's] | ||
| + | |||
| + | This is likely because JMicron controllers incorrectly report identical serial numbers and other data which confuses various systems. | ||
| + | |||
| + | You can “fix” this by adding a rule to /lib/udev/rules.d/60-persistent-storage.rules '''after''' the entry for '''“Fall back usb_id for USB devices”''': | ||
| + | |||
| + | # Fix Quad SATA HAT disk serial number | ||
| + | KERNEL=="sd*", ATTRS{idVendor}=="1058", ATTRS{idProduct}=="0a10", SUBSYSTEMS=="usb", PROGRAM="/root/serial.sh %k", ENV{ID_SERIAL}="USB-%c", ENV{ID_SERIAL_SHORT}="%c" | ||
| + | |||
| + | You will also need to create '''/root/serial.sh''' containing the following: | ||
| + | |||
| + | #!/bin/bash | ||
| + | /sbin/hdparm -I /dev/$1 | grep 'Serial Number' | awk '{print $3}' | ||
| + | |||
| + | |||
| + | And you need to add execute permission to the file via the following: | ||
| + | |||
| + | chmod +x /root/serial.sh | ||
| + | |||
| + | |||
| + | Finally, install the hdparm. | ||
| + | |||
| + | sudo apt-get install hdparm | ||
| + | |||
| + | This will ensure that unique paths are created based on the serial number of the actual drives and not the hat. | ||
| + | |||
| + | === RTC support(optional) === | ||
| + | |||
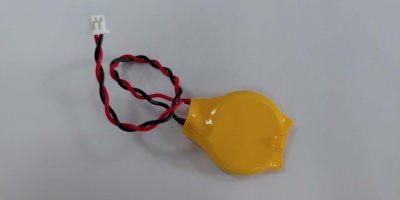
| + | In version 1.2, we added RTC functionality. If you want to use the RTC, you will need to install a battery (socket next to the fan). For Raspbian, you can do this to enable RTC: | ||
| − | + | Add '''dtoverlay=i2c-rtc,pcf8563''' to the /boot/config.txt and reboot. Execute '''sudo hwclock -w''' after reboot. | |
| − | + | [[File:Rtc-battery.jpeg | 400px]] | |
=== Supplied with this product === | === Supplied with this product === | ||
| Line 66: | Line 121: | ||
=== Model Number === | === Model Number === | ||
| − | Since the Raspberry Pi 4 changes the form factor(swapping USB and RJ45), we need different USB connection adapter. The ROCK Pi 4 shares form factor with Raspberry Pi 3/3B+. Below is the different model number: | + | Since the Raspberry Pi 4 changes the form factor(swapping USB and RJ45), we need a different USB connection adapter. The ROCK Pi 4 shares form factor with Raspberry Pi 3/3B+. Below is the different model number: |
{| class="wikitable" border="1" | {| class="wikitable" border="1" | ||
| Line 279: | Line 334: | ||
<div class="lazyYT" data-youtube-id="xz-AhmjiTu8" data-ratio="16:9">loading ... </div> (click image to play or watch on [https://www.youtube.com/watch?v=xz-AhmjiTu8&feature=youtu.be Youtube]) | <div class="lazyYT" data-youtube-id="xz-AhmjiTu8" data-ratio="16:9">loading ... </div> (click image to play or watch on [https://www.youtube.com/watch?v=xz-AhmjiTu8&feature=youtu.be Youtube]) | ||
</div> | </div> | ||
| + | |||
| + | |||
| + | |||
| + | <div class="clearfix"></div> | ||
| + | |||
| + | ==== Full Setup Quad Sata Hat for Raspberry Pi 4 NAS Review ==== | ||
| + | |||
| + | <div class="col-md-6"> | ||
| + | <div class="lazyYT" data-youtube-id="Eix0PCB0byQ" data-ratio="16:9">loading ... </div> (click image to play or watch on [https://www.youtube.com/watch?v=Eix0PCB0byQ&feature=youtu.be Youtube]) | ||
| + | </div> | ||
| + | |||
| + | |||
| + | |||
<div class="clearfix"></div> | <div class="clearfix"></div> | ||
| Line 299: | Line 367: | ||
| 3 ~ 5W | | 3 ~ 5W | ||
|- | |- | ||
| − | | | + | | 3.5 HDD |
| 5 ~10W | | 5 ~10W | ||
|} | |} | ||
| Line 308: | Line 376: | ||
=====Option 1: Powering from Raspberry Pi/ROCK Pi 40P GPIO header ===== | =====Option 1: Powering from Raspberry Pi/ROCK Pi 40P GPIO header ===== | ||
| − | The Raspberry Pi GPIO [https://pinout.xyz/pinout/pin2_5v_power +5V can provide up to 1.5A power], the typical SSD is [https://www.anandtech.com/show/8747/samsung-ssd-850-evo-review/10 3W power consumption]. So you can drive up to two SSDs directly powering from Raspberry Pi with good 5V/5A USB C power adapter. | + | The Raspberry Pi GPIO [https://pinout.xyz/pinout/pin2_5v_power +5V can provide up to 1.5A power], the typical SSD is [https://www.anandtech.com/show/8747/samsung-ssd-850-evo-review/10 3W power consumption]. So you can drive up to two SSDs directly powering from Raspberry Pi with a good 5V/5A USB C power adapter. |
The ROCK Pi 4 GPIO +5V can provide up to 4A current. You can drive four SSD/HDD directly if your power adapter can provide > 35W power. | The ROCK Pi 4 GPIO +5V can provide up to 4A current. You can drive four SSD/HDD directly if your power adapter can provide > 35W power. | ||
| Line 316: | Line 384: | ||
'''V1.1 SATA HAT''' | '''V1.1 SATA HAT''' | ||
| − | For V1.1 hardware revision, we use USB C for the power input on SATA HAT with PD/QC support. Same as option 1, you can choose USB PD power adapter > 35W to | + | For V1.1 hardware revision, we use USB C for the power input on SATA HAT with PD/QC support. Same as option 1, you can choose USB PD power adapter > 35W to drive up to four 2.5inch HDDs and Raspberry PI at the same time. 3.5inch HDD powering is not supported by the USB C port. |
'''V1.2 SATA HAT''' | '''V1.2 SATA HAT''' | ||
| − | For V1.2, we changed the power jack on SATA HAT to 12V DC because the 12V power adapter is much cheaper than USB C PD adapter. Also, users want to power 3.5inch HDD with power adapter instead of ATX PSU. The 12V DC jack is 5.5x2.1mm diameter. You need at least 12V/3A to power four 2.5inch HDD and 12V/5A to power four 3.5inch HDD. | + | For V1.2, we changed the power jack on SATA HAT to 12V DC because the 12V power adapter is much cheaper than the USB C PD adapter. Also, users want to power 3.5inch HDD with a power adapter instead of ATX PSU. The 12V DC jack is 5.5x2.1mm diameter. You need at least 12V/3A to power four 2.5inch HDD and 12V/5A to power four 3.5inch HDD. |
=====Option 3: Powering from ATX PSU===== | =====Option 3: Powering from ATX PSU===== | ||
| − | If you plan to put the SATA HAT in a PC enclosure, then you can use the ATX PSU. Mostly ATX PSU can meet the power requirement. You need | + | If you plan to put the SATA HAT in a PC enclosure, then you can use the ATX PSU. Mostly ATX PSU can meet the power requirement. You need an ATX Floppy cable to power the SATA HAT and Raspberry Pi. |
=== Software configuration === | === Software configuration === | ||
| Line 372: | Line 440: | ||
f-temp = false | f-temp = false | ||
</syntaxhighlight> | </syntaxhighlight> | ||
| + | |||
| + | === SATA HAT Firmware Update === | ||
| + | |||
| + | See Forum Discussion -> [https://forum.radxa.com/t/how-to-upgrade-f-w-with-jms561-under-raspberry-pi/3560 How to upgrade F/W with jms561 under Raspberry Pi] | ||
| + | |||
| + | === Troubleshooting === | ||
| + | |||
| + | 1. [https://forum.radxa.com/t/quad-sata-hat-assembly-and-troubleshooting/3879 Quad SATA HAT Assembly and Troubleshooting] | ||
=== Dimensions === | === Dimensions === | ||
=== Hardware Revision === | === Hardware Revision === | ||
Latest revision as of 08:53, 20 June 2024
Home > SATA HAT > Dual/Quad SATA HAT
Introduction
Contents
- 1 Introduction
- 2 Software support
- 3 Upgrade firmware
- 4 Common NAS OS issues
- 5 RTC support(optional)
- 6 Supplied with this product
- 7 Other hardware needed
- 8 Model Number
- 9 PINOUT
- 10 Getting Started
- 11 Software configuration
- 12 SATA HAT Firmware Update
- 13 Troubleshooting
- 14 Dimensions
- 15 Hardware Revision
ROCK Pi Dual/Quad SATA HAT is an addon HAT designed for Raspberry Pi 4. It utilizes the high-speed USB3 buses on Raspberry Pi 4 and providing a complete NAS solution based on Raspberry Pi 4. It has the following features:
- Up to 4x HDD/SSD, support 2.5inch or 3.5inch SSD
- Utilize two independent USB3 buses on Raspberry Pi 4
- Type C power input with USB PD support for both 2.5inch SSD and Raspberry Pi 4(v1.1 hardware)
- 12V DC power input for 2.5 and 3.5 inch HDD and Raspberry Pi 4(v1.2 hardware)
- External standard ATX power supply support for 3.5inch HDD
- Support HDD suspend mode
- Support software RAID 0/1/5
- Support USB Direct Access Mode from PC
- Optional PWM control fan for HDD heat dispatching
- Optional OLED display for IP/Storage info
Software support
We provide an install script to help you get the SATA software that works in Raspberry Pi 4B.
 sudo apt update
 sudo apt install python3-dev
 wget https://github.com/radxa/rockpi-quad/releases/download/0.3.0/rockpi-quad.deb
 sudo apt install -y ./rockpi-quad.deb
Just copy the commands above and paste it into the terminal and press enter. If you want more settings, check out section Software Configuration at the bottom of the page.
Upgrade firmware
1. How to upgrade F/W with jms561 under Raspberry Pi
2. How to upgrade F/W with jms561 under Windows (recommend)
Common NAS OS issues
OpenMediaVault
OMV does not support using USB storage as RAID device. If this is your use case you will have to create the RAID yourself (using either MD-RAID or btrfs), update /etc/fstab to mount on boot, and use openmediavault-sharerootfs package to share it via OMV.
Install: Installing OMV5 on Raspberry PI's
Troubleshooting:
1. OMV WebUI only shows two HDD's
This is likely because JMicron controllers incorrectly report identical serial numbers and other data which confuses various systems.
You can “fix” this by adding a rule to /lib/udev/rules.d/60-persistent-storage.rules after the entry for “Fall back usb_id for USB devices”:
   # Fix Quad SATA HAT disk serial number
   KERNEL=="sd*", ATTRS{idVendor}=="1058", ATTRS{idProduct}=="0a10", SUBSYSTEMS=="usb", PROGRAM="/root/serial.sh %k", ENV{ID_SERIAL}="USB-%c", ENV{ID_SERIAL_SHORT}="%c"
You will also need to create /root/serial.sh containing the following:
   #!/bin/bash
   /sbin/hdparm -I /dev/$1 | grep 'Serial Number' | awk '{print $3}'
And you need to add execute permission to the file via the following:
chmod +x /root/serial.sh
Finally, install the hdparm.
sudo apt-get install hdparm
This will ensure that unique paths are created based on the serial number of the actual drives and not the hat.
RTC support(optional)
In version 1.2, we added RTC functionality. If you want to use the RTC, you will need to install a battery (socket next to the fan). For Raspbian, you can do this to enable RTC:
Add dtoverlay=i2c-rtc,pcf8563 to the /boot/config.txt and reboot. Execute sudo hwclock -w after reboot.
Supplied with this product
Dual version
- ROCK Pi Dual SATA HAT
- Mechanical spacers
- 2x USB 3.0 connection adapter *1
- CPU heatsink with fan(DF4 version only)
Quad version
- ROCK Pi Quad SATA HAT
- Mechanical spacers
- 4x USB 3.0 connection adapter *1
- CPU heatsink with fan(DF4 version only)
SATA HAT Top board(Optional)
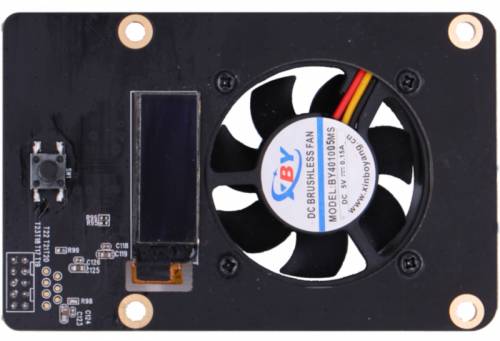
- 0.91inch OLED
- One GPIO button
- PWM controlled 40x40mm FAN
Metal Case(Optional)
- Holds up to four 2.5 inch HDDs/SSDs
- Supports top board
- Top acrylic cover for OLED display
- Support fan for HDD heat dispatching air flow
- One button for powering off and OLED info switch
Other hardware needed
- Proper power adapter(Check power options below for more info)
- 2.5inch or 3.5inch HDD/SSD
- Raspberry Pi 4 or ROCK Pi 4 with OS running
- optional 7+15P SATA cable(For 3.5inch HDD or extending the length)
Model Number
Since the Raspberry Pi 4 changes the form factor(swapping USB and RJ45), we need a different USB connection adapter. The ROCK Pi 4 shares form factor with Raspberry Pi 3/3B+. Below is the different model number:
| Model | Description |
|---|---|
| DF4 | Dual version for Raspberry Pi 4 |
| QF3 | Quad version for ROCK Pi 4, Raspberry Pi 3/3B+ |
| QF4 | Quad version for Raspberry Pi 4 |
PINOUT
Pinout for 40PIN GPIO header
| Description | Function | Pin# | Pin# | Function | Description | |
|---|---|---|---|---|---|---|
| 1 | 2 | VCC5V0_SYS | ||||
| OLED I2C | I2C_SDA | 3 | 4 | VCC5V0_SYS | ||
| OLED I2C | I2C_SCL | 5 | 6 | |||
| 7 | 8 | |||||
| 9 | 10 | |||||
| top board key | GPIO4_C2 | 11 | 12 | |||
| GPIO4_C6 | 13 | 14 | ||||
| 15 | 16 | GPIO4_D2 | reset OLED | |||
| 17 | 18 | |||||
| 19 | 20 | |||||
| 21 | 22 | GPIO_RST1 | reset SATA1/2 | |||
| 23 | 24 | |||||
| 25 | 26 | ADC_IN0 | ||||
| SDA | 27 | 28 | SCL | |||
| 29 | 30 | |||||
| 31 | 32 | |||||
| control tb-fan speed | PWM_33 | 33 | 34 | |||
| 35 | 36 | |||||
| reset SATA3/4 | GPIO_RST2 | 37 | 38 | |||
| 39 | 40 |
Pinout for 2x5 PHD 2.0mm connector
| Function | Pin# | Pin# | Function | |
|---|---|---|---|---|
| I2C_SDA | 1 | 2 | VCC3V3_SYS | |
| I2C_SCL | 3 | 4 | VCC5V0_SYS | |
| GPIO4_D2 | 5 | 6 | GPIO4_C2 | |
| GND | 7 | 8 | PWM_33 | |
| GND | 9 | 10 | NC |
Getting Started
Assemble the Kits
Full Setup Quad Sata Hat for Raspberry Pi 4 NAS Review
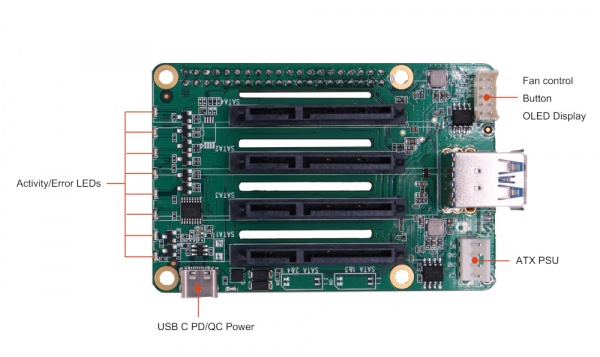
Detail of the HAT board
Power Options
Power consumptions for typical disks:
| Power Consumption | |
|---|---|
| SSD | <3W |
| 2.5 HDD | 3 ~ 5W |
| 3.5 HDD | 5 ~10W |
Note: the table above is for reference, check your disk label for the exact power consumption. More info can be found here.
Option 1: Powering from Raspberry Pi/ROCK Pi 40P GPIO header
The Raspberry Pi GPIO +5V can provide up to 1.5A power, the typical SSD is 3W power consumption. So you can drive up to two SSDs directly powering from Raspberry Pi with a good 5V/5A USB C power adapter.
The ROCK Pi 4 GPIO +5V can provide up to 4A current. You can drive four SSD/HDD directly if your power adapter can provide > 35W power.
Option 2: Powering from USB C or DC Jack on SATA HAT
V1.1 SATA HAT
For V1.1 hardware revision, we use USB C for the power input on SATA HAT with PD/QC support. Same as option 1, you can choose USB PD power adapter > 35W to drive up to four 2.5inch HDDs and Raspberry PI at the same time. 3.5inch HDD powering is not supported by the USB C port.
V1.2 SATA HAT
For V1.2, we changed the power jack on SATA HAT to 12V DC because the 12V power adapter is much cheaper than the USB C PD adapter. Also, users want to power 3.5inch HDD with a power adapter instead of ATX PSU. The 12V DC jack is 5.5x2.1mm diameter. You need at least 12V/3A to power four 2.5inch HDD and 12V/5A to power four 3.5inch HDD.
Option 3: Powering from ATX PSU
If you plan to put the SATA HAT in a PC enclosure, then you can use the ATX PSU. Mostly ATX PSU can meet the power requirement. You need an ATX Floppy cable to power the SATA HAT and Raspberry Pi.
Software configuration
Just edit /etc/rockpi-sata.conf, take it effect by below command
sudo systemctl restart rockpi-sata.service
Below is the default /etc/rockpi-sata.conf, which you can modify according to the comments
[fan]# When the temperature is above lv0 (35'C), the fan at 25% power,
# and lv1 at 50% power, lv2 at 75% power, lv3 at 100% power.
# When the temperature is below lv0, the fan is turned off.
# You can change these values if necessary.
lv0 = 35
lv1 = 40
lv2 = 45
lv3 = 50
[key]# You can customize the function of the key, currently available functions are
# slider: oled display next page
# switch: fan turn on/off switch
# reboot, poweroff
# If you have any good suggestions for key functions,
# please add an issue on https://rock.sh/rockpi-sata
click = slider
twice = switch
press = none
[time]# twice: maximum time between double clicking (seconds)
# press: long press time (seconds)
twice = 0.7
press = 1.8
[slider]# Whether the oled auto display next page and the time interval (seconds)
auto = true
time = 10
[oled]# Whether rotate the text of oled 180 degrees, whether use Fahrenheitrotate = false
f-temp = false
SATA HAT Firmware Update
See Forum Discussion -> How to upgrade F/W with jms561 under Raspberry Pi
Troubleshooting
1. Quad SATA HAT Assembly and Troubleshooting

