Difference between revisions of "RockpiN10/dev/usb-install"
(→Install to eMMC via USB) |
(→Boot the board to Maskrom mode) |
||
| (16 intermediate revisions by 2 users not shown) | |||
| Line 6: | Line 6: | ||
[[rockpiN10 | ROCK Pi N10]] > [[rockpiN10/dev | Development]] > [[rockpiN10/dev/usb-install | Install from USB OTG ]] | [[rockpiN10 | ROCK Pi N10]] > [[rockpiN10/dev | Development]] > [[rockpiN10/dev/usb-install | Install from USB OTG ]] | ||
| − | ROCK Pi N10 comes with on board eMMC, you can install images to eMMC with USB. The installation is running in | + | This guide describes how to flash the '''GPT-FORMAT''' system image from USB OTG port. |
| + | |||
| + | ROCK Pi N10 comes with on board eMMC, you can install images to eMMC with USB. The installation is running in Maskrom mode, which is a special running mode that the CPU is waiting for command from USB OTG port. We can flash the system image on Windwos/Linux/Mac. We recommend AndroidTool on Windows PC while rkdeveloptool on Linux/Mac. | ||
=== Requirement === | === Requirement === | ||
| Line 13: | Line 15: | ||
* '''USB Male A to Male A cable'''(important) USB-C has been seen as not working, an adaptor for USB-C to USB-A has worked. [https://forum.radxa.com/t/otg-flashing-not-working/717 See discussion]. | * '''USB Male A to Male A cable'''(important) USB-C has been seen as not working, an adaptor for USB-C to USB-A has worked. [https://forum.radxa.com/t/otg-flashing-not-working/717 See discussion]. | ||
| − | === | + | === Boot the board to Maskrom mode === |
| − | ==== Linux==== | + | |
| + | To boot ROCK Pi N10 into maskrom mode is simple since we have the maskrom key on board. | ||
| + | * Power off the board and '''remove any bootable storage media''' such as microSD card. If your board has SPI Flash and you have bootloader in SPI flash, you need to shortcut SPI flash first as picture below. Or you can erase SPI flash at first. | ||
| + | |||
| + | [[File:Rockpin10_spi_shortcut.jpeg | 300px ]](click to view large image) | ||
| + | |||
| + | * Plug the USB Male A to Mail A cable to ROCK Pi N10 OTG port(the front USB3 port), the other side to PC | ||
| + | |||
| + | [[File:Rockpin10_usb_install.jpeg | 300px ]](click to view large image) | ||
| + | |||
| + | * Power on the board | ||
| + | * Press and hold the '''maskrom''' key, short press the '''reset''' key | ||
| + | |||
| + | [[File:Rockpin10_maskrom_key.jpeg | 300px]](click to view large image) | ||
| + | |||
| + | * Release the '''maskrom''' key | ||
| + | |||
| + | Check if the board is in the maskrom mode. | ||
| + | |||
| + | Now on your Linux/MAC PC, '''lsusb''' command would show the following usb devices | ||
| + | |||
| + | Bus 001 Device 014: ID 2207:330c Fuzhou Rockchip Electronics Company RK3399 in Mask ROM mode | ||
| + | |||
| + | On windows PC, you will see it within device manager. | ||
| + | |||
| + | [[File:RK_Driver_Assistant_Install_Usb_driver.png]] | ||
| + | |||
| + | === Operation on Windows PC === | ||
| + | |||
| + | ==== Setup tools Rockchip_DriverAssitant ==== | ||
| + | |||
| + | Download and extract [https://dl.radxa.com/rock/tools/windows/DriverAssitant_v4.8.zip Rockchip_DriverAssitant V4.8]. | ||
| + | |||
| + | Then double click on DriverInstall.exe in the Rockchip_DriverAssitant_v4.8 directory to start the utility. | ||
| + | |||
| + | press the button "Install Driver" and a window showing "Install driver ok." is popped up. | ||
| + | |||
| + | When ROCK Pi N10 is in Maskrom mode, you will see a Rockusb device on the device manager window. | ||
| + | |||
| + | [[File:RK_Driver_Assistant_Install_Usb_driver.png]] | ||
| + | |||
| + | Now the driver has been installed successfully! | ||
| + | |||
| + | ==== Flash system image via AndroidTool ==== | ||
| + | |||
| + | Download and extract [https://dl.radxa.com/tools/windows/AndroidTool_Release_v2.69.zip AndroidTool V2.69] | ||
| + | |||
| + | * Step 1: Double click file AndroidTool.exe to start the application. | ||
| + | * Step 2: Select the Download Image page, you will see "Found One MASKROM device" | ||
| + | * Step 3: Add one item line, the Loader line. And select the loader. [https://dl.radxa.com/rockpin10/images/loader/rk3399pro_loader_3GB_ddr_v1.22.115.bin rk3399pro_loader_3GB_ddr_v1.22.115.bin] for ROCK Pi N10 Model A and [https://dl.radxa.com/rockpin10/images/loader/rk3399pro_loader_v1.20.115.bin rk3399pro_loader_v1.20.115.bin] for ROCK Pi N10 Model B/C. | ||
| + | * Step 4: Add one item line, the Image line. And select the system image. | ||
| + | * Step 5: Click "Run" and wait until the flash work is done. | ||
| + | |||
| + | [[File:androidtool-setting.png | 800px ]] | ||
| + | |||
| + | [[File:androidtool-download-image.png | 800px ]] | ||
| + | |||
| + | === Operation on Linux/Mac PC === | ||
| + | ==== Setup tool rkdeveloptool on Linux PC ==== | ||
| + | |||
To build rkdeveloptool on a debain based Linux distribution, follow the instruction below: | To build rkdeveloptool on a debain based Linux distribution, follow the instruction below: | ||
| Line 28: | Line 89: | ||
If you encounter compile error like below | If you encounter compile error like below | ||
| − | + | ./configure: line 4269: syntax error near unexpected token `LIBUSB1,libusb-1.0' | |
| − | + | ./configure: line 4269: `PKG_CHECK_MODULES(LIBUSB1,libusb-1.0)' | |
| − | + | ||
You should install pkg-config libusb-1.0 | You should install pkg-config libusb-1.0 | ||
| − | + | sudo apt-get install pkg-config libusb-1.0 | |
Then re-run | Then re-run | ||
| − | + | autoreconf -i | |
| − | + | ./configure | |
| − | + | make | |
Now you have rkdeveloptool executable at the current directory. | Now you have rkdeveloptool executable at the current directory. | ||
sudo cp rkdeveloptool /usr/local/bin/ | sudo cp rkdeveloptool /usr/local/bin/ | ||
| − | ==== | + | ==== Setup tool rkdeveloptool on Mac PC ==== |
To build rkdeveloptool on macOS, you need [https://brew.sh/ homebrew](or similar package manager) to install required packages. | To build rkdeveloptool on macOS, you need [https://brew.sh/ homebrew](or similar package manager) to install required packages. | ||
| Line 49: | Line 109: | ||
Install build dependency: | Install build dependency: | ||
| − | + | brew install automake autoconf libusb | |
Clone the source code and build: | Clone the source code and build: | ||
| − | + | git clone https://github.com/rockchip-linux/rkdeveloptool | |
| − | + | cd rkdeveloptool | |
| − | + | autoreconf -i | |
| − | + | ./configure | |
| − | + | make | |
If you encounter compile error like below | If you encounter compile error like below | ||
| − | + | ./configure: line 4269: syntax error near unexpected token `LIBUSB1,libusb-1.0' | |
| − | + | ./configure: line 4269: `PKG_CHECK_MODULES(LIBUSB1,libusb-1.0)' | |
| − | + | ||
You should install pkg-config libusb-1.0 | You should install pkg-config libusb-1.0 | ||
| − | + | brew install pkg-config | |
Then re-run | Then re-run | ||
| − | + | autoreconf -i | |
| − | + | ./configure | |
| − | + | make | |
Now you have rkdeveloptool executable at the current directory. | Now you have rkdeveloptool executable at the current directory. | ||
| − | + | sudo cp rkdeveloptool /usr/local/bin/ | |
| − | + | ||
| − | + | ||
| − | + | ||
| − | + | ||
| − | + | ||
| − | + | ||
| − | + | ||
| − | + | ||
| − | + | ||
| − | + | ||
| − | + | ||
| − | + | ||
| − | + | ||
| − | + | ||
| − | + | ||
| − | + | ||
| − | + | ||
| − | + | ||
| − | + | ||
| − | + | ||
| − | + | ||
| − | + | ||
| − | + | ||
| − | + | ||
| − | + | ||
| − | + | ||
| − | === | + | ==== Flash system image ==== |
On your PC, run the rkdeveloptool | On your PC, run the rkdeveloptool | ||
| − | + | rkdeveloptool ld # List the device | |
| − | + | DevNo=1 Vid=0x2207,Pid=0x330c,LocationID=305 Maskrom | |
Download the loader (flash helper) to init the ram and prepare the flashing environment etc. If you don't have it, you can download it from [https://dl.radxa.com/rockpin10/images/loader/ here] | Download the loader (flash helper) to init the ram and prepare the flashing environment etc. If you don't have it, you can download it from [https://dl.radxa.com/rockpin10/images/loader/ here] | ||
| − | rkdeveloptool db rk3399pro_loader_vxxxx.bin | + | rkdeveloptool db rk3399pro_loader_3GB_ddr_v1.22.115.bin # For ROCK Pi N10 Model A |
| + | |||
| + | rkdeveloptool db rk3399pro_loader_vxxxx.bin # For ROCK Pi N10 Model B/C | ||
Write the GPT image to eMMC, start to write from offset '''0'''. | Write the GPT image to eMMC, start to write from offset '''0'''. | ||
| − | + | rkdeveloptool wl 0 /path/to/rockpin10xxx-gpt.img | |
Reboot the device | Reboot the device | ||
| − | + | rkdeveloptool rd | |
Now the device should boot the new image on eMMC | Now the device should boot the new image on eMMC | ||
| − | === Install by partitions(optional) === | + | ==== Install by partitions(optional) ==== |
Sometimes we only want to update a partition of the image, for example only the boot partition to update kernel only. We can flash by partitions | Sometimes we only want to update a partition of the image, for example only the boot partition to update kernel only. We can flash by partitions | ||
| − | + | {| class="wikitable" | |
| − | | Part Number | Offset | Name | + | ! Part Number || Offset || Name || Description |
| − | | - | + | |- |
| − | | | + | | raw|| 32KB || loader1 || First stage loader |
| − | | | + | |- |
| − | | | + | | raw|| 8MB || loader2 || U-boot image |
| − | | | + | |- |
| − | | | + | | raw|| 12MB || trust || ATF |
| − | + | |- | |
| + | | 1 || 16MB || boot ||Kernel partition, bootable | ||
| + | |- | ||
| + | | 2 || 528MB ||rootfs || Rootfs | ||
| + | |} | ||
When the board is in maskrom mode, flash the partitions with the following command and offset: | When the board is in maskrom mode, flash the partitions with the following command and offset: | ||
| − | + | rkdeveloptool db rk3399pro_loader_*.bin | |
| − | + | rkdeveloptool wl 64 idbloader.img | |
| − | + | rkdeveloptool wl 16384 uboot.img | |
| − | + | rkdeveloptool wl 24576 trust.img | |
| − | + | rkdeveloptool wl 32768 boot.img | |
| − | + | rkdeveloptool wl 1081344 rootfs.img | |
=== Troubleshooting === | === Troubleshooting === | ||
* If you have issue with flashing via USB OTG, start a new post on the forum. https://forum.radxa.com/c/dev | * If you have issue with flashing via USB OTG, start a new post on the forum. https://forum.radxa.com/c/dev | ||
Latest revision as of 07:42, 9 April 2021
ROCK Pi N10 > Development > Install from USB OTG
This guide describes how to flash the GPT-FORMAT system image from USB OTG port.
ROCK Pi N10 comes with on board eMMC, you can install images to eMMC with USB. The installation is running in Maskrom mode, which is a special running mode that the CPU is waiting for command from USB OTG port. We can flash the system image on Windwos/Linux/Mac. We recommend AndroidTool on Windows PC while rkdeveloptool on Linux/Mac.
Contents
Requirement
- ROCK Pi N10 main board
- Power adapter
- USB Male A to Male A cable(important) USB-C has been seen as not working, an adaptor for USB-C to USB-A has worked. See discussion.
Boot the board to Maskrom mode
To boot ROCK Pi N10 into maskrom mode is simple since we have the maskrom key on board.
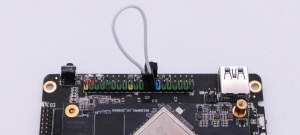
- Power off the board and remove any bootable storage media such as microSD card. If your board has SPI Flash and you have bootloader in SPI flash, you need to shortcut SPI flash first as picture below. Or you can erase SPI flash at first.
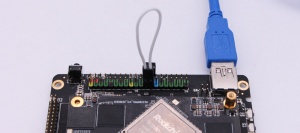
- Plug the USB Male A to Mail A cable to ROCK Pi N10 OTG port(the front USB3 port), the other side to PC
- Power on the board
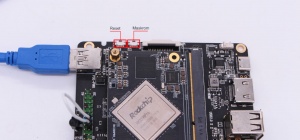
- Press and hold the maskrom key, short press the reset key
- Release the maskrom key
Check if the board is in the maskrom mode.
Now on your Linux/MAC PC, lsusb command would show the following usb devices
Bus 001 Device 014: ID 2207:330c Fuzhou Rockchip Electronics Company RK3399 in Mask ROM mode
On windows PC, you will see it within device manager.
Operation on Windows PC
Setup tools Rockchip_DriverAssitant
Download and extract Rockchip_DriverAssitant V4.8.
Then double click on DriverInstall.exe in the Rockchip_DriverAssitant_v4.8 directory to start the utility.
press the button "Install Driver" and a window showing "Install driver ok." is popped up.
When ROCK Pi N10 is in Maskrom mode, you will see a Rockusb device on the device manager window.
Now the driver has been installed successfully!
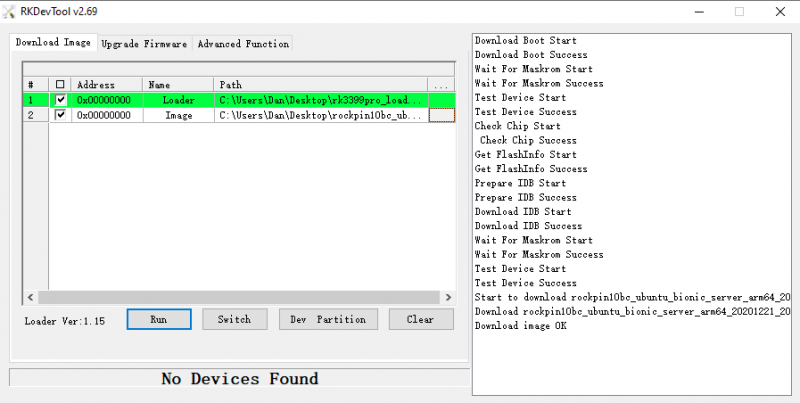
Flash system image via AndroidTool
Download and extract AndroidTool V2.69
- Step 1: Double click file AndroidTool.exe to start the application.
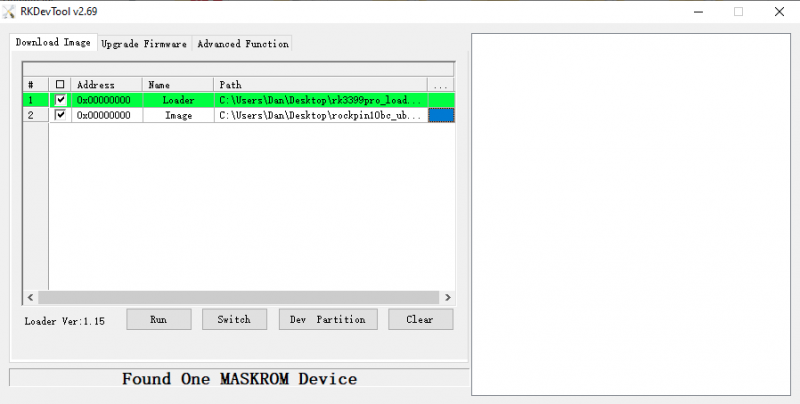
- Step 2: Select the Download Image page, you will see "Found One MASKROM device"
- Step 3: Add one item line, the Loader line. And select the loader. rk3399pro_loader_3GB_ddr_v1.22.115.bin for ROCK Pi N10 Model A and rk3399pro_loader_v1.20.115.bin for ROCK Pi N10 Model B/C.
- Step 4: Add one item line, the Image line. And select the system image.
- Step 5: Click "Run" and wait until the flash work is done.
Operation on Linux/Mac PC
Setup tool rkdeveloptool on Linux PC
To build rkdeveloptool on a debain based Linux distribution, follow the instruction below:
Install build dependecy:
sudo apt-get install libudev-dev libusb-1.0-0-dev dh-autoreconf
Clone the source code and build:
 git clone https://github.com/rockchip-linux/rkdeveloptool
 cd rkdeveloptool
 autoreconf -i
 ./configure
 make
If you encounter compile error like below
 ./configure: line 4269: syntax error near unexpected token `LIBUSB1,libusb-1.0'
 ./configure: line 4269: `PKG_CHECK_MODULES(LIBUSB1,libusb-1.0)'
You should install pkg-config libusb-1.0
sudo apt-get install pkg-config libusb-1.0
Then re-run
 autoreconf -i
 ./configure
 make
Now you have rkdeveloptool executable at the current directory.
sudo cp rkdeveloptool /usr/local/bin/
Setup tool rkdeveloptool on Mac PC
To build rkdeveloptool on macOS, you need homebrew(or similar package manager) to install required packages.
Install build dependency:
brew install automake autoconf libusb
Clone the source code and build:
 git clone https://github.com/rockchip-linux/rkdeveloptool
 cd rkdeveloptool
 autoreconf -i
 ./configure
 make
If you encounter compile error like below
 ./configure: line 4269: syntax error near unexpected token `LIBUSB1,libusb-1.0'
 ./configure: line 4269: `PKG_CHECK_MODULES(LIBUSB1,libusb-1.0)'
You should install pkg-config libusb-1.0
brew install pkg-config
Then re-run
 autoreconf -i
 ./configure
 make
Now you have rkdeveloptool executable at the current directory.
sudo cp rkdeveloptool /usr/local/bin/
Flash system image
On your PC, run the rkdeveloptool
 rkdeveloptool ld        # List the device
 DevNo=1	Vid=0x2207,Pid=0x330c,LocationID=305	Maskrom
Download the loader (flash helper) to init the ram and prepare the flashing environment etc. If you don't have it, you can download it from here
 rkdeveloptool db rk3399pro_loader_3GB_ddr_v1.22.115.bin  # For ROCK Pi N10 Model A

 rkdeveloptool db rk3399pro_loader_vxxxx.bin  # For ROCK Pi N10 Model B/C
Write the GPT image to eMMC, start to write from offset 0.
rkdeveloptool wl 0 /path/to/rockpin10xxx-gpt.img
Reboot the device
rkdeveloptool rd
Now the device should boot the new image on eMMC
Install by partitions(optional)
Sometimes we only want to update a partition of the image, for example only the boot partition to update kernel only. We can flash by partitions
| Part Number | Offset | Name | Description |
|---|---|---|---|
| raw | 32KB | loader1 | First stage loader |
| raw | 8MB | loader2 | U-boot image |
| raw | 12MB | trust | ATF |
| 1 | 16MB | boot | Kernel partition, bootable |
| 2 | 528MB | rootfs | Rootfs |
When the board is in maskrom mode, flash the partitions with the following command and offset:
 rkdeveloptool db rk3399pro_loader_*.bin
 rkdeveloptool wl 64 idbloader.img
 rkdeveloptool wl 16384 uboot.img
 rkdeveloptool wl 24576 trust.img
 rkdeveloptool wl 32768 boot.img
 rkdeveloptool wl 1081344 rootfs.img
Troubleshooting
- If you have issue with flashing via USB OTG, start a new post on the forum. https://forum.radxa.com/c/dev

