Difference between revisions of "Penta SATA HAT"
(→Metal Case(Optional)) |
|||
| (12 intermediate revisions by 5 users not shown) | |||
| Line 5: | Line 5: | ||
[[Home | Home]] > [[SATA_HAT | SATA HAT]] > [[Penta_SATA_HAT | Penta SATA HAT]] | [[Home | Home]] > [[SATA_HAT | SATA HAT]] > [[Penta_SATA_HAT | Penta SATA HAT]] | ||
| + | == notice == | ||
| + | The information on this page is out of date, please visit our new documentation. | ||
| + | |||
| + | https://docs.radxa.com/en/accessories/penta-sata-hat | ||
=== Introduction === | === Introduction === | ||
[[File:Penta_sata_hat_angle.png | 500px | right]] | [[File:Penta_sata_hat_angle.png | 500px | right]] | ||
| − | ROCK Pi Penta SATA HAT is an addon HAT designed for ROCK Pi 4. It utilizes the high speed PCIe buses on ROCK Pi 4 and | + | ROCK Pi Penta SATA HAT is an addon HAT designed for ROCK Pi 4. It utilizes the high-speed PCIe buses on ROCK Pi 4 and provides a complete NAS solution based on ROCK Pi 4. It has the following features: |
* Up to 5x HDD/SSD, support 2.5inch or 3.5inch SSD, up to '''100T''' Storage | * Up to 5x HDD/SSD, support 2.5inch or 3.5inch SSD, up to '''100T''' Storage | ||
| Line 22: | Line 26: | ||
=== Software support === | === Software support === | ||
| − | We provide | + | We provide an install script to help you get the Penta SATA software that works in ROCK Pi 4. |
| + | |||
| + | [[File:Get-rockpi-penta.png]] | ||
curl -sL https://rock.sh/get-rockpi-penta | sudo -E bash - | curl -sL https://rock.sh/get-rockpi-penta | sudo -E bash - | ||
Just copy the command above and paste it into the terminal and press enter. If you want more settings, check out section Software Configuration at the bottom of the page. | Just copy the command above and paste it into the terminal and press enter. If you want more settings, check out section Software Configuration at the bottom of the page. | ||
| − | |||
| − | |||
| − | |||
| − | |||
=== Supplied with this product === | === Supplied with this product === | ||
* Penta SATA HAT | * Penta SATA HAT | ||
* Mechanical spacers | * Mechanical spacers | ||
| − | * M.2 to FPC board and high speed FPC cable | + | * M.2 to FPC board and high-speed FPC cable |
| − | + | ||
==== SATA HAT top board(Optional) ==== | ==== SATA HAT top board(Optional) ==== | ||
| Line 49: | Line 50: | ||
==== Metal Case(Optional) ==== | ==== Metal Case(Optional) ==== | ||
| − | * Holds up to four 2.5 inch HDDs/SSDs | + | * Holds up to four 2.5-inch HDDs/SSDs |
* Bottom big heatsink for ROCK Pi 4 CPU | * Bottom big heatsink for ROCK Pi 4 CPU | ||
* Supports top board | * Supports top board | ||
| Line 55: | Line 56: | ||
* One button for powering off and OLED info switch | * One button for powering off and OLED info switch | ||
* eSATA connector exported | * eSATA connector exported | ||
| − | * Support fan for HDD heat dispatching | + | * Support fan for HDD heat dispatching airflow |
[[File:Penta_kits_back.jpeg | 300px]] [[File:Penta_kits_front.jpeg | 300px]] | [[File:Penta_kits_back.jpeg | 300px]] [[File:Penta_kits_front.jpeg | 300px]] | ||
| Line 63: | Line 64: | ||
[[File:Penta_sata_hat_with_5bay_disks.jpg | 500px]] | [[File:Penta_sata_hat_with_5bay_disks.jpg | 500px]] | ||
| − | |||
=== Other hardware needed === | === Other hardware needed === | ||
| Line 83: | Line 83: | ||
| Support four 2.5/3.5inch HDD/SSD plus one eSATA | | Support four 2.5/3.5inch HDD/SSD plus one eSATA | ||
|} | |} | ||
| + | |||
| + | === PINOUT === | ||
| + | |||
| + | Pinout for 40PIN GPIO header | ||
| + | |||
| + | {| class="wikitable" | ||
| + | ! style="text-align: center;" | Description | ||
| + | ! style="text-align: center;" | Function | ||
| + | ! style="text-align: center;" | Pin# | ||
| + | ! rowspan="21" | | ||
| + | ! style="text-align: center;" | Pin# | ||
| + | ! style="text-align: center;" | Function | ||
| + | ! style="text-align: center;" | Description | ||
| + | |- | ||
| + | | style="text-align: center;" | | ||
| + | | style="text-align: center;" | | ||
| + | | style="text-align: center;" | 1 | ||
| + | | style="text-align: center;" | 2 | ||
| + | | style="text-align: center;" | VCC5V0_SYS | ||
| + | | style="text-align: center;" | | ||
| + | |- | ||
| + | | style="text-align: center;" | OLED I2C | ||
| + | | style="text-align: center;" | I2C_SDA | ||
| + | | style="text-align: center;" | 3 | ||
| + | | style="text-align: center;" | 4 | ||
| + | | style="text-align: center;" | VCC5V0_SYS | ||
| + | | style="text-align: center;" | | ||
| + | |- | ||
| + | | style="text-align: center;" | OLED I2C | ||
| + | | style="text-align: center;" | I2C_SCL | ||
| + | | style="text-align: center;" | 5 | ||
| + | | style="text-align: center;" | 6 | ||
| + | | style="text-align: center;" | | ||
| + | | style="text-align: center;" | | ||
| + | |- | ||
| + | | style="text-align: center;" | | ||
| + | | style="text-align: center;" | | ||
| + | | style="text-align: center;" | 7 | ||
| + | | style="text-align: center;" | 8 | ||
| + | | style="text-align: center;" | | ||
| + | | style="text-align: center;" | | ||
| + | |- | ||
| + | | style="text-align: center;" | | ||
| + | | style="text-align: center;" | | ||
| + | | style="text-align: center;" | 9 | ||
| + | | style="text-align: center;" | 10 | ||
| + | | style="text-align: center;" | | ||
| + | | style="text-align: center;" | | ||
| + | |- | ||
| + | | style="text-align: center;" | top board key | ||
| + | | style="text-align: center;" | GPIO4_C2 | ||
| + | | style="text-align: center;" | 11 | ||
| + | | style="text-align: center;" | 12 | ||
| + | | style="text-align: center;" | | ||
| + | | style="text-align: center;" | | ||
| + | |- | ||
| + | | style="text-align: center;" | | ||
| + | | style="text-align: center;" | GPIO4_C6 | ||
| + | | style="text-align: center;" | 13 | ||
| + | | style="text-align: center;" | 14 | ||
| + | | style="text-align: center;" | | ||
| + | | style="text-align: center;" | | ||
| + | |- | ||
| + | | style="text-align: center;" | | ||
| + | | style="text-align: center;" | | ||
| + | | style="text-align: center;" | 15 | ||
| + | | style="text-align: center;" | 16 | ||
| + | | style="text-align: center;" | GPIO4_D2 | ||
| + | | style="text-align: center;" | reset OLED | ||
| + | |- | ||
| + | | style="text-align: center;" | | ||
| + | | style="text-align: center;" | | ||
| + | | style="text-align: center;" | 17 | ||
| + | | style="text-align: center;" | 18 | ||
| + | | style="text-align: center;" | | ||
| + | | style="text-align: center;" | | ||
| + | |- | ||
| + | | style="text-align: center;" | | ||
| + | | style="text-align: center;" | | ||
| + | | style="text-align: center;" | 19 | ||
| + | | style="text-align: center;" | 20 | ||
| + | | style="text-align: center;" | | ||
| + | | style="text-align: center;" | | ||
| + | |- | ||
| + | | style="text-align: center;" | | ||
| + | | style="text-align: center;" | | ||
| + | | style="text-align: center;" | 21 | ||
| + | | style="text-align: center;" | 22 | ||
| + | | style="text-align: center;" | | ||
| + | | style="text-align: center;" | | ||
| + | |- | ||
| + | | style="text-align: center;" | | ||
| + | | style="text-align: center;" | | ||
| + | | style="text-align: center;" | 23 | ||
| + | | style="text-align: center;" | 24 | ||
| + | | style="text-align: center;" | | ||
| + | | style="text-align: center;" | | ||
| + | |- | ||
| + | | style="text-align: center;" | | ||
| + | | style="text-align: center;" | | ||
| + | | style="text-align: center;" | 25 | ||
| + | | style="text-align: center;" | 26 | ||
| + | | style="text-align: center;" | ADC_IN0 | ||
| + | | style="text-align: center;" | temperature | ||
| + | |- | ||
| + | | style="text-align: center;" | | ||
| + | | style="text-align: center;" | SDA | ||
| + | | style="text-align: center;" | 27 | ||
| + | | style="text-align: center;" | 28 | ||
| + | | style="text-align: center;" | SCL | ||
| + | | style="text-align: center;" | | ||
| + | |- | ||
| + | | style="text-align: center;" | | ||
| + | | style="text-align: center;" | | ||
| + | | style="text-align: center;" | 29 | ||
| + | | style="text-align: center;" | 30 | ||
| + | | style="text-align: center;" | | ||
| + | | style="text-align: center;" | | ||
| + | |- | ||
| + | | style="text-align: center;" | | ||
| + | | style="text-align: center;" | | ||
| + | | style="text-align: center;" | 31 | ||
| + | | style="text-align: center;" | 32 | ||
| + | | style="text-align: center;" | | ||
| + | | style="text-align: center;" | | ||
| + | |- | ||
| + | | style="text-align: center;" | control tb-fan speed | ||
| + | | style="text-align: center;" | PWM_33 | ||
| + | | style="text-align: center;" | 33 | ||
| + | | style="text-align: center;" | 34 | ||
| + | | style="text-align: center;" | | ||
| + | | style="text-align: center;" | | ||
| + | |- | ||
| + | | style="text-align: center;" | | ||
| + | | style="text-align: center;" | | ||
| + | | style="text-align: center;" | 35 | ||
| + | | style="text-align: center;" | 36 | ||
| + | | style="text-align: center;" | | ||
| + | | style="text-align: center;" | | ||
| + | |- | ||
| + | | style="text-align: center;" | | ||
| + | | style="text-align: center;" | | ||
| + | | style="text-align: center;" | 37 | ||
| + | | style="text-align: center;" | 38 | ||
| + | | style="text-align: center;" | | ||
| + | | style="text-align: center;" | | ||
| + | |- | ||
| + | | style="text-align: center;" | | ||
| + | | style="text-align: center;" | | ||
| + | | style="text-align: center;" | 39 | ||
| + | | style="text-align: center;" | 40 | ||
| + | | style="text-align: center;" | | ||
| + | | style="text-align: center;" | | ||
| + | |} | ||
| + | |||
| + | Pinout for 2x5 PHD 2.0mm connector | ||
| + | |||
| + | {| class="wikitable" | ||
| + | ! style="text-align: center;" | Function | ||
| + | ! style="text-align: center;" | Pin# | ||
| + | ! rowspan="6" style="text-align: center;" | | ||
| + | ! style="text-align: center;" | Pin# | ||
| + | ! style="text-align: center;" | Function | ||
| + | |- | ||
| + | | style="text-align: center;" | I2C_SDA | ||
| + | | style="text-align: center;" | 1 | ||
| + | | style="text-align: center;" | 2 | ||
| + | | style="text-align: center;" | VCC3V3_SYS | ||
| + | |- | ||
| + | | style="text-align: center;" | I2C_SCL | ||
| + | | style="text-align: center;" | 3 | ||
| + | | style="text-align: center;" | 4 | ||
| + | | style="text-align: center;" | VCC5V0_SYS | ||
| + | |- | ||
| + | | style="text-align: center;" | GPIO4_D2 | ||
| + | | style="text-align: center;" | 5 | ||
| + | | style="text-align: center;" | 6 | ||
| + | | style="text-align: center;" | GPIO4_C2 | ||
| + | |- | ||
| + | | style="text-align: center;" | GND | ||
| + | | style="text-align: center;" | 7 | ||
| + | | style="text-align: center;" | 8 | ||
| + | | style="text-align: center;" | PWM_33 <b>OR</b> GPIO4_C6 | ||
| + | |- | ||
| + | | style="text-align: center;" | GND | ||
| + | | style="text-align: center;" | 9 | ||
| + | | style="text-align: center;" | 10 | ||
| + | | style="text-align: center;" | NC | ||
| + | |} | ||
| + | |||
| + | Pin 8 support 2 different signals. Please check your board against the [https://dl.radxa.com/accessories/sata-hat/penta/PENTA-BOTTOM-REF.pdf component placement map] to find out which signal is routed. | ||
| + | |||
| + | If you have R563 populated on your board, you have GPIO4_C6 on pin 8. | ||
| + | |||
| + | If you have R573 populated on your board, you have PWM_33 on pin 8. | ||
| + | |||
| + | Both resistors are located on the left bottom corner of the map. | ||
| + | |||
| + | <b>Do not populate both resistor!</b> | ||
=== Getting Started === | === Getting Started === | ||
| Line 88: | Line 287: | ||
==== Power Options ==== | ==== Power Options ==== | ||
| − | Power | + | Power consumption for typical disks: |
{| class="wikitable" | {| class="wikitable" | ||
| Line 100: | Line 299: | ||
| 3 ~ 5W | | 3 ~ 5W | ||
|- | |- | ||
| − | | | + | | 3.5 HDD |
| 5 ~10W | | 5 ~10W | ||
|} | |} | ||
| Line 113: | Line 312: | ||
=====Option 2: Powering from 12V DC Jack on SATA HAT===== | =====Option 2: Powering from 12V DC Jack on SATA HAT===== | ||
| − | For Penta SATA HAT, we use 12V DC power jack on SATA HAT since 12V power adapter is much cheaper than USB C PD adapter. Also, users want to power 3.5inch HDD with power adapter instead of ATX PSU. The 12V DC jack is 5.5x2. | + | For Penta SATA HAT, we use a 12V DC power jack on SATA HAT since the 12V power adapter is much cheaper than a USB C PD adapter. Also, users want to power a 3.5inch HDD with a power adapter instead of an ATX PSU. The 12V DC jack is 5.5x2.5mm in diameter. You need at least 12V/4A to power four 2.5inch HDD plus eSATA and 12V/6A to power four 3.5inch HDD plus eSATA. |
=====Option 3: Power from ATX PSU===== | =====Option 3: Power from ATX PSU===== | ||
| − | If you plan to put the SATA HAT in a PC enclosure, then you can use the ATX PSU. Mostly ATX PSU can meet the power requirement. You need | + | If you plan to put the SATA HAT in a PC enclosure, then you can use the ATX PSU. Mostly ATX PSU can meet the power requirement. You need an ATX 4P HDD power cable to power the SATA HAT and ROCK Pi 4. |
=== Software configuration === | === Software configuration === | ||
| Line 130: | Line 329: | ||
[fan] | [fan] | ||
# When the temperature is above lv0 (35'C), the fan at 25% power, | # When the temperature is above lv0 (35'C), the fan at 25% power, | ||
| − | # and lv1 at 50% power, lv2 at 75% power, lv3 at 100% power. | + | # and lv1 at 50% power, lv2 at 75% power, and lv3 at 100% power. |
# When the temperature is below lv0, the fan is turned off. | # When the temperature is below lv0, the fan is turned off. | ||
# You can change these values if necessary. | # You can change these values if necessary. | ||
| Line 166: | Line 365: | ||
</syntaxhighlight> | </syntaxhighlight> | ||
| − | === | + | === Downloads === |
| + | |||
| + | * [https://dl.radxa.com/penta/hw/radxa-penta-SCH_201909161.pdf radxa-penta-SCH_201909161.pdf] | ||
| + | * [https://dl.radxa.com/penta/hw/radxa-penta-TOP-REF.pdf radxa-penta-TOP-REF.pdf] | ||
| + | * [https://dl.radxa.com/penta/hw/radxa-penta-BOTTOM-REF.pdf radxa-penta-BOTTOM-REF.pdf] | ||
| + | |||
| + | === Reviews & Guide === | ||
| + | * [https://hardware.developpez.com/dossiers/NAS/RockPi-3-Penta-Sata-Hat/ ROCK Pi 4C + Penta SATA HAT Discovery, assembly and configuration (French)] | ||
Latest revision as of 08:34, 20 June 2024
Home > SATA HAT > Penta SATA HAT
notice
The information on this page is out of date, please visit our new documentation.
https://docs.radxa.com/en/accessories/penta-sata-hat
Introduction
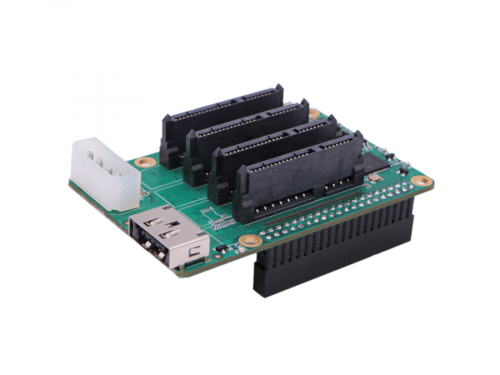
ROCK Pi Penta SATA HAT is an addon HAT designed for ROCK Pi 4. It utilizes the high-speed PCIe buses on ROCK Pi 4 and provides a complete NAS solution based on ROCK Pi 4. It has the following features:
- Up to 5x HDD/SSD, support 2.5inch or 3.5inch SSD, up to 100T Storage
- 4x SATA + 1x eSATA with power
- Utilize two lanes PCIe 2.1 buses on ROCK Pi 4
- External standard ATX power supply support for HDD and ROCK Pi 4
- 12V DC power input for 2.5/3.5 HDD power and ROCK Pi 4
- Support HDD suspend mode
- Support software RAID 0/1/5
- Optional PWM control fan for HDD heat dispatching
- Optional OLED display for IP/Storage info
Software support
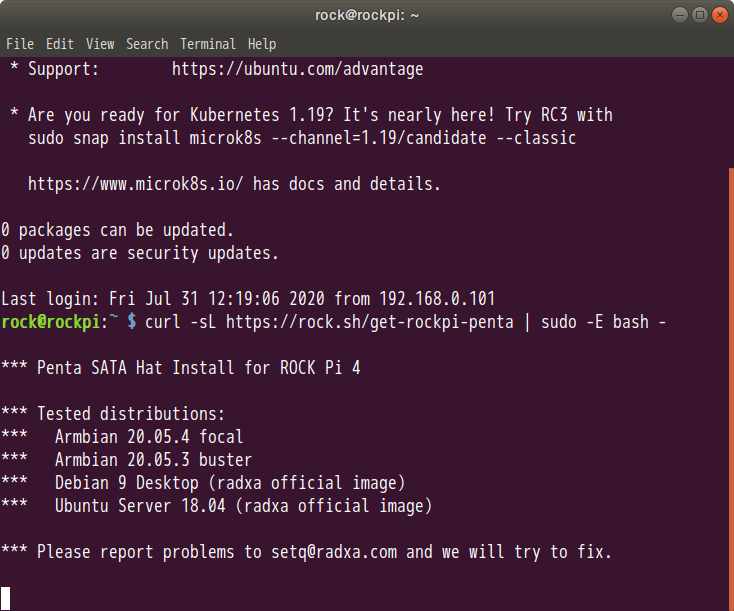
We provide an install script to help you get the Penta SATA software that works in ROCK Pi 4.
curl -sL https://rock.sh/get-rockpi-penta | sudo -E bash -
Just copy the command above and paste it into the terminal and press enter. If you want more settings, check out section Software Configuration at the bottom of the page.
Supplied with this product
- Penta SATA HAT
- Mechanical spacers
- M.2 to FPC board and high-speed FPC cable
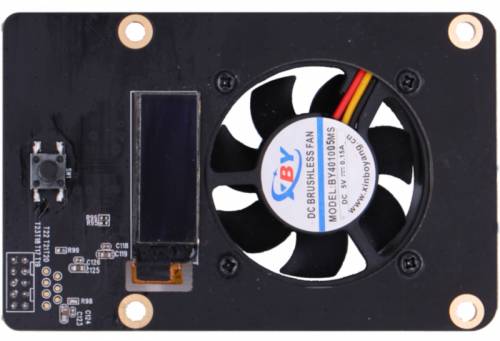
SATA HAT top board(Optional)
- 0.91inch OLED
- One GPIO button
- PWM controlled 40x40mm FAN
- Cable for SATA HAT to top board
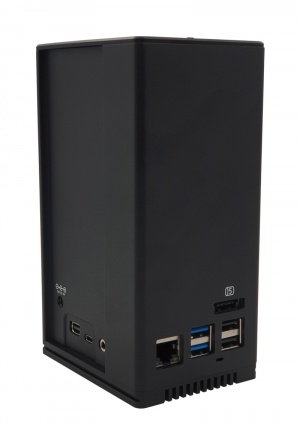
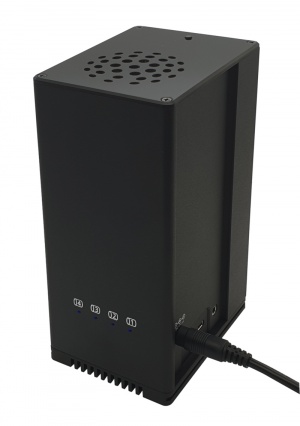
Metal Case(Optional)
- Holds up to four 2.5-inch HDDs/SSDs
- Bottom big heatsink for ROCK Pi 4 CPU
- Supports top board
- Top acrylic cover for OLED display
- One button for powering off and OLED info switch
- eSATA connector exported
- Support fan for HDD heat dispatching airflow
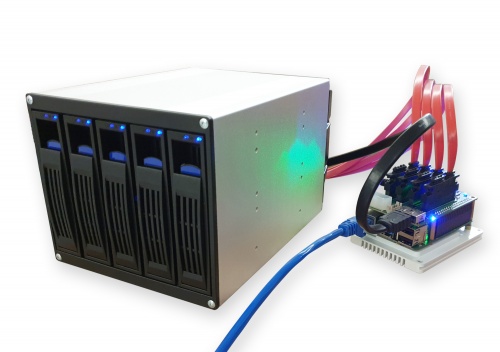
5 Bay 3.5HDD case (Optional)
- 5 bay pluggable 3.5inch HDD case
Other hardware needed
- Proper power adapter(Check power options below for more info)
- 2.5inch or 3.5inch HDD/SSD
- ROCK Pi 4 with os running
- optional 7+15P SATA cable(For 3.5inch HDD or extending the length)
Model Number
The Penta SATA HAT is designed for ROCK Pi 4, one model only.
| Model | Description |
|---|---|
| PF4 | Support four 2.5/3.5inch HDD/SSD plus one eSATA |
PINOUT
Pinout for 40PIN GPIO header
| Description | Function | Pin# | Pin# | Function | Description | |
|---|---|---|---|---|---|---|
| 1 | 2 | VCC5V0_SYS | ||||
| OLED I2C | I2C_SDA | 3 | 4 | VCC5V0_SYS | ||
| OLED I2C | I2C_SCL | 5 | 6 | |||
| 7 | 8 | |||||
| 9 | 10 | |||||
| top board key | GPIO4_C2 | 11 | 12 | |||
| GPIO4_C6 | 13 | 14 | ||||
| 15 | 16 | GPIO4_D2 | reset OLED | |||
| 17 | 18 | |||||
| 19 | 20 | |||||
| 21 | 22 | |||||
| 23 | 24 | |||||
| 25 | 26 | ADC_IN0 | temperature | |||
| SDA | 27 | 28 | SCL | |||
| 29 | 30 | |||||
| 31 | 32 | |||||
| control tb-fan speed | PWM_33 | 33 | 34 | |||
| 35 | 36 | |||||
| 37 | 38 | |||||
| 39 | 40 |
Pinout for 2x5 PHD 2.0mm connector
| Function | Pin# | Pin# | Function | |
|---|---|---|---|---|
| I2C_SDA | 1 | 2 | VCC3V3_SYS | |
| I2C_SCL | 3 | 4 | VCC5V0_SYS | |
| GPIO4_D2 | 5 | 6 | GPIO4_C2 | |
| GND | 7 | 8 | PWM_33 OR GPIO4_C6 | |
| GND | 9 | 10 | NC |
Pin 8 support 2 different signals. Please check your board against the component placement map to find out which signal is routed.
If you have R563 populated on your board, you have GPIO4_C6 on pin 8.
If you have R573 populated on your board, you have PWM_33 on pin 8.
Both resistors are located on the left bottom corner of the map.
Do not populate both resistor!
Getting Started
Power Options
Power consumption for typical disks:
| Power Consumption | |
|---|---|
| SSD | <3W |
| 2.5 HDD | 3 ~ 5W |
| 3.5 HDD | 5 ~10W |
Note: the table above is for reference, check your disk label for the exact power consumption. More info can be found here.
Option 1: Powering from ROCK Pi 40P GPIO header
The ROCK Pi 4 GPIO +5V can provide up to 4A current. You can drive four SSD/HDD directly if your power adapter can provide > 35W power.
Option 2: Powering from 12V DC Jack on SATA HAT
For Penta SATA HAT, we use a 12V DC power jack on SATA HAT since the 12V power adapter is much cheaper than a USB C PD adapter. Also, users want to power a 3.5inch HDD with a power adapter instead of an ATX PSU. The 12V DC jack is 5.5x2.5mm in diameter. You need at least 12V/4A to power four 2.5inch HDD plus eSATA and 12V/6A to power four 3.5inch HDD plus eSATA.
Option 3: Power from ATX PSU
If you plan to put the SATA HAT in a PC enclosure, then you can use the ATX PSU. Mostly ATX PSU can meet the power requirement. You need an ATX 4P HDD power cable to power the SATA HAT and ROCK Pi 4.
Software configuration
Just edit /etc/rockpi-penta.conf, take it effect by below command
sudo systemctl restart rockpi-penta.service
Below is the default /etc/rockpi-penta.conf, which you can modify according to the comments
[fan]# When the temperature is above lv0 (35'C), the fan at 25% power,
# and lv1 at 50% power, lv2 at 75% power, and lv3 at 100% power.
# When the temperature is below lv0, the fan is turned off.
# You can change these values if necessary.
lv0 = 35
lv1 = 40
lv2 = 45
lv3 = 50
[key]# You can customize the function of the key, currently available functions are
# slider: oled display next page
# switch: fan turn on/off switch
# reboot, poweroff
# If you have any good suggestions for key functions,
# please add an issue on https://rock.sh/rockpi-sata
click = slider
twice = switch
press = none
[time]# twice: maximum time between double clicking (seconds)
# press: long press time (seconds)
twice = 0.7
press = 1.8
[slider]# Whether the oled auto display next page and the time interval (seconds)
auto = true
time = 10
[oled]# Whether rotate the text of oled 180 degrees, whether use Fahrenheitrotate = false
f-temp = false

