Difference between revisions of "RockpiX/install/Windows.wim"
| (2 intermediate revisions by 2 users not shown) | |||
| Line 9: | Line 9: | ||
== Prepare == | == Prepare == | ||
| − | * Windows .wim Image - You need a copy of the Windows .wim image, which can be downloaded from [https://dl.radxa.com/rockpix/images/ | + | * Windows .wim Image - You need a copy of the Windows .wim image, which can be downloaded from [https://dl.radxa.com/rockpix/images/win10_21h1_en/Install.WIM Install.WIM]. |
* USB drive - We need this as the installation media | * USB drive - We need this as the installation media | ||
* ROCK Pi X - It doesn't matter if the board has OS running already or not, as long as we have proper BIOS installed, we can install a new OS | * ROCK Pi X - It doesn't matter if the board has OS running already or not, as long as we have proper BIOS installed, we can install a new OS | ||
| Line 77: | Line 77: | ||
| − | 3. You will need to download [ | + | 3. You will need to download the latest Windows OEM Image(.WIM format) from the [[RockpiX/downloads | Download section]]. (You can use the Dism tool to capture the desired .wim image) and put it in the '''Images''' directory. |
. | . | ||
| Line 113: | Line 113: | ||
[[File:Createpartitionandformat1.png | 600px]] | [[File:Createpartitionandformat1.png | 600px]] | ||
| − | + | 3. You will need to download [https://dl.radxa.com/rockpix/images/wim_installer/rockpi_x_win10_installer.tar.gz rockpi_x_win10_installer.tar.gz] and unzip it to the root directory of the USB flash drive,U disk directory structure is as follows: | |
. | . | ||
| Line 122: | Line 122: | ||
└── Images | └── Images | ||
| − | + | 4. You will need to download [https://dl.radxa.com/rockpix/images/wim_installer/Install.WIM Install.WIM] (You can use the Dism tool to capture the desired .wim image) and put it in the '''Images''' directory. | |
. | . | ||
Latest revision as of 06:25, 10 September 2021
ROCK Pi X > Install > Install Windows .wim image to ROCK Pi X (eMMC)
Contents
[hide]Introduction
The Windows Imaging Format (WIM) is a file-based disk image format. It was developed by Microsoft to help deploy Windows Vista and subsequent versions of the Windows operating system family.
Prepare
- Windows .wim Image - You need a copy of the Windows .wim image, which can be downloaded from Install.WIM.
- USB drive - We need this as the installation media
- ROCK Pi X - It doesn't matter if the board has OS running already or not, as long as we have proper BIOS installed, we can install a new OS
- Keyboard/mouse and HDMI monitor for ROCK Pi X - We need to operate on ROCK Pi X
- Rockpi_x_win10_installer - It is a small WinPE system, we will use it to complete the deployment of Wim images. Download here rockpi_x_win10_installer.tar.gz
- Another PC(HOST PC) running Windows or Linux - We need to make bootable USB drive from Rockpi_x_win10_installer on this PC
Step 1: Make a bootable USB disk from Rockpi_x_win10_installer
Windows HOST
We use Rockpi_x_win10_installer to make a boot disk on Windows:
1. Insert your USB flash drive into the Windows host, we will use the diskpart command tool to format the USB flash drive:
C:\WINDOWS\system32>diskpart

Microsoft DiskPart version 10.0.18362.1

Copyright (C) Microsoft Corporation.
On computer: DESKTOP-NT5FLRV

DISKPART> list disk

  Disk ###  Status         Size     Free     Dyn  Gpt
  --------  -------------  -------  -------  ---  ---
  Disk 0    Online           28 GB      0 B        *
  Disk 1    Online           58 GB      0 B

DISKPART> select disk 1

Disk 1 is now the selected disk.

DISKPART> clean

DiskPart succeeded in cleaning the disk.

DISKPART> create partition primary

DiskPart succeeded in creating the specified partition.

DISKPART> active

DiskPart marked the current partition as active.

DISKPART> format fs="ntfs" label="WinDeploy" quick

  100 percent completed

DiskPart successfully formatted the volume.

DISKPART> assign letter=I

DiskPart successfully assigned the drive letter or mount point.

DISKPART> exit

Leaving DiskPart...
2. You will need to download rockpi_x_win10_installer.tar.gz and unzip it to the root directory of the USB flash drive,U disk directory structure is as follows:
.
├── Boot
├── bootmgr
├── DriverInfolist.txt
├── EFI
└── Images
3. You will need to download the latest Windows OEM Image(.WIM format) from the Download section. (You can use the Dism tool to capture the desired .wim image) and put it in the Images directory.
.
├── Boot
├── bootmgr
├── DriverInfolist.txt
├── EFI
└── Images
                ├── Install.WIM
                ├── unattend.xml
                └── Winre.wim
Linux HOST
On Linux we use Rockpi_x_win10_installer to make a bootable USB drive.
1. First use the gparted tool to format the U disk.
How to install the gparted:
$ sudo apt-get install gparted -y
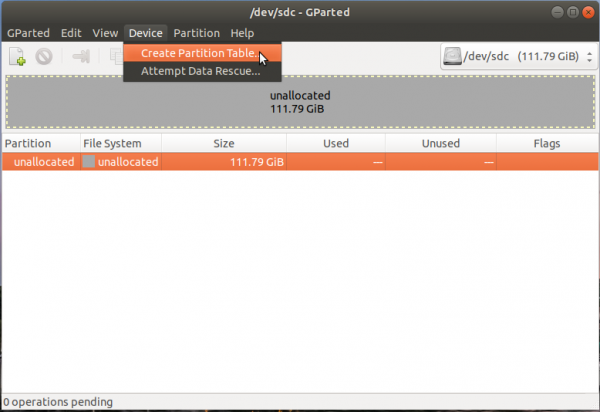
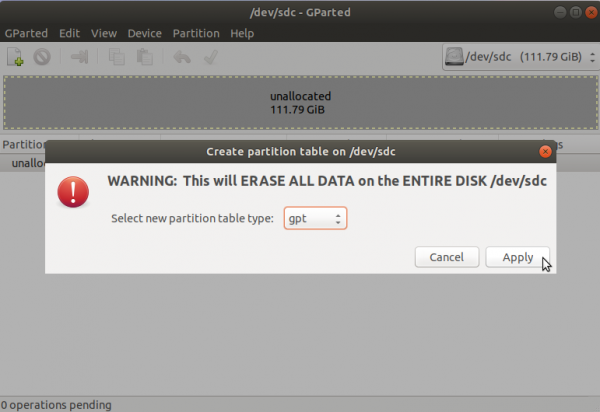
How to use the gparted:
1.Create partition table.
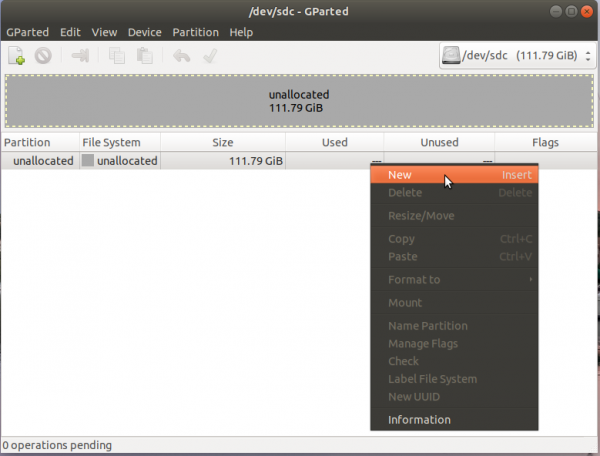
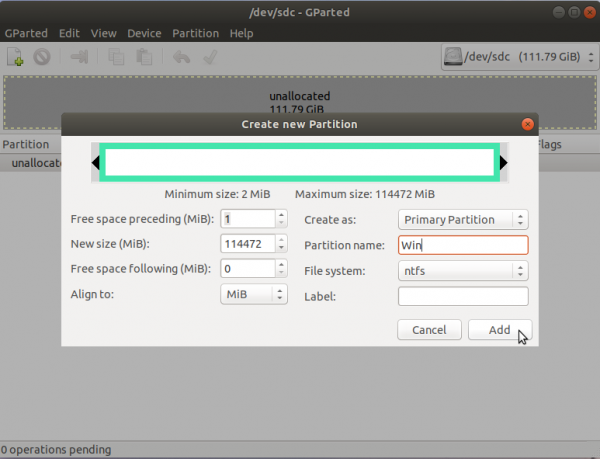
2. Create partition and format.
3. You will need to download rockpi_x_win10_installer.tar.gz and unzip it to the root directory of the USB flash drive,U disk directory structure is as follows:
.
├── Boot
├── bootmgr
├── DriverInfolist.txt
├── EFI
└── Images
4. You will need to download Install.WIM (You can use the Dism tool to capture the desired .wim image) and put it in the Images directory.
.
├── Boot
├── bootmgr
├── DriverInfolist.txt
├── EFI
└── Images
                ├── Install.WIM
                ├── unattend.xml
                └── Winre.wim
Step 2: Boot from USB disk
1. Plug the USB drive on ROCK Pi X, if your USB drive is USB 3.0, plug it to the ROCK Pi X USB 3.0 port is preferred.
2. Plug keyboard and HDMI monitor on ROCK Pi X
3. Power on the ROCK Pi X, keep pressing DEL on the keyboard until the BIOS screen is on HDMI
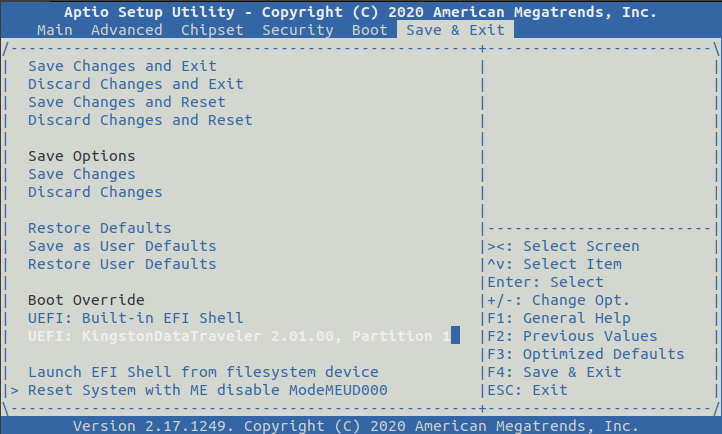
4. Go the last tab [Save & Exit] -> [Boot Override] of BIOS menu, select your USB drive and press Enter to boot.
Step 3: Deploy
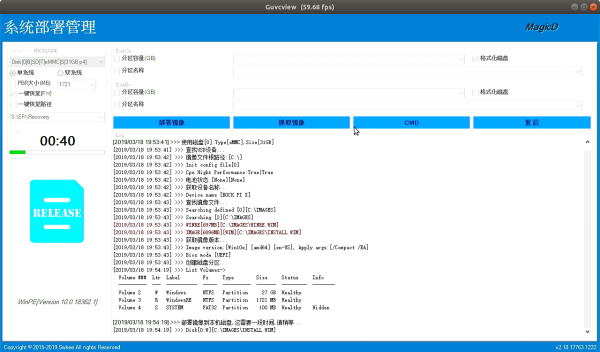
After waiting for a while, you will see the following deployment interface:
After deployment, ROCK PI X will be restarted automatically.
FAQs
Troubleshooting
- Post your issue at the forum: https://forum.radxa.com/c/rockpiX/win

